On this tutorial I will show you How to Sew a Zipper in 3 different ways, so you can sew them in a bag, on a dress, on a pillow… Everywhere you want!!
Sewing the perfect zipper might seem like a tricky thing, even if you have a few years sewing already. But it doesn’t have to be.
How you ask?? You only need to know the not-so-secret Zipper trick.
If you don’t know how to sew a zipper you NEED to read this post from top to end. I am going to show you 3 ways to install a regular nylon zipper into your garment.
And in the end, I am going to give you one more special bonus tip that comes with a Free Sewing Pattern.
With a little bit of practice and of course the key secret (psst…. is interfacing) you will master all zippers in no time. So, in order to keep this practice go and download and print this Sewing Resolution list and use it to keep you motivated.
In this post, I will teach you 3 techniques to sew a regular Zipper so you can put them in any garment you want.
If you want to jump to a specific Zipper Tutorial just click the link above to “jump” to it.
Note: This post contains affiliate links, which means that if you make a purchase using one of the links in this article, I may earn some coffee money at no extra cost to you. Read more about it here.
The Use of Interfacing for sewing zippers.
First of all, I want you to always keep in mind this word: Interfacing.
Interfacing is the key secret technique that your zipper needs to have a clean and neat finish.
This will help to stabilize and give body to your fabric, believe me, you are going to see the difference once you start using interfacing in your zipper area. (Get 3 yards of lightweight interfacing for 6.99 here)


Second of all, if you are looking to save some money on zippers, I want to recommend you to buy them in bulk right here.
These Yaka Zippers are one of the most loved products from Amazon and the ones I buy to save money. They are 8″ long so you can use them for most of your Sewing Projects and forget about running to the store every time you need a new zipper.
And other seamstresses love them too! Here is what one of the 500+ reviews of this product has to say:
So if you’d like to save money on zippers this is a great option!
How to sew a Zipper with a Zipper Foot
The second thing is the Zipper Foot.
This foot can easily position to the right or left side of the needle, depending on what side of the zipper you are sewing on. (This zipper foot fits most brands of home sewing machines)

- When sewing the right side of the zipper, attach the shank to the left pin of the zipper foot.
- When sewing the left side of the zipper, attach the shank to the right pin of the zipper foot.
Read this after: How to sew a button. 2, 4 holes and Shank buttons.
1.- How to sew a Hidden Zipper

1.-Press about 1″ width of interfacing along the edges of the fabric where you are going to sew the zipper on.
2.- Place the zipper next to the edges of the fabric and make a mark just below the zipper stop is.
3.- Make a straight stitch 1/2″ from the edge of the fabric making a backstitch at the height of the mark you made in point 2 and keep going to the end of the fabric.
4.- Press the seam open.
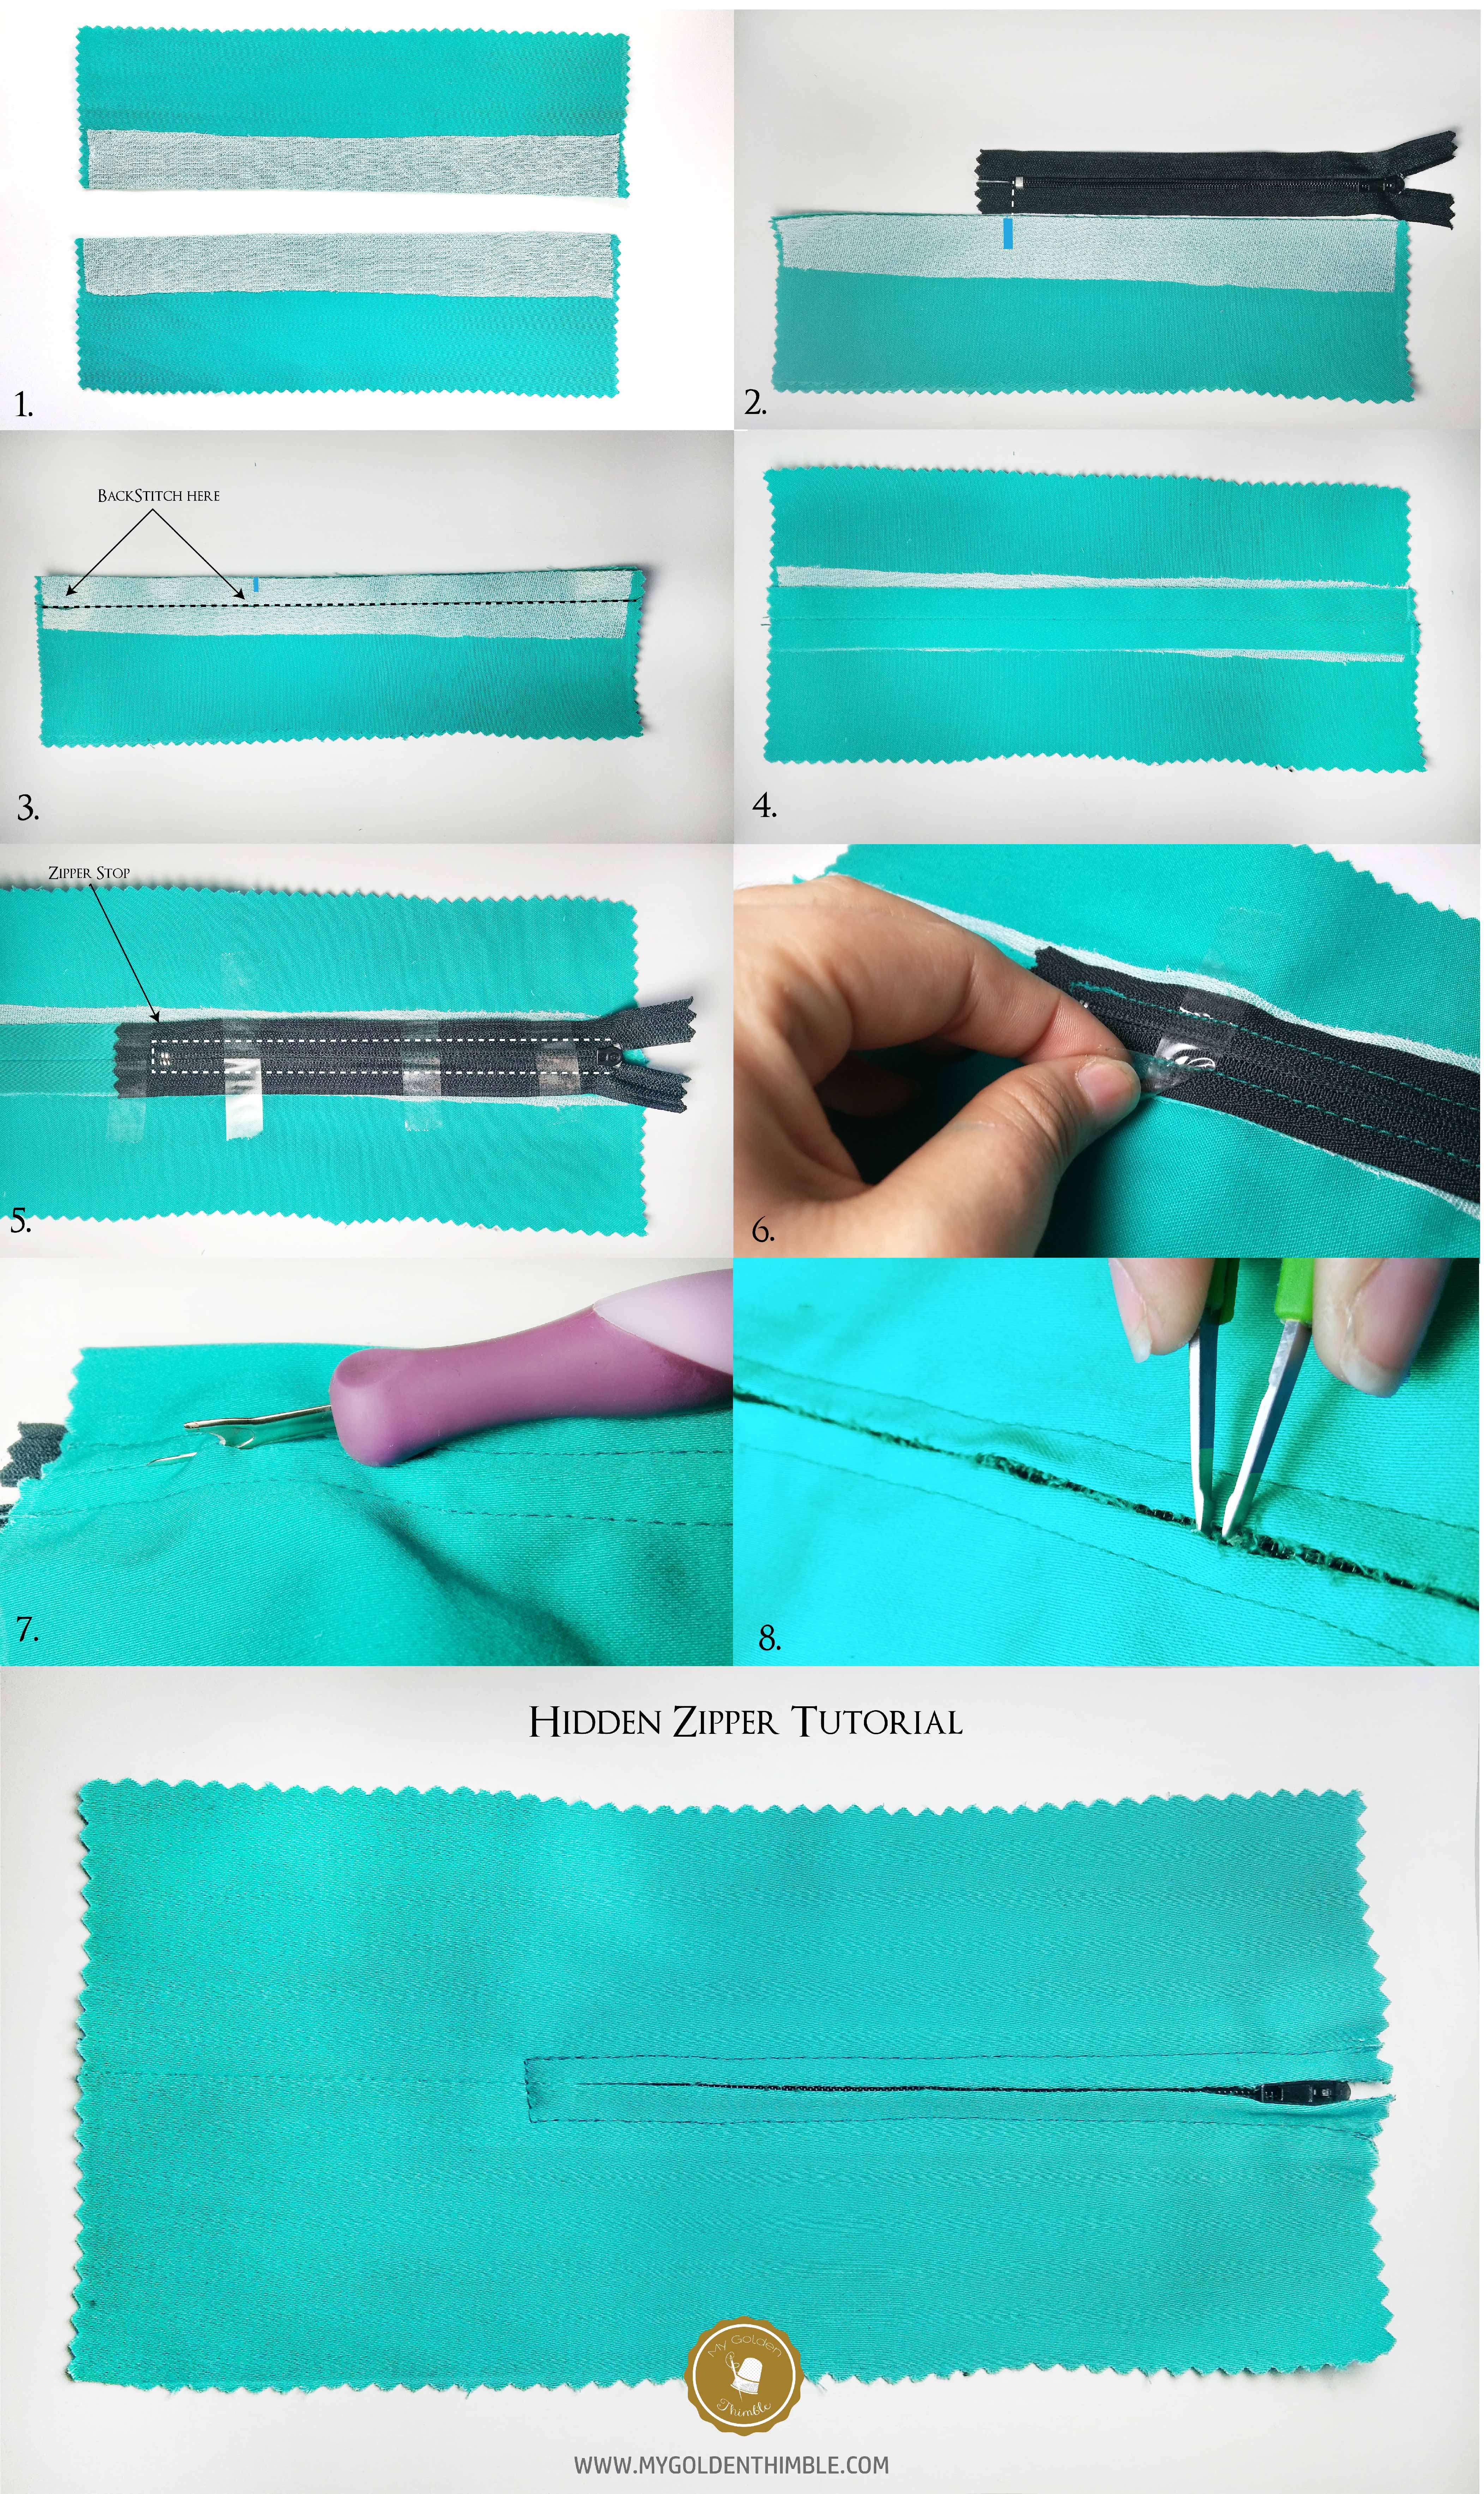
5.- Tape the zipper placing it at the center of the seam and use the Zipper Foot to sew it. Also, make sure the seam should be at least 1/4″ away from the center of the zipper, this is especially relevant to keep the opening looking good.
6.- Peel out the tape.
7.- Use the seam ripper to carefully unstitch the seam from the end of the zipper to the top of it.
8.- As a result, there are going to be small threads stuck between the folds. With a pair of tweezer pull out the remaining threads. Finally, Press the seams.
2.- How to sew an Exposed Zipper

1.-First of all, Press about 1″ width of interfacing along the edges of the fabric.
2.- Place the zipper next to the edges of the fabric and make a mark just below the zipper stop is.
3.- Sew 1/2″ to the mark and backstitch. Then press seams open.
4.-From the end of the stitch mark 1/4″ down and 1/4″ in (A) (away from the edge of the fabric). In the edge mark 1/4″ (B) up from the end of the stitch. Next, draw a red line from A to B, and cut both layers of the red line.
5.- Fold 3/4″ of the fabric and press the sides of the zipper area open.

6.- Fold down the small triangles of the center bottom and press down.
7.- Place the zipper facing up below the triangles making sure not to cover the end of the zipper. Sew as shown in the picture.
8.- Align the zipper whit the folded sides making sure is centered. Pin it.
9.- Flip the fabric to see the back and stitch along the zipper length.
10.- Finally, Cut the extra zipper length if needed.
3.- How to sew a Welt Zipper

1.-Mark a line to guide where you want the center of the zipper to be. And mark the end and start of the zipper too.
2.- Press about 2″ width of interfacing trying to cover 1/2″ of extra zipper length.
3.- Draw a 1/2″ line at the end and the start of the marks of the zipper length. Also, measure 1/4″ from this point to the center line and draw the sides of a triangle with the color red, and then draw a red line connecting the point of these triangles. Cut the red line.

4.-Fold and press the seams open.
5.- In addition, flip the fabric and align the edge of the zipper next to the edge of the fabric making sure it is in the right place. After this, Sew along the dotted line. Do the same with the opposite side.
6.- Finally, flip the fabric again to the bottom side and sew the little triangle to the bottom of the zipper. Do the same with the opposite side.

Looks easier this way, don’t you think? Just remember the secret: Interfacing and Zipper Foot.
I bet you are going to be the Zipper Master in no time at all. Keep practicing and you will see the results.
Remember to Pin these graphics or follow this board to have these instructions in hand every time you want to try this technique on your garments.
- RELATED
- Basting Stitch: Why you need to do it and How (By hand and machine)
- Ironing Board Cover DIY Easy and Quick Tutorial!
- 15 Sewing Notions to Save Money you can buy in Bulk
- How to sew a Button Quick and Easy. Step by Step Tutorial.
- How to sew Knit Fabric without Puckering- My Secret Trick
Now for the FREE SPECIAL BONUS TECHNIQUE:

Learn how to shorten a zipper.
Click this link from All Free Sewing to learn what to do if your zipper is too long for your project and get the free triangle pouch tutorial.
Let me know how you did in the comments below and don’t forget to follow us on Facebook, Pinterest, and Instagram. And if you are up for a free Sewing Pattern join My Golden Thimble Sewing Club on Facebook.


Thank you for having zippers in the lessons!! Sewing a zipper was the first thing I sewed and your tutorial is much easier than I made it for myself! And I had no idea how to use the zipper foot! Now I do!! Thank you!!
HI Daftne and thank you for this very good tutorial on zippers. I am making a presentation to my small sewing group of friends in a few weeks on this very topic. I would like to copy your photos to be able to show them the very steps you have outlined. I am having trouble getting them to copy over to Microsoft Word. I put them first into Google Docs and one set copied over, but the other two would not. Can you help me – are there any techie secrets that would make this happen? I am 75 and have been sewing for 62 years. Just not that great with computers. Thank you for anything you may share with me. 🙂 Liz
Hi Fer,
I am sorry to say that I don’t know any techie tricks for “Word” and images. I don’t usually use it for that so I wouldn’t know how to help you.
All though, I am sure there should be some information out there, or maybe use PowerPoint??
While I am happy my content is going to be helpful for your group and I hope they find it useful, I gotta make you the note that all of My Golden Thimble’s articles, pictures and files are copyright protected. So, you are free to use it for your small group, but please don’t reproduce, copy, distribute or sell the content.
Have a wonderful sewing session!!