
Do you want to rock this year’s Halloween Party? Download this FREE Halloween Clutch DIY Pattern today!

Halloween is not just for kids.
That is why today I am going to give away this amazing Bat Clutch Pattern to all of you my friends.
No strings attached!
Because, adults deserve good Halloween Patterns too, Don’t you think?
I guarantee that this Halloween Clutch DIY is going to turn all the looks everywhere you take it.
For this tutorial, I used about ¼ yard of Faux Leather Fabric (Vinyl Leather imitation you can find here) and Halloween themed fabric for the Clutch Lining.
To download this pattern join My Golden Thimble Sewing Club on Facebook and Download it directly from the files of the group.
NOTE: This post contains affiliate links, which means that if you make a purchase using one of the links in this article, I may earn a commission at no extra cost to you (To know more about this click here.)<<
Materials you need to make this Bat Clutch:
- Bat Clutch FREE Sewing Pattern
- ¼ of light (thin) Faux Leather Fabric
- ¼ of Halloween Themed Fabric (you can totally use fat quarters for this)
- 1 Nylon Zipper 8” long
- 1 Nylon Zipper 6” long
- Seamstress chalk
- Tracing Wheel
- Optional* embroidery floss thread
- Optional* 1 Swivel Snap Hook
Halloween Clutch DIY Sewing Tutorial

Download the Halloween Clutch DIY Free Sewing Pattern by joining My Golden Thimble Sewing Club and going into the files of the group. FYI…You are also going to find another Freebie there: this Free Slippers Sewing Pattern for Men and Women.
Front Clutch Preparation-

Join the pattern by the half as instructed and with a knife cut out the eyes of the bat.
Woha! That sounded creepy!
Use your seamstress chalk to mark the eyes over the front piece of the clutch.
Thread a hand needle (medium size) with embroidery floss and fill the eyes area making sure you are not making your stitches too close together, or the fabric could break.
Make a knot on the back.
Cheat it: If you don’t have Embroidery Floss you can thread a needle two times and you will get a thicker thread look.

Now, grab your tracing wheel and follow the wings and body’s lines to poke into the paper pattern.
You are going to put the paper pattern over so the front of the bag piece and rub your chalk over the lines you just pierced so it can pass and mark through the holes.
As a result, we are going to leave small chalk dots on the vinyl fabric.

Hand sew a chain stitch starting with the outside wings fingers and on the bottom end.

So now do the same with both center lines of the bat’s body

Back Bat Clutch pocket-

In order to make the Back Pocket, we are going to use the 6” Nylon Zipper. (If you don’t have a 6” zipper find out how to cut a zipper the right way at the end of this tutorial).
Take the back piece and mark the welt zipper lines.
Start by sewing the little triangles to both zipper ends and then sew the sides.
Use the rectangle lines you drew to guide where the stitch should be.

If you need a deeper explanation on How to sew a Welt Zipper Step by Step click here.

After sewing the welt zipper to the back clutch, you’re going to take the “Pocket Lining” and pin it to the upside tab of the zipper. Sew just over the first stitch line.
Don’t forget to make sure the right side of the fabric is facing the wrong side of the back clutch piece.

You are going to do the same thing with the bottom part of the zipper and the other layer of “Pocket Lining”.
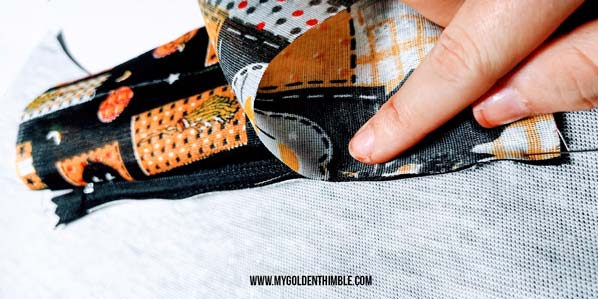
Once both layers of the “Pocket Lining” are sewn to the zipper tabs pin them together by the sides. The bottom lining is going to be larger so cut the excess of fabric.
Sew the sides and the bottom of the pocket at ½”. Trim the sewing allowance.
The Clutch Lining-

Then, make a notch on the exact half of the 8” zipper and pin and sew at ¼” the layers of the lining on both sides of the zipper as shown in this picture.

Place the right side of the Back Bat’s Head over the right side of the zipper and sew the bottom at ¼”.
Put together both heads facing with wrong sides together and sew at the edge of the bat’s head.

Now, fold the strip for the Hand Strap on half and sew both sides with your edge foot.

Finishing the Clutch-

Cut a vertical notch on both sides of the Bat’s front head like this.

Fold the head towards the right side of the clutch so you can match and sew the zipper just before getting into the bat’s neck.
Match the Centers of the back of the clutch and the other side of the zipper and sew it together at ¼”.
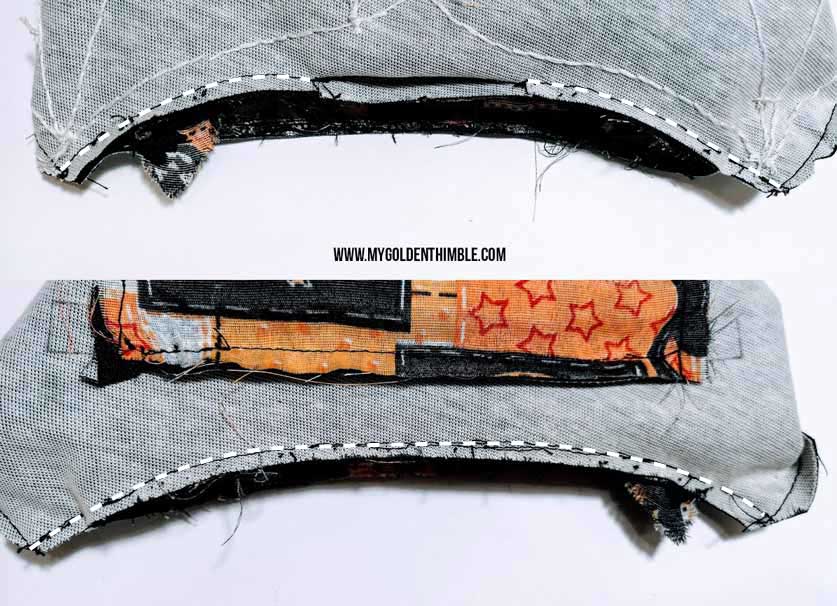
Carefully place the folded strip between both right sides of the main clutch’s body.
It should be on the side of the wing if you are making the clutch version or on the top of both sides if you are making the shoulder bag version.
Hold with clips and Sew the main clutch body’s edge at ¼”. And clip the curves and corners so it can turn nicely.

Pin the Lining with the right sides of the fabric facing together and sew from the end of the zippers to ¼” of the edges.
Leave the center part open.

Turn the bag inside out and push carefully the corners of the wings.
Almost finish!! Fold the open sides of the bottom lining and make a top stitch to close.
Finally, apply black paint on the head raw edges to conceal the insides of the fabric.

Applying the Hand Strap to the Clutch-
For the strap Cut a 14” x 1 ¼” rectangle and fold the sides in half like this. Sew the edges at ⅛” from the edge.

Insert one end of the strap to the Swivel Snap Hook and fold it again in half leaving ½” to cover the ends and sew by hand to secure.

And you are DONE!!
I hope you enjoyed this Free Halloween Clutch DIY Free Sewing Pattern. Don’t forget to keep coming back to our blog.
We have a lot of New Sewing Projects we have just for you.









I would love the pattern for the bat clutch but I am not on Facebook. Can it be sent to me?
Hi Sharon, Of course! Can you please write me to dafhtne@mygoldenthimble.com your email please?