To understand how to fix the tension on a sewing machine, you need to know how to balance the thread of the needle (top) and the bobbin (bottom).
To get the perfect Sewing Machine Tension, you must achieve that both the top thread and the bobbin thread have the same exact balance of strength.
Sewing machines come in many different sizes and shapes. Home sewing machines have their own unique way of adjusting the tension, and this article will teach you how to use the tension adjustment dial on most sewing machines.

In this post, we will tackle the most common issues about wrong thread tension when sewing. As well as learning how to handle the tension dial in your machine to get the perfect straight seam.
This will depend on several variants, such as the type of fabric you are using, using the right needle, and the type of thread.
To find the ideal tension for your sewing machine, you will need to fix the tension dial, which is the one that controls the tension on the top thread. But if this doesn’t fix the problem, the issue might be in the bobbin tension. Don’t worry we will show you exactly how to do it.
Table of Contents:
- Why is it important to balance the thread tension?
- How do straight stitches work on a sewing machine?
- What is causing my tension issues?
- Most Common Sewing Machine Tension Issues and Solutions
- How To Fix The Tension On A Sewing Machine
- Top Thread Showing on the Bottom
- Bottom Thread Showing on Top
- How do you fix the bobbin tension?
Why is the Thread Tension Important?
Getting the just right tension for sewing is one of the most important basic skills you need to master, right next to how to sew a button and how to sew a zipper.
Mastering skills like these can make the difference between our projects looking cheap or professional. It might not seem important to have a neatly balanced tension at first.
But the time will come when the wrong tension becomes an issue for you. It could be that you are sewing with special fabrics. Or maybe you want to sew two different colors of fabrics on each side, and you want to match color threads.
And if you don’t know how to use your tension dial… Well, let’s say you will not have that much fun.
So, let’s get learning.
You will also love: Sewing Knits without Puckering (My Secret Cheat)
How do straight stitches work on a sewing machine?
I want you to imagine a chain when you think of a straight stitch. There is the top thread (the upper thread) and the one at the bottom (the thread in the bobbin). These threads interlock in the fabric at even intervals.
I think the best graphic example I can give you to understand this is this Gif from our friends at Giphy.

To adjust the sewing machine tension to perfection, both threads’ tension must be equal. When I say this, I mean that both upper and bobbin threads should have the same tension, so neither show up on the opposite side of the fabric.
This is what the perfect sewing machine tension should look like:
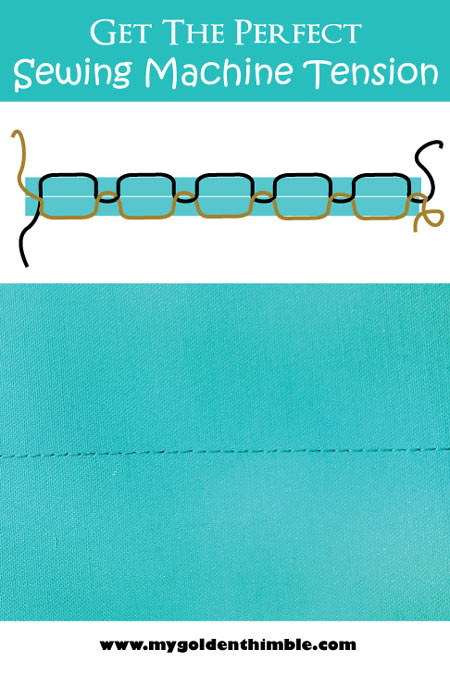
A perfect and even stitch where you can’t see any bottom threads up or the top threads downside the fabric.
Check this too: Sewing Room Shelving and Storage Ideas

What is causing my tension issues?
Before changing the numbers on the tension dial, you should consider a couple of issues that might be causing your tension problems.
This is because sometimes the problem is not in the tension but in other elements in the sewing machine, such as the type of needle you use for fabric. It can also be that the thread you are using is not of the best quality.
Believe it or not, that can significantly affect how good our seams are.
That is why I recommend that you go through this list of common tension issues first. Your thread tension issues might be easily fixed by changing one or two of the following list.
Most Common Sewing Machine Tension Issues and Solutions
1. Use the Same type of thread
First of all, use the same thread: check if your bobbin thread and your upper thread are the same brands, material, and weight. When you use different threads, there can be a lot of different issues when sewing, especially with the tension.
2. Clean your machine.
If the bobbin case or the thread path has tangled threads or even dust, your seam is not coming as expected.
3. Use the right needle size.
Sometimes you can adjust your thread tension dials, and nothing will change just because you are not using the right needle size. Most sewing machines have the option to change your needles. This will allow you to choose between needles for heavyweight or lightweight fabrics. Fine needles are for fine threads and fabrics, while heavier needles and threads work better for heavyweight fabrics. Choosing the right needle size for your fabric will help you to get a better tension.
5. Use the right type of thread.
Normally one will use the same kind of threads for everything, but there are some types of threads that work better in certain fabrics.
6. Retread your machine.
I can’t tell you how many times my machine’s thread popped out of one hook without me noticing. This basically ruins your whole tension. So make sure to rule out this.
7. Check and adjust the bobbin.
If you’ve ever sewn with a sewing machine before, you probably know what a bobbin looks like. It’s the spool of thread that sits inside the machine on the bottom part of your machine. Usually below the needle plate. You’ll also need to make sure that the bobbin is loaded correctly. If you load the bobbin incorrectly, the sewing machine won’t be able to make even stitches when you sew.
8. Balance the Stitch Lenght
After choosing the right needle size and threading your bobbin correctly with the right thread weight, it’s time to set the stitch length. The length of the stitches will depend on the type of fabric you have, so always test in a scrap of fabric first. Usually, the heavier the fabric, the longer the stitch will be.
How To Fix The Tension On A Sewing Machine
New! Print this guide to have at home. Get the printable file at the bottom of this post!

How do you fix the tension dial on a sewing machine?
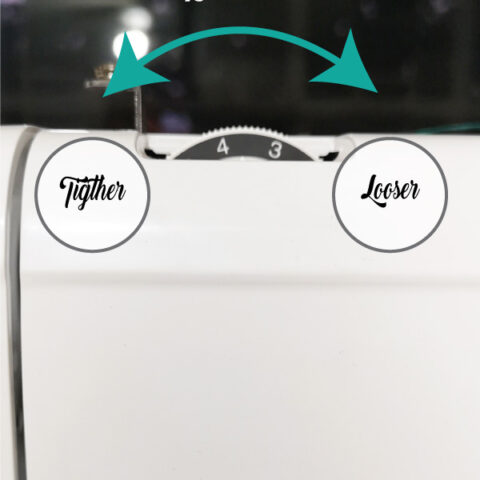
The tension machine tension numbers control the strength the tension disk is applying on your thread. As simple as it comes. The tension dial is this beautiful and tortuous device that allows us to control the tension of the needle thread.
This means that the higher the number, the higher the tension on your needle thread is going to be. On the contrary, the lower the number on the disk, the lower pressure (tension) your thread will have.
The General Rule is: The bigger the fabric weigth the more tension it will need.
My Golden Thimble
Now we will learn how to move the thread tension disk to achieve the perfect tension. The number on the dial will be different on each fabric, so it might be a good idea to have a notepad where you can write down the perfect tension for each fabric you test.
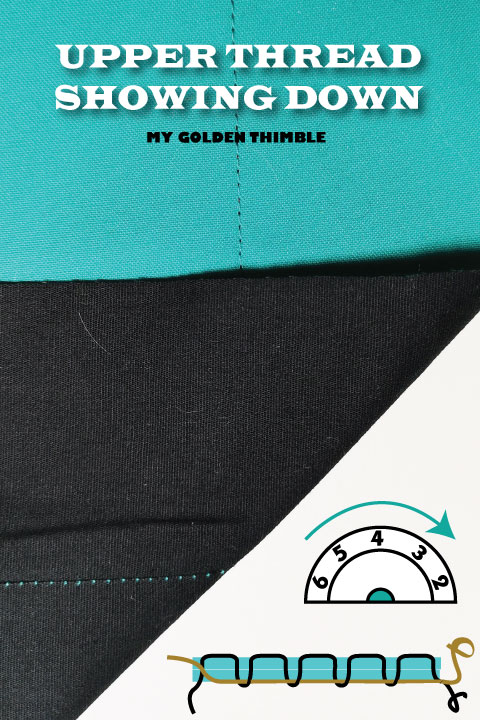
Top Thread Showing on the Bottom
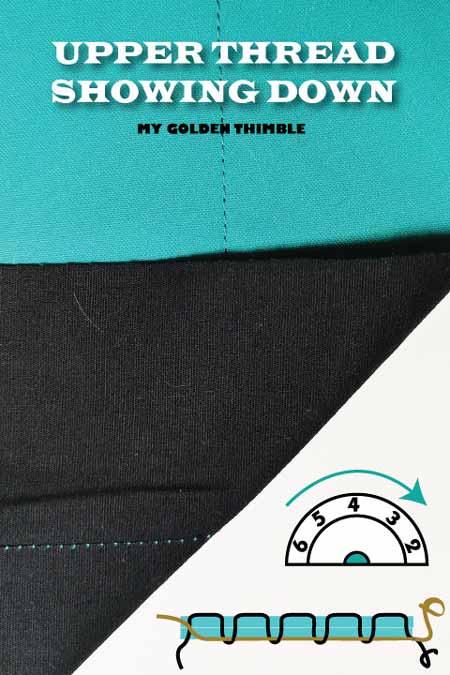
Issue: Top thread is showing on the bottom
Problem: The tension is too low.
If your top thread is showing on the bottom, your top tension (thread of the needle) is too loose, or your bottom tension (thread bobbin) is too tight.
To fix this thread tension issue, increase the tension by rotating your dial disk to the right, which means a higher number. Do this by increasing a small amount and then testing on a scrap of fabric. Repeat until you are satisfied with the result.
If by any chance you still don’t get the expected result, you will need to reduce the tension on your bobbin. We explain how to do this at the end of this post.
You might like this: Best Sewing Books for beginners and Improvers.
Bottom Thread Showing on Top
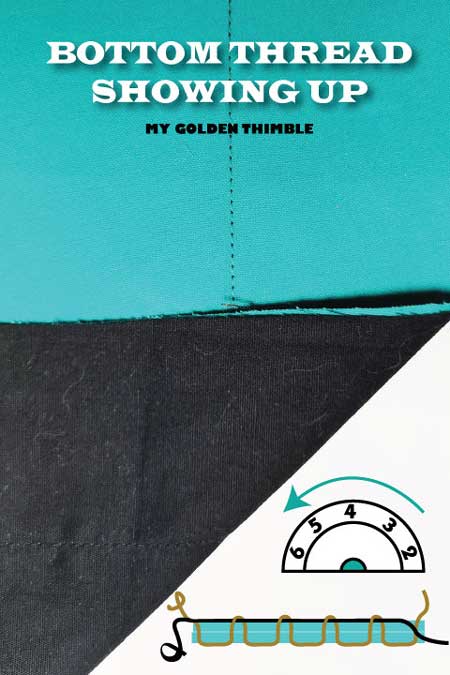
Issue: The bottom tread is showing on top
Problem: The tension is too high.
When the bobbin thread is showing on the top of your fabric, your tension is too tight and needs to be loosened.
To fix this thread tension issue, decrease the thread tension by rotating your dial disk to the left, which means a lower number. Remember not to move your disk tension dial too much. Try to increase about 1/4¨ turns at a time. And always test on a piece of fabric between changes.
If you don’t achieve the perfect balance tension by modifying the top thread tension, then you will have to change the bobbin tension. Learn how in the next section of this post.
How do you fix the bobbin tension?
If you have already tried all of the troubleshooting above and you are still having problems, the problem might be in the bobbin. This can be clear if the top thread is still showing down even though you played with your needle tension disk on all its settings.
This is because the tension on the bobbin is just too high.
You see, the bobbin case also has some tension for the thread. This is usually set up by the manufacturer, but on some machines is easily fixed. Depending on your sewing machine, you can pull out the bobbin case. If that’s the case, use a screw to raise or lose the tension on it.
Here my friend Kate from Sewing from Scratch shows us a really clear and simple way to check and fix the bobbin tension issues.

There she shares amazing tutorials, exclusive content, and some nice freebies! I truly believe that you will love her, as she is the most charming and kindest sewing girl I know.
Any questions left??
- Recommended reading:
- Types of Knit Fabrics and Their Best Uses on Garments.
- How to use a Rolled Hem Foot: A Failproof Method
- What is Basting in Sewing? What it means and how to do it.
- How to make bias tape. Easy and without a maker.
If you have more questions about the sewing machine tension please write to me at My Golden Thimble Sewing Club. Here the community and mewill be more than happy to help out.
Psst… don’t forget to check out more of our amazing sewing tutorials!
Psst…Is this article helpful to you?? Please support us so we can keep making awesome tutorials for you by buying us a cup of coffee here. We will be forever grateful!
Don’t forget to follow us on Social Media!!
Thread Tension Guide
Use this guide to fix your sewing machine thread tension issues.
Instructions
Issue #1- Top Thread Showing on the Bottom
Solution: The tension is too low. Increase the tension by rotating your disk to the right
Issue #2- Bottom Thread Showing on Top
Solution: The tension is too high. Fix it by rotating your disk to the left.

Thread Tension Troubleshoot Guide:
- Use the same type of thread on top and bobbin.
- Clean your machine.
- Use the right needle size.
- Use the right type of thread.
- Retread your machine.
Recommended Products
As an Amazon Associate and member of other affiliate programs, I earn from qualifying purchases.
-
 SINGER | MX231 Sewing Machine With Accessory Kit & Foot Pedal - 97 Stitch Applications - Simple & Great for Beginners
 -
Brother CS5055 Computerized Sewing Machine, 60 Built-in Stitches, LCD Display, 7 Included Feet, White
-
Brother CS7000X Computerized Sewing and Quilting Machine, 70 Built-in Stitches, LCD Display, Wide Table, 10 Included Feet, White


This was SO helpful and informative. I’m probably at an intermediate skill level, and almost everything you said was useful and new info for me.
Thank you so much. I am glad that this information was useful to you.
I’ve been using a brother5000 for a couple of months with no problem. All of a sudden the top tension is way to tight and I can’t get it to loosen up. I use quality thread, and rethreaded many times. It’s like the tension dial just does work anymore.
🙁 It sounds like is time to get it to the shop for a checkout. Do you make regular cleaning and oiling?
That’s so helpful
Keep making these tutorials they are a godsend
Thank you so much for taking the time to make these for us amateurs ?
Kind regards from a self taught sewer
Take care and stay safe
I am so happy that I can help you in your journey! Thank you so much for reading me 😀
Thanks for ones marvelous posting! I seriously enjoyed reading it, you might be a great author.I will ensure that I bookmark your blog and will come back in the foreseeable future. I want to encourage you to ultimately continue your great writing, have a nice morning!
Been trying to figure out why my top thread looses tension every 10, 20 or 30 stitches. I can be stitching just fine, and all of a sudden it pulls hard from the spool and creates a big loop on the bottom side. I’ve cleaned, oiled, changed needles, changed thread, adjusted tension (top and bobbin). Got any ideas what the hang up can be? (I’ve even created a cone holder so thread could come off the top of the spool, and not unwind from the spindle). No matter the change without warning it “snags”. I have actually watched with the bobbin open….top thread loops around the bobbin for a few stitches, then doesn’t get pulled tight and remains in as a “half stitch” across the bobbin case. I can hear a hard pull from the spool almost as if it had been caught on something.
It sounds like might be something wrong with the bobbin case. When that happens to me is usually because I am using the wrong needle for a fabric. But if you have already tried to change those, it might be something with the machine.
Has your bobbin been inserted into the bobbin case the right way? Also double check that you haven’t missed any of the thread tension guides when threading the machine. Missing just one of these can cause all sorts of issues.
Although you say that you have changed the needle, make sure the new needle is straight and doesn’t have any burrs on it.
I have constant problems with my bobbin thread knotting us. It’s so frustrating I have stopped sewing..something I love to do. Wrong bobbin wrong machine,?
You know, some machines can handle all kinds of bobbins. But others (like mine) are very piki when it comes to brand-specific bobbins.
My bobbins issues went away when I change from the metallic bobbins that I used to bought because they were cheaper to the recommended bobbins on my manual.
There are a lot of variables I can advise you to check on: Brand bobbin, tension, clean your machine, oiling, right needle and thread…
If you are insecure about what to do take it to service. They might be able to help 🙂
Years ago I learned a trick to help with tension. Sew across the bias on a scrap of your fabric. Then give a sharp tug from each end of your stitching. The side that the thread breaks on is the too tight side.
That is a wonderful advice!
I have a old metal console machine. It knots up a lot when I begin to sew, sometimes knotting up so it freezes the needle and I have to cut the thread loose and get the knot out. It this a tension problem? Had the machine for many many years and has always been a problem.
It would depend. Is this happening when you start your stitches or at any time of the sewing line?
I am having the same problem. The thread is knotting up after about 3 stitches. It was sewing fine until I changed thread. Now I can’t get the top thread to feed through. It is getting stuck on the bobbin holder.
A couple of things that haven’t been mentioned:
1. sometimes the thread isn’t securely lodged in the take up lever and it pops out after a few stitches;
2. The presser foot was not up when the machine was threaded. This means the tension disks were closed at the time and did not ‘receive’ the thread so it is loose in that area (it has no tension).
3. You may have a thread that is too thick for the needle size you are using, so it rubs and shreds while going through the needle eye. (i.e. using ‘top stitching’ thread rather than regular thread).
4. Your bobbin case or hook may have a rough edge (has been damaged by a needle strike)
5. Thread is catching on the edge of the spool (especially if the spool edge has a notch) Just put the other end of the spool at the top or facing left.
Evelyn, thank you kindly for this information. This is gold and I am sure that our readers will appreciate your help. Thanks!!
I think you just saved me from buying a new machine!!!! I never knew the foot had to be up to thread the machine in order to set the tension correctly. I’ve had problems with the tension suddenly going haywire while I’ve been sewing just fine for 15-30 minutes and then getting all out of whack and I’ve never been able to figure out why. I am willing to bet it is because I leave the foot down to keep the fabric in place that is causing my issues!!! THANK YOU AGAIN!!!!
I am very glad that this post about the thread machine’s tension was useful to you!! Thank you for your comment.
Hi, I find if you hold the top and bobbin threads a little taught for the first 4 or 5 stitches, it stops the top thread from being pulled into, and tangled round the bobbin.
Thank you so much. This is an amazing trick!
Yes I found this very interesting information and useful methods the “righty-tighty” and “lefty-loosey” this will all come in handy for when I begin to sew again I am an ex-sewer and trying to do some again ok
Thank you and kind regards
Bev
You have been very helpful
An easy way to remember a tension change is to say “Righty-tighty. Lefty-loosey.” That’s the phrase many workers use in building and plumbing occupations. It’s even used in simple tools like a screwdriver! Just use the phrase when you adjust your sewing machine tension. But be careful when adjusting tension, just move one number at a time and then check that number with a scrap of fabric.