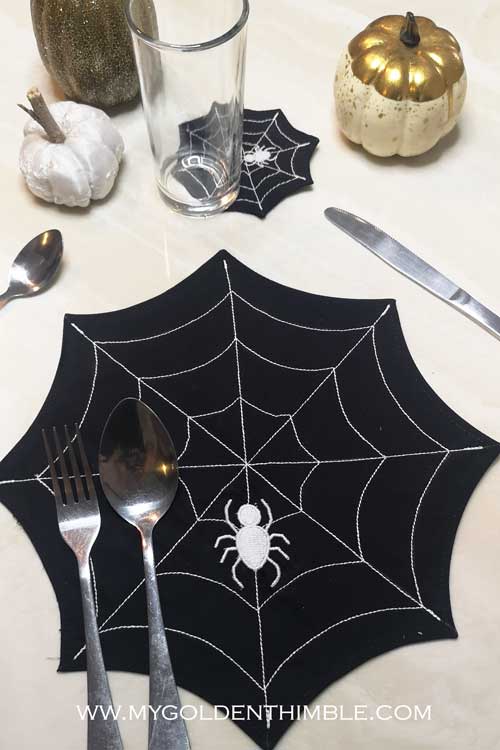
These cute spider web placemats and coasters patterns will be the hit of your Halloween parties and dinners.
Get the conversation started with these fantastic designs on your dining table because it’s not only about the food or the candy. It is also about the details.
Download these free sewing patterns and follow the easy Sewing tutorial to create the most fantastic spider web placemats and coasters.

NOTE: This post contains affiliate links, which means that if you make a purchase using one of the links in this article, I may earn a commission at no extra cost to you (To know more about this, click here.)
When it comes to Halloween Crafts, I am all in. I love making cute and spooky projects. And don’t even get me started on the DIY pumpkin crafts ideas.
I love them all!
Making Halloween Crafts.
I haven’t made a lot of projects Halloween-wise. Before, I used to start my projects in the last week of October, but this year I prepped every holiday with enough time to achieve my project plans.
I have created amazing things! From Hocus Pocus crafts to Disney Costumes ideas. Pumpkin stencils for t-shirts, throw pillows with pumpkin faces, and even printable games for kids.
How to make the Spider web Placemats and Coasters.
Download the free pattern
To make the Spider web placemats and coasters, your first need to download our free sewing pattern. You can do so by scrolling down to the end of this post, where you’ll find the download link on the materials list for the Instructions Card.
Gather your materials
Gather your materials next. I used about ½ yard of black woven fabric. My recommendation is to get cotton. I found this beautiful fabric in my stash and decided to use it for my placemats and coasters. It was pretty easy to sew, and I adore how they turned out. You will also want to apply fusible interfacing to at least the upper layer of the placemats and coasters. This is because these designs require a lot of stitches for both the web and the little spider.

Cut your fabrics
Follow the pattern directions to cut your fabrics. You will need two layers of pattern pieces for each individual spiderweb. You can press fusible interfacing to both or only one layer of the pieces.
Follow the sewing instructions.
Now it’s time to sew. Follow the sewing instructions provided on this page to form your spider web placemats and coasters. If you want to embroider the Spider on your designs, you must do this before sewing the two layers together. But if you want to skip the Spider, then start by joining the pieces, turning inside out, and then stitching the web.

Add embellishment like buttons or ribbons.
Finally, you can add any type of embellishment you want, like buttons or ribbons. I was even thinking about adding small mini pompoms made with a fork (so they will be ultra-small, and gluing them in each corner of the spider web placemat.
Combine your plates and centerpieces
Now that you have your second focus (the first is obviously the Halloween centerpiece), it’s time to combine the elements of your table. Think about one single color scheme and stick to it. Then place your centerpiece and the rest of the elements, including the spiderweb placemats and coasters patterns. These DIY Coasters and Placemats are very easy to make and will last forever. Not to mention they are pretty affordable.
Sewing Instructions

How to sew a Spider Web Coaster and Placemat
Download these free sewing patterns and follow the easy Sewing tutorial to create the most amazing spider web placemats and coasters.
Materials
Tools
- Sewing Machine
- Iron
- Embroidery Machine
- Ironing Boad
Instructions
1. Cut your Fabrics.
Use tailor chalk to trace the pattern pieces on two layers of fabric. Cut two pieces of each mirrored. Press to set.
2. Press the Fusible Interfacing.
I recommend adding fusible pressing interfacing to both layers of each placemat and coaster. This will help you stabilize your pieces and add the embroider spider web stitches.
3. Make a basting stitch.
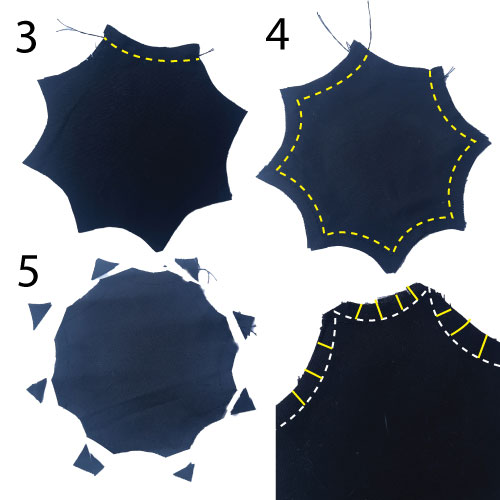
To help you turn your pieces easier, make a basting stitch on one of the curves of the edges of the pieces at ¼”.
*Optional*
If you want to embroider the little spider, we are offering the embroidery file in PES. Format so you can use it on your embroidery machine. Embroider the spider before following the next steps.
4. Sew two layers.
Place two of the layers of either the coaster or the placemat with the right sides facing together and sew them close at ¼”. Leave a space between the curves, and don’t forget to make a backstitch at the beginning and end of the stitch.
5. Cut the corners and clip the curves.
Cut the corners so you can turn them easily, and they can be very sharper. Ensure you are cutting as near the seam as possible without cutting the stitches. Then clip the cuts along every single curve of the pieces.
6. Turn outside.
Use a loop turner to turn the piece inside out through the space you left open in the last step. Then use a creaser to sharpen the corners. Press the piece flat.
7. Transfer the web lines.
Use your wheel to transfer the lines of the web. To make it easier, I rubbed a bit of tailor´s chalk on the back of the pattern so that the lines transferred perfectly when I passed the wheel. Then transfer or simply use a ruler to draw the straight lines from one corner to the opposite corner.
8. Make a topstitch on the edge.
Using thread that is the same color as your fabric, make a topstitch at 1/8¨ from the edge.
9. Sew the spider web.
Now simply follow the lines you transferred with tailor’s chalk. Use a topstitching thread. If you don’t have a topstitch thread, you can do as I did and use a double thread on the needle.

10. Press
Finally, press your Spider web Placemats and Coasters. You are done!! Enjoy your designs, and don´t forget to show off your results at My Golden Thimble Sewing Club on Facebook.
If you have 60 seconds, please rate the free pattern here.
Recommended Products
As an Amazon Associate and member of other affiliate programs, I earn from qualifying purchases.
-
 Tortoise 4 Cones of 3000 Yards Each Spool Thread for Sewing All Purpose Sewing Thread 100% Polyester Thread for Serger Overlock Quilting Sewing Machine 40S/2 White
 -
Master FAB -Black 100% Cotton Fabric by The Yard for Sewing DIY Crafting Fashion Design Washable Cloth Bundles Voile;Full Width cuttable39 x 55inches (100x140cm) (Black Solid)
-
LUNARM 2 PCS Tracing Wheel - Professional Stitch Marking Spacer, 4mm and 2mm Leather Needle Point Tracing Wheel with Wooden Handle for Arts and Leather Crafts
-
SINGER | M1000.662 Sewing Machine - 32 Stitch Applications - Mending Machine - Simple, Portable & Great for Beginners