
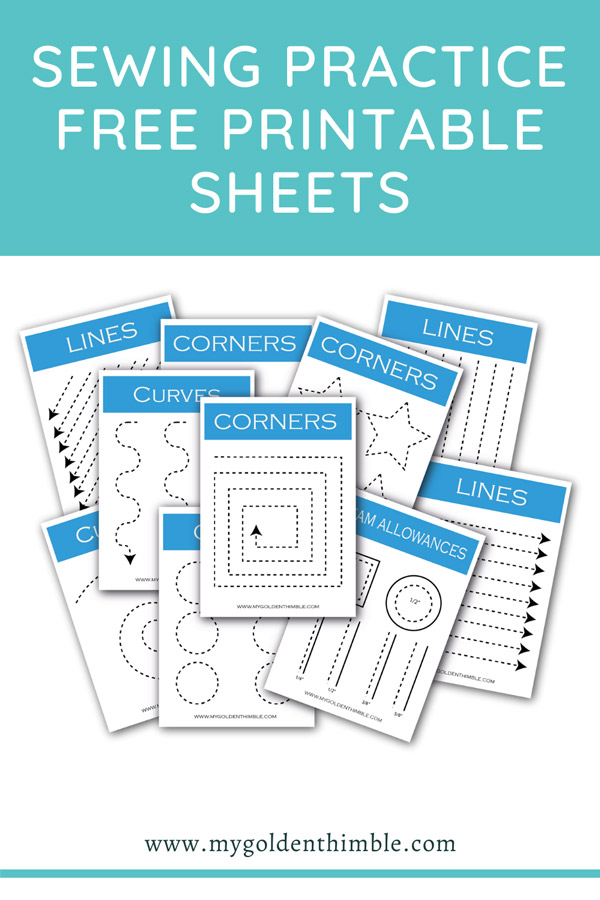
Use these sewing practice sheets to make better seams on your sewing projects.
Sewing a simple straight line is way more complicated than anyone’s think. You need to pair up precision and coordination.
That’s why we created a file with many worksheets to practice your stitches on an easy and more manageable material first. Paper.
Keep reading and learn how to use our free file to get better at sewing.
I know how complicated and frustrating getting a good seam can be.
The hardest thing for me was figuring out how to sew straight. And, I know it sounds like a pretty simple thing to achieve, but it is not, especially as a beginner seamstress.
After learning how to thread your sewing machine, knowing how to make straight stitches is next.
Firstly, you have to figure out the correct thread tension, the right needle size, and many other elements.
I spent hours and sleepless nights unstitching seams and making them over and over again.
Eventually, I figured it out with a lot of practice (even though there is always room for improvement).
And one thing that helped me a lot was practicing on paper.
As you read!
Practicing on these free printable worksheets will help you sew in a straight line. Also, you will learn how to control the speed.
Not to mention that it will be way easier for you to control.
Start with the straight lines and move on to the more complex shapes such as curves and figures.
The best thing is to print these sheets as many times as you need until you get them perfect.
You won’t need to waste your precious fabric until you are ready. And when you are done with them, throwing in the recycling bin!
And before you ask, here is the answer. Sewing on paper is safe.
Why should I practice my stitches on paper?
Sewing on paper is great to practice. It’s way easier to handle than fabric, making it perfect for you to control the stitches.
As the paper is thicker and stiffer than fabric. So, you will be able to control the material and move it around to adjust your stitches.
Once you feel more confident, you can practice on muslin fabric, which also has a great body to handle easily.
There you can play and adjust the thread tension on your sewing machine.
What type of needle should I use to practice sewing on paper?
The most important tip to remember about machine sewing needles is that the thicker the fabric, the larger the needle size.
This means that the lightest the fabric, the smaller the sewing needle you’ll need.
We can treat paper as a standard thickness, a number 12/80 needle.
This type of needle is the one that will usually come with your machine.
Tips to practice Sewing Stitches.
I have always been told that practice makes perfect, and it is true.
Getting to the point of perfect seams will take practice and patience. You can even start by practicing your hand stitches to understand how they work.

Here are some tips to help you make the most out of these sewing practice sheets.
- Use a bright thread color to see where your stitches are falling on.
- If your machine allows it, reduce the speed.
- Remember to lower your needle through the sheet before turning or rotating it.
- Start practicing without a thread fist if you don’t feel confident enough.
How to use the Free Sewing Practice Sheets?
Click here to download the Free PDF Sewing Practice Sheets
How to sew a Straight line?

Even though it is a pretty simple shape, sewing a straight line can be as complex as free drawing one.
Our advice is to focus on the dotted line and your needle rather than the presser foot. Put both hands on the sides of each line for better control.
Just make sure to keep them at a safe distance from the needle.
Don’t forget to make a backstitch at the beginning and the end of each line.
Corners

The most important thing to achieve great corner seams is to know when to stop and turn.
Slow the speed by releasing the pressure on the foot controller as you reach each corner. Then when you are on the last stitch, use the handwheel to lower the needle puncturing precisely on top of the corner.
Raise the presser foot (not the needle). Then use your hands to turn the sheet to change the seam directions.
Continue sewing like this on each line and corner. Make a backstitch at the beginning and the end of each path.
Curves.

Sewing curves are way easier than corners.
The trick to master them is to go slow and easy. Raise the presser foot, especially if it is a very deep curve.
Try noticing where the edges of the presser foot are, depending on the position of your needle. That will help to have better control.
Make a backstitch at the beginning and the end of each seam. Do not try to make a curve backstitch; it is not necessary first.
You can practice that once you master your curves.
For now, you can make two straight stitches back and two to the front.
Seam Allowances.

These practice sheets are by far the most important ones. Clothes are sewn with a lot of different sewing allowances.
With this sheet, you will be able to identify the position where every part of your machine needs to be.
Use the bold line as a guide to imitating the edge of the fabric.
Leave your needle in the center position.
If you think it will be better, you can cut that bold line, so it makes an edge. That way, you will see where the edge of the “fabric” needs to be for each seam allowance.
If your machine has a seam guide, check where the sheet’s edge is.
Shapes.

The shape sheets are meant to be used when you have mastered the other practice sheets.
You will be able to apply everything you learned about lines, curves, and corners.
On closed shapes like these, you can choose where the starting point of the seam will be.
Make a backstitch of only two stitches at the beginning and the end of each seam.
The main takeaway I want to leave you with is not to overstress. Remember that you got the file now, and you can print as many of these sheets as you need. It will be tough to get the results you want at first, but hand in there.
It will get easier with time and a bit of patience.
Do you want more shapes to practice with? Let me know which ones are in the comments to add to this product!
Do you enjoy our freebies?? Support us so we can keep making freebies for you by buying us a cup of coffee here. We will be forever grateful!
Don’t forget to follow us on Social Media!!

Love this idea! I’m going to start teaching my granddaughters to sew this summer and never knew of this idea for beginners. Though I am confident in my own sewing, I don’t feel super confident teaching it! Thanks for your tips!
Thank you for leaving your thougths! Teaching your girls to sew is going to be so much fun!! Let me know how it goes.
Takes me back to when I left school in 1964 and went into a men’s tailoring factory. That is the way they taught us to use the sewing machine before going on to stitch fabric, and then onto the assembly line. They were great days.
I wish I could have had those classes. I see videos on youtube about home ecs all the time and the sewing classes are the best!