
When it comes to hand sewing you have to know all the Hand Stitching Types and how and where to use each one of them.
In this Free Guide, you will be able to learn all the basic hand stitches you need to sew all your sewing projects and clothes.
A lot of people think that they need a sewing machine to make all their sewing dreams come true. But that’s a total misconception.
There is a whole timeline of clothes making before the sewing machine was invented.
And even if you had a sewing machine, some stitches are just better to do by hand. Whether it is for strength, endurance, or simply convenience.
So, dig into this guide to learn everything about hand sewing.

Hand sewing is essential to our daily sewing adventures.
All of these stitches do a great job. They can help us make simple repairs, serve for emergencies outside, and even to make our job easier when our sewing machine fails to reach those hard spots of your garments.
They can even make a difference in the quality of every one of our designs and projects.

That’s why in this practical Guide we will make sure of having the basic knowledge of the basic hand stitching types that will help us grow our sewing skills.
If you don’t have a sewing machine but still want to make amazing sewing projects such as the Doggy’s Bandana, a Magnolia Dress sewing pattern, or simply a bathroom mat, then take a look at this list, because with these stitches you can totally do it!
Hand Stitching Types. The 101 Guide on how and when to use them.
Table of contents:
- Basting Stitch
- Running Stitch
- Back Stitch
- Whip Stitch
- Overcast Stitch
- Catch Stitch
- Blanket Stitch
- Ladder Stitch
- Slip Hemming Stitch
- Blind Hem Stitch
- Vertical/Couch Stitch
- Securing Stitch
1. Basting stitch.

A basting stitch is useful to hold temporarily two or more layers of fabric before sewing it with your machine. But you can also use this stitch to gather fabric, embroider, and make decorative stitches on your garments.
Most of us are used to pinning our fabrics and go directly to sewing with our machines before even think of basting it first.
And that might work most of the time.
But there is a saying out there that I am pulling out of our “Memes that only real seamstresses will understand” post.

Basting can save us a lot of extra work with our seam rippers and even makes us score perfect matching seams every single time.
In fact, using a hand-basting stitch is much more effective than a machine one, especially on lightweight fabrics such as silk and chiffon or heavy ones like leather or vinyl.
How to make a Basting Stitch

To make a basting stitch by hand, you have to insert the needle up and down both through layers of your fabrics. Make long stitches of about ¼” both up and down the fabrics.
In the end, you can choose to leave the stitch without a knot depending on the difficulty of the fabric to work with.
To learn all about the different types of basting stitches and their uses, check out our step-by-step basting stitch video tutorial on this post.
2. Running Stitch
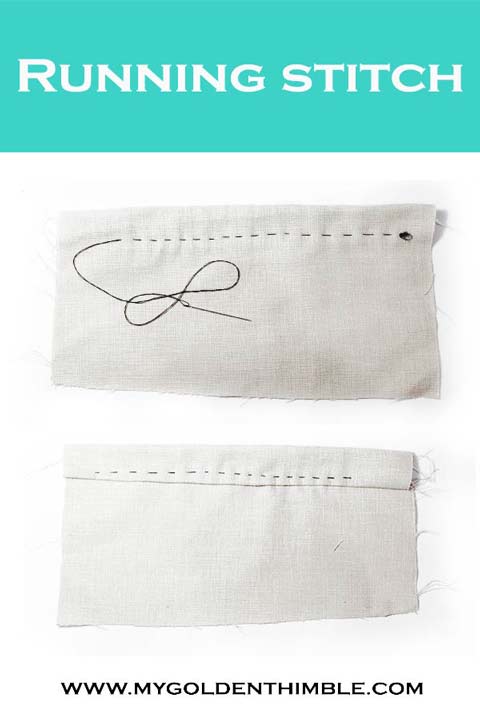
The running stitch is one of the most commonly used stitches in sewing. Both in a machine and hand stitching.
This stitch is a must for most of your sewing projects, for quilting and to close and hold spaces where your sewing machine simply can not reach.
Not to mention that it works amazingly for felt DIY projects.

How to sew a Running Stitch
To make a continuous running stitch, hold the layers of the fabrics together and insert the needle through all the layers up and down leaving about ⅛” between each stitch.
The closer these stitches are between each other, the safer and stronger the stitch will be.
3. Backstitch

Not to be confused with the function of a sewing machine’s backstitching. A hand Backstitch is one of the strongest stitches there are out there.
It is perfect for sewing seams that will be under a lot of tension. Such as a back center seam of a pair of pants.
It also works to mend, embroider, and fix seams of clothes that you cannot simply reach with your sewing machine.

How to sew a hand backstitch?
To make a backstitch, make a small single stitch of about ⅜”. Then pull the needle up and stitch back inserting the needle just above where the first stitch ends. Keep repeating these steps until you reach the end of your seam.
The distance between these stitches might be different depending on the project you are working on.
But the process will always be the same. Stitch forward and backward inserting the needle at the end of the last stitch you make.
4. Whip Stitch

This is one of the simplest and fastest hand stitching types that you can learn.
This type of hand sewing is made out of short diagonal stitches, which are commonly applied to make hems or to sew two separate pieces of fabric.

How to make a whip stitch?
Making a whip stitch is very easy. First, insert your needle between the layers of your fabric so the knot won’t be visible on the outside. Then push the needle from the front to the back through both (or all) layers of the fabric.
And simply repeat until you reach the end of the seam.
The distance between each of these stitches is completely up to you. Obviously, you might want to consider that the nearest these stitches are together the stronger the seam will be.
5. Overcast stitch

The hand overlock stitch is a better and more secure alternative to the zig-zag stitch. This stitch can be used both in light or heavy-weight fabrics.
It is sewn on the edge of the fabrics to avoid fraying and you want to make the stitches diagonally and as short as possible.
In the picture below you can see an Overcast stitch on step two. If you need to reinforce this stitch then you would repeat the steps and make it a double overcast stitch.
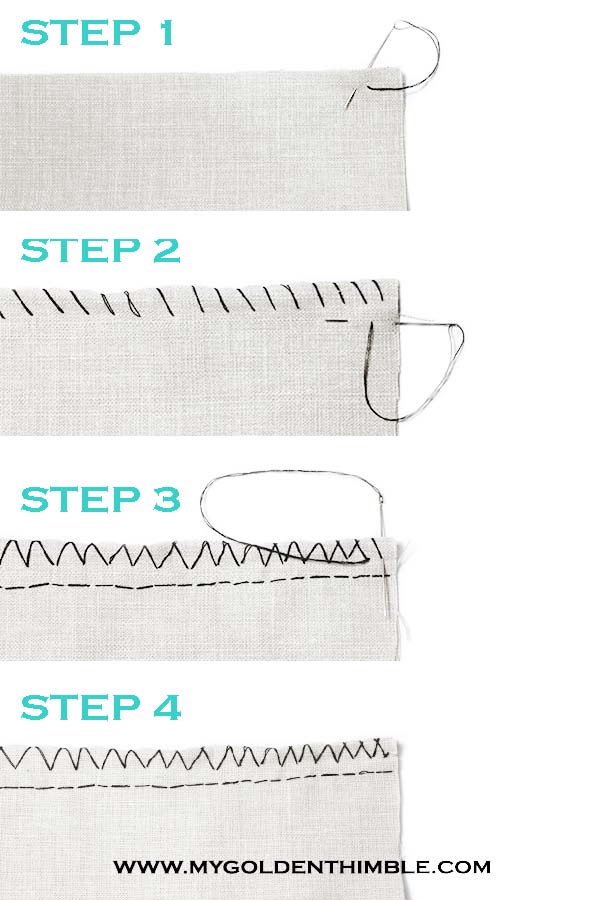
How to sew an overcast stitch?
To make an overcast stitch start by making small diagonal stitches on the edge of the fabric. Then you can make a backstitch to reinforce the seam if you are joining two pieces of fabric together.
Then if you need to make a double overcast stitch you will make the diagonal stitches starting from the end towards the opposite side from the first ones.
This will act like a zig-zag stitch.
6. Catch stitch

This type of stitch is ideal for hems with bulky fabrics and even for hemming knit fabrics.
Thanks to the way it is stitched it allows the fabric to have some stretch that also allows movement on garments and hems such as a pencil skirt.

How to make a catch stitch?
If you want to make a catch stitch insert your needle close to the edge of the folded edge of the fabric. Go up diagonally above the hem and make a horizontal stitch trying to grab as little as you can of that part of the fabric.
Ideally less than ⅛”.
Go down to the opposite diagonal and make another small horizontal stitch on the folded hem of the fabric. Repeat these steps until you finish your hem.
7. Blanket stitch

This is a stitch that is made to be seen.
It is used to make buttonholes, reinforce edges and prevent the fabric from fraying. And in this way, we will get a better finish in all our pieces.
This is also a very good alternative to the overlock stitch or the hand overcast stitch.

How to make a blanket stitch?
Start at the end of the edge of the fabric and make a knot on the wrong side of it.
Insert your needle again through the back and pull it to the front just enough to leave a loop with the thread. Then pass the needle through that loop and finish pulling the thread.
Use your fingers to make sure that the knot formed by passing the needle through that loop stays on the edge of the fabric.
Insert your needle from the back again with a separation of about ¼” from the last stitch leaving the same loop for the needle to pass through again. Repeat until you reach the end of the raw edge of the fabric.
8. Ladder stitch

A ladder stitch also called an invisible stitch, is used to make hidden or invisible seams.
Other uses for this type of stitching are for bindings, closing lining of clothes, or sewing projects that are filled like a pillow or DIY Zero-Waste Sponges.

How to make a ladder stitch?
To perform a ladder stitch (also called invisible stitch) first insert the needle making a stitch on the right side of the fabric. Then make a stitch on the left side inserting the needle at the same height (horizontally) as your last stitch.
This will start to look like a ladder shape.
Repeat the process going from the right side to the left side until you reach the end of the fabric.
Then pull the thread carefully to close the stitch.
You can also see a full video and step-by-step tutorial on how to make a ladder/invisible stitch straight and on curves.
9. Slip Hemming Stitch

This seam is very useful, serves to make hems, and if it is done carefully, it is almost invisible on both sides.
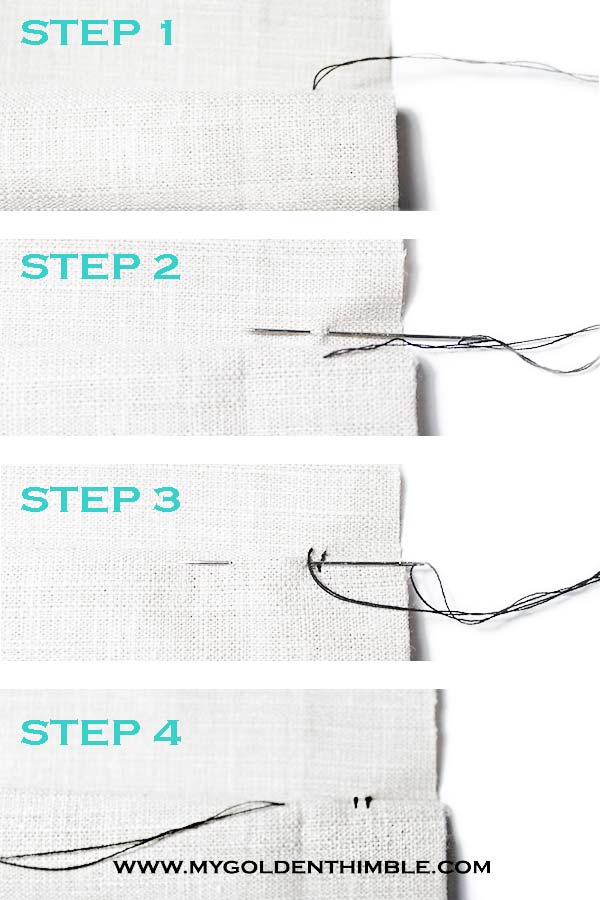
To make this stitch you have to pass your needle through the fold of the hem and make a stitch of about ⅛” every ½” of the distance between them.
10. Blind Hem Stitch.

A blind hem stitch is another perfect way to make invisible hems or to joining two pieces of fabric with almost invisible seams. One of the most used of the hand stitching types.
It’s a perfect seam for dresses, pants, and sleeve hems.

How to sew a blind hemming stitch?
First, insert the needle between the fold of the hem to hide the knot of the thread. Then make a stitch on the main fabric, slightly further to the left from the first stitch but near the folded edge of the hem.
Then insert the needle through the fold of the hem again, and repeat these steps all the way.
In the end, it will look like an inverted “V” shape.
11. Vertical/Couch stitch hand stitching type

This stitch is a great option to make simple and almost invisible hems on the front of our garments.

Insert the needle inside or behind the fold of the hem to hide the knot. Then, make a small stitch right above the hem on the garment part.
After that pass the needle behind the folded hem and make a stitch from the back to the front grabbing only the two layers of the folded hem.
Repeat until you reach the end.
12. Securing Stitch
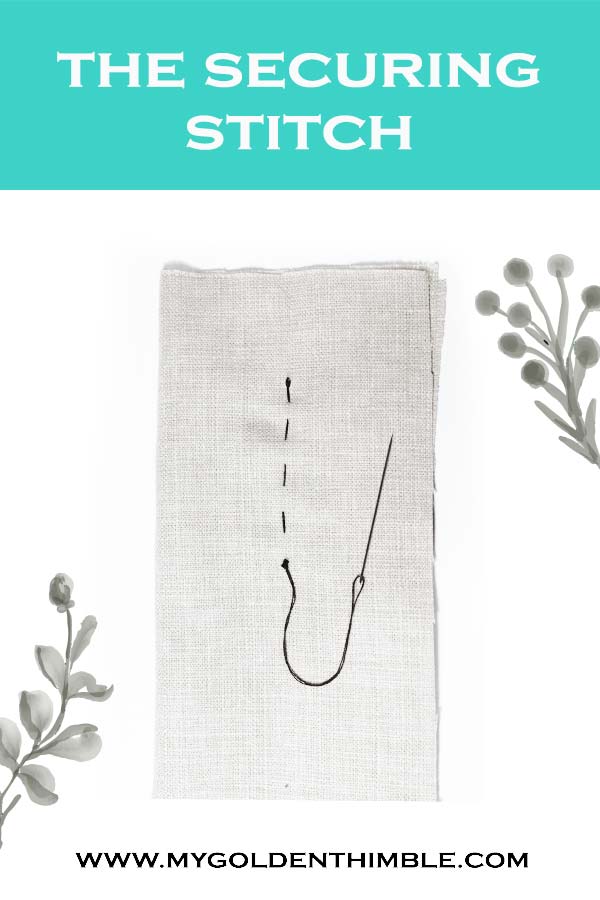
As the name states, this stitch works to secure our hand-stitching at the beginning and the end of each seam.
This stitch prevents your seam to get unthreaded.

How to make a securing stitch?
It is made when you make stitch from the back to the front and then make another stitch in the same place, but before pulling the thread all the way you will leave a loop.
After that, you will have to pass the needle through that loop and then finish pulling the thread tightening the knot.
You can repeat this step as many times as you see fit to reinforce the stitch.
Now that you know all these hand stitching types is time to using them in your designs! Let us know in the comments which one of these hand stitching types you use the most and when. We’ll love to read you.
Don’t forget to follow us on Social Media!!

Monika Garcya loves to write, she considers Japanese culture to be her biggest inspiration.
She like conscious, sustainable, and sustainable fashion, that’s why I do my best to apply it in my professional life since my goal is always to be functional and of quality.
My Golden Thimble writer.








Thank you! I’m an art teacher and I’ve been wanting to teach a lesson on textile art and the basics of sewing. This will help tremendously! Thanks again.
I am so happy that this was useful to you guys! I hope your sewing class like these too.
Slip hemming stitch and securing stitch these are the two that I always use. I’ve never heard of some of the other stitches. Thank you for showing the others. I will try to use them.
You are so welcome Bobby! I am glad that this post helped.
Thank you for these, I don’t often hand sew but do on quilt backs and hems, I also blanket stitch felt onto the back of a cross stitching hoop to hide the wrong side of the work.
You are welcome. I am very glad these stitches guide helped you!