
These Sewing Room Organization Hacks are going to help you to finally get the perfect Sewing Room.
You will be able to find everything and have a wonderful layout of all your sewing supplies for you to work with.
This list of hacks is part of week 4 of our FREE Sewing Room Organization Challenge in which we take 5 weeks to reorganize our entire sewing rooms.
NOTE: This post contains affiliate links, which means that if you make a purchase using one of the links in this article, I may earn a commission at no extra cost to you (To know more about this, click here.)
PS. Once you implement the Perfect Sewing Room Plan you might wish to Re-organize it and Clean it, join our SEWING ROOM ORGANIZATION CHALLENGE on which we will take you step by step on how to completely reorganize your sewing room and supplies from scratch.
Having an organized sewing space does not have to be difficult or expensive.
Even though there are many great Storing and Shelving options for our sewing supplies, we can also work with things that we already have.
In this post, I am going to show you a lot of the hack solutions I came up with for my sewing room organization.
How to declutter my Sewing Room?
Before implementing the sewing room organization hacks, you will have to do some decluttering and categorization of everything you own.
Getting rid of what we don’t use helps us declutter the room and have a better organization.
So that’s one of the steps.
That is why I want to warn you that these hacks are in their rough state. The next step will be to make them look pretty and match our Sewing Room Decor Ideas.
How can I organize my Sewing Room?
There are 5 stages to take in order to completely reorganize your Sewing Room. These go from layout planning to room decor.
If you want to know how to do it, sign up for the Sewing Room Organization Challenge and do everything from step 1 with all the free worksheets and printables we have for you.
But if you are totally ready let’s check out these hacks.
Sewing Room Organization Hacks
As I said above, setting up your organization does not have to be expensive.
That is why I am going to give you budget-friendly options and their purchasable replacement in case you want to check that out too.
Read how I made all these hacks below the video.

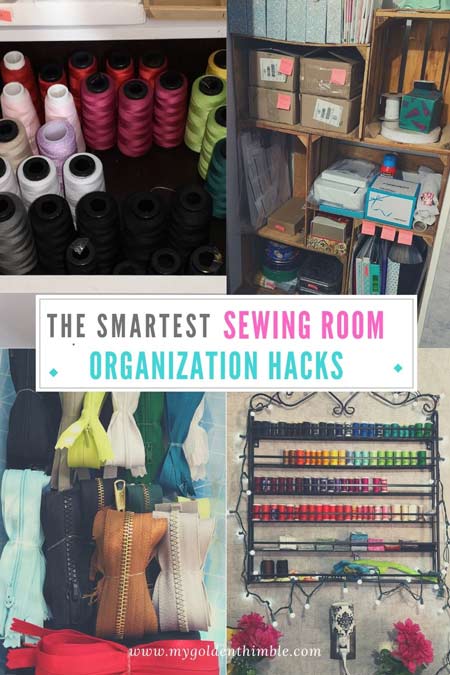
1. Use a Nail Polish Wall Rack to display your standard-size thread spools
This Nail Polish Rack was one of my favorite organization purchases for the shelving solutions in my room.
It’s not only perfect to hold my threads, but it is also a beautiful way to display them.
This is the main focal point in my sewing room and the first thing people compliment when they see it.
If you don’t have the budget to buy one of these, check out the Facebook store for used nail polish racks. There is always someone who might want to sell one of those for a much lower price.
2. Fold your zippers by type, color, and size.
Whenever I need zippers for a new sewing project, I usually tend to buy more than I need.
Just in case one of the zippers won’t work or I accidentally cut them wrong.
What? It happens!
That makes me end up with a lot of extra zippers. So, what I do is organize them by color, type (metal, invisible, standard, jacket), and size.
Then, I group them, fold them, and tie them with clear small rubber bands. They all go to a clear plastic box labeled “zippers.”
You can also try to use hooks to hang your zippers in a rainbow colorful way.
3. Cut a cardboard box to make your own Ribbon Display
Ok, I know this looks very, very rough, but I am only starting with this solution.
What I did here was cut in half a small Amazon box and then I inserted craft sticks to make the holders.
Then I rolled my ribbons in things like empty tape spools or rolls of cardboard I made.
I plan to paint or decoupage this for later.
Another solution is to buy a Steel Ribbon Organizer Rack, which will look perfect for display.
4. Roll your Medium-size Scrap Fabrics.
When there is a beautiful scrap of fabric that is too good to just throw in the scrap bin I do this.
I fold them and roll them, then I stack them up in a cube from my storage cube shelf.
This way, I make sure I can see them easily when I need a piece of lining or fabric for a small project.
I used to have them folded and stored in Ziploc bags. But the problem with that was that because I didn’t see them, I never used them.
Now that I have them on sight, I have been using them more regularly. So, this is a great solution that forces you to use your pretty scraps.

5. Store the Thread Spools in Drawers
This is a pretty good and practical solution that won’t take up space in your sewing table. Use this tray threads organizer for drawers to keep each spool in its place.
You can also use a wall thread rack to display them on sight.
6. Jars are perfect to hold your Sewing Notions
I love jars so much. That’s a perfect item that you don’t even have to buy separately or individually.
Always keep the jars from coffee, food, or, my favorite, the candle jars I clean to reuse. That way you don’t even have to buy a set of jars to store your things.
For my notions, I use the jars of sauce I am addicted to. They fit perfectly in my second drawer and have this beautiful gold lid.
Right now, they have Post-its so I can know what is inside them. But I am printing them beautiful labels next.
Another thing you can use to store your notions is clear box containers or plastic jars that you can hang on your pegboard.
7. Wooden Crates for your tools and sewing supplies
Wooden crates are super cheap, practical, and to be honest, the latest DIY decor trend of the past years.
You can buy them at any craft store or ask them for free at your nearest grocery stand.
Stack them in creative ways and use each crate for one category of your sewing supplies organization.

8. Hang your Rulers on the wall without nails.
Good lord, I love my rulers. This kit of sewing pattern rulers had been with me since I was in school…
I refrain from saying since when, I just say it was many, many years ago.
And when you have such good rulers, you have to take good care of them. I knew I wanted them hanged, but I hated making holes in my walls.
That’s why I bought these damage-free wire hooks that come with strips to stick on your wall. If you ever want to remove them, you just pull down the strip, and there is no damage to the painting either!
Hanging your rulers also can be done on a pegboard. Just make sure they are safe from anything that can hit them.
9. If you have a closet, use Ziploc bags and hangers.
I have particular special fabrics I don’t want to mix up with the other ones, such as mesh, embroidery applique, sequins, and others.
As I don’t use them very often, but I still want to keep them, I put them all folded in Ziploc bags and then use a paper clip to hang them… in a hanger.
Easy enough.
They look pretty, and you can slide them easily to see what you need at the moment.
10. Cereal boxes as Sewing Pattern Organizers
A very cheap trick, we all know. Make magazine organizers with cereal boxes to hold your sewing patterns in them. Decor them as you want.
I have each pattern inside a white envelope with the pattern card on the outside so I can see which pattern it is quickly.
You can also buy a lot of different magazine holders for your patterns and label them as you see fit.

11. Store your bobbins in clear plastic boxes.
Having a full bobbin is a must in our line of duty. These specialty bobbin storing boxes are awesome for sorting your bobbins.
They come in a pretty nice size, so you can place them inside a toolbox or wherever you need.
If you want a more budget-friendly option, there are always the ice trays or store them with a plastic straw.
12. Use cookies and tin boxes for classifying.
The classic cookie box as a sewing bin storage is a classic whether you’re using a tin of chocolates or a tin of cookies.
They are both perfect for classifying bulky sewing supplies.
For example, I use mine to store my snap button collection and my stamp maker kit.
The plan is to paint them to make them look prettier.
13. Make bins for your scraps.
Ok, ok I went too far with my roughness this time. But in my defense, I plan to make new clear bins for my scraps so they serve as part of the decoration.
They will be the same size as these food delivery paper bags but taller.
In the meantime, I am sorting my scraps by type of fabric: wovens, knits, and sheer fabrics.
I also have a special bin for tiny bits of scraps. I use these as filling for toys or other sewing projects, like my felt diy pumpkins for fall decor.

14. Color sorted Fabric Scraps Jars
Do you enjoy making Crumb Fabrics? I do!
That is why I sort my small scraps of fabric by color, so when I fill a jar I sew them together to make new fabric for my DIY projects.
Besides, they are a wonderful decoration for my window.
15. Fold your fabrics with a custom piece of cardboard.
The evenly folded fabric looks beautiful on display. If you look closely at the picture below, you will notice a piece of pizza cardboard.
I made that by measuring the cube base and width, and I cut it in half. This helps me to fold my fabrics in the same size every time.
Always place the folded side on the outside so the raw edges of the fabrics don’t show.

That is it for today’s Sewing Room Organization Hacks. I hope you find some useful ideas here for your organization.
Please remember to leave a comment below if you want to share with us more organization hack ideas!
Don’t forget to follow us on Social Media!!








Comment had my wrong email sorry this is the correct one
Thanks again so excited to design my new claimed spare room into my first ever sewing room
Hi Diane!! I am so happy you have a new sewing room! How exciting is it going to be to decorate it to your liking!??!
Thank you sir the suggestions and tips. Ive never had an actual sewing room just random space. I am redoing a now spare room making it my sewing room. A stitch in time just for me. Taking tips from many sources. Thank you
How happy!!! I am so happy you get a new room all for yourself!
Loved reading through the site. I am an experienced seamstress and machine embroidery. Our house was flooded and we have redone our home. Sewing room was last room to purchase and organize. You gave me some wonderful ideas. Looking forward to implementing them.
Hi Sherrille! I am so glad that this post was useful to you. Organizing your sewing room sure feels like a lot. But it is so worth it at the end.
I used comic book boards to fold my fabric on and instead of laying them down in a stack as you did, I stood them like books in a shelf.
Comic book boards are cheap and acid free so it helps protect the fabric better!
I have seen that trick and I think it is pretty genius too. I wish I had more storage for my fabrics to try that one.
I do the same thing. And I group them by designer or line of fabric.
Wish I could have seen a readable post. The ads made it impossible.
:/ I feel so bad that you felt that way. Unfurtunately ads keep our site and content free for all, so we need to stick with those. I hope you find value on the content otherwise. Best wishes.
I love the jar idea for scraps! I have huge cheese ball containers we recently emptied! They will make perfect scrap fabric containers! I also love your idea of hanging the rulers. I have a bookcase that it’s side will be perfect for! Thanks so much for sharing!
I bet you will make some great organizers with this! Can’t wait to see them. Thank you so much for leaving your comment.
Hi! Could you show a picture of the fabric scraps you sewed together to make a new piece of fabric, please ?
Absolutely Wanda! You can find an example of that in my post of the free sunglasses case sewing pattern.
I use a jumper hanger for all my material, folded around pieces of card, it holds loads ands looks very tidy.
That’s a great idea! Could you share a picture of this in My Golden Thimble Sewing CLub on facebook? I bet everyone there will love that.
Some great ideas! I use a folder rack for my quilt templates. It keeps them readily available and neat as well as readily available on my cutting table.
That’s super smart!! Is it a normal folder rack or a wall one?