
Many people have told me that one of the most frustrating moments of sewing is to Change Serger Threads on their machines.
And I get it. Opening the lid of your overlock machine is a bit scary.
There are many specific numbers and places through which each thread has to pass. Places by which, if it does not pass correctly, your Serger/Overlock Machine will simply -refuse- to stitch.

But, Did you know that it is not really necessary to even open the lid in order to change your Serger Threads?
In this post, I will tell you the secret shortcut to change the threads of your Serger Machine quickly and without errors.
The best thing is without having to see the threading instructions!
You will see that after learning this trick you will never re-thread your serger the same way again.
I have created a video of this tutorial so I can show you in live-action the 6 steps to re-thread your Serger/Overlock Machine.
Note: This post contains affiliate links, which means that if you make a purchase using one of the links in this article, I may earn a commission at no extra cost to you. (To know more about this click here.)
Tip: Learn how to clean your sewing machine and schedule its cleaning whit this free schedule.
The Best way to Change Serger Threads in 3 minutes or less.
How to Change Serger Threads-Step by Step Tutorial
Step 1
Fist of all, turn your machine off.
We don’t want any accidents!
Then lift the foot of the machine and place the needle at its highest point.
Do this by turning the needle dial on the right size to the machine.
Turn until you see the needle at its higest point.

Step 2
Cut the current threads as close as you can to the thread cone.
This is to leave a good piece of thread hanging. Because we will be using this to change our colors.
Then remove the cones.
Try to not unthread the tree.

Step 3 -THE SECRET TRICK-
Put the cones of threads of the new color in their corresponding place.
Now you will have to take the ends of the two threads (old color and new color) and make a knot with them.
Do you know where we’re going with this?
Make sure the knot is strong and small.
It is not necessary to make a double knot as long as the knot does not break easily.

Step 4
Pull the remaining threads near the foot to undo the chain and separate the 3 (or 4) threads.
I usually do this with the help of a pin, because I find that is easier.
You can also pull first the needle thread.
But make sure you have the foot up. Otherwise it won’t come out.

Step 5
Now what you have to do is pull each thread, one at a time to make the new color thread travel all the way through which the old thread was.

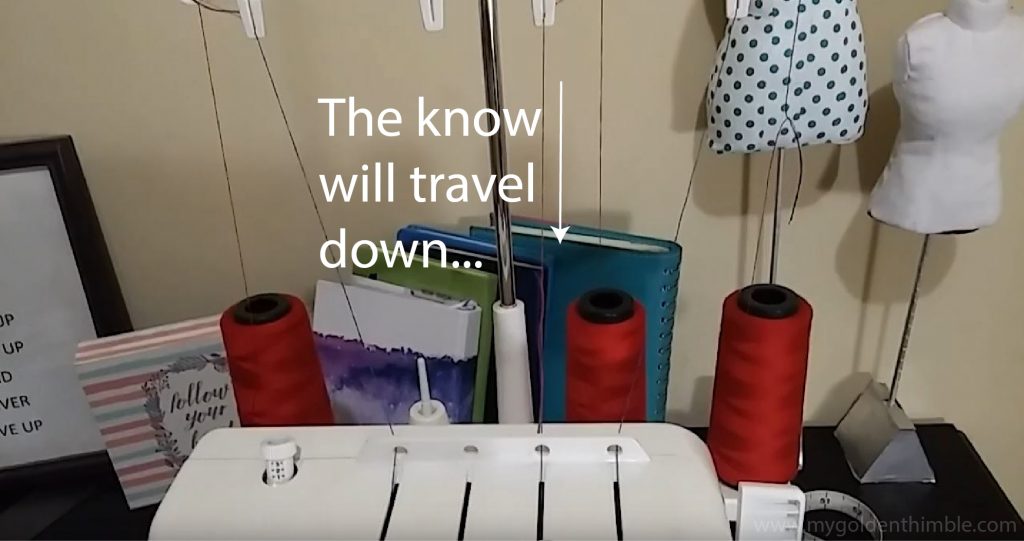
You will notice that the thread can “get stuck” in certain places. Like through the tension (the colored wheels).
So, use your free hand to carefully pull towards you the thread on this zone.
Take it out of the dial tension if you need.
That way we won’t mess with the tension settings.
This will allow it to continue on its way until it comes out the other end.

Note about the thread of the needle: The thread of the needle will stop traveling when it reaches the needle hole, so you must cut the knot here and thread the needle by hand as you usually do.


Step 6
Cut the remaining threads and Start sewing.
That was it!!
Now you can start sewing as usual.

Did you see how easy it was?
I hope you loved this trick the same as I did when I first learn it. If so, please leave a kind comment about your opinion. I always read and respond!!
Psst…Is this article helpful to you?? Please support us so we can keep making awesome tutorials for you by buying us a cup of coffee here. We will be forever grateful!
Let me know how you did in the comments below and don’t forget to follow us on Facebook, Pinterest, and Instagram. And if you are up for a free Sewing Pattern join My Golden Thimble Sewing Club on Facebook.







I worked in the garment industry and this was the method that was used on all machines. I did not matter if you were sewing with a straight stitch machine or one with 2, 3, or 4 threads.
I bet that, industry speaking that is a TON of time saved!
I learned this technique years ago with a commercial sewing machine and have saved time using it on my home sewing machine. Was truly thrilled to see that there was a way to do it in my serger.
Saving time 4 times!
That’s exactly what I do, but with a little difference. I would just sew the thread out until it reaches the needles, it sometimes goes through but not all the time, then I’ll cut and retread..
Haven’t you had issues with the knots passing through the needles?? Or messing with the tension settings?
I was taught just loosen the tension a little to get the thread through easier. I also was taught that when you raise the needle to highest point do so by reversing the knob will unlock the thread chain so it’s easier to identify each thread to pull. Thanks for the help!
I’d just found this technique and it saves so much time and effort. I used to dread having to retread the overlocker but now I don’t care!
I am so glad that this tutorial helped you! 😀 I hope threading your serger will be an easy task for now own!
Genius!
Thank you so much! I hope this serger threading hack works for you!
This is such a neat trick. I know I would hardly use my serger if I had to thread it every time.I use what I know as a square knot and have no trouble pulling the threads all the way through with no affect on tension
Oh wow, I’ve never heard of it. What is a square knot?
Using your tip to join new threads by knots , then just sew on waste fabric until new cotton threads come through. Keeps tension correct and stops them coming loose through over stress on the pull through
Haven’t you had any issues with the needle thread passing through?
Halo there
Am so happy about your way of changing the overlocker thread. Its works wonderfully. Am no longer going to be weary if overlocking my garments 💃💃💃💃
Yasss! More time to sew!
Thank you for the video. My daughter taught me years ago this wonderful trick…..works great!
You are welcome! I am very glad that it helped you 😀
What and where is the disc’s you said not to run the knot through?
The tension disks in which the thread has to pass through. The ones with the numbers. On this machine, they are inside but they are 2 plates that “holds” the thread while it sews.
I look forward to trying this. I have two overlockers ,so can keep one in dark and one in light threads , just to save thread hassles.
So
Thank you.
I am glad that it could help 🙂 I tried once only serge in dark and lights but my ocd’s wouldn’t let me 🙁
For the 80 yr old from another 80+ yr old. Place a white card behind the needle or as I did paint the foot holder white, it makes such a difference.
Very interesting!
Thank you. I’m new to using a serger. I haven’t threaded yet. This is a huge difference. The part I have been nervous about. I will be grateful for this tip. Also, will try to learn a sea man’s knot.
I am new to sergers. I was shown this re-threading tip when I purchased my 5 thread Husqvarna Huskylock s25. Do you have tips for threading the coverstitch looper? Thank you.
Sorry Linda! I have never had a coverstitch… but as soon as I get one, I’ll make a tutorial 😉
I was told never to do this as it will damage the machine. Just learn how to thread it!!!!!
Only if the knot pass through the disks, that can damage the disks tension settings. Otherwise it is perfectly ok.
Was dreading threading new overlocker and tried this excellent short cut. (Also recommended in the machine’s manual.) If you use a seaman’s knot you can pull the threads all the way through the needle without re-threading.
I haven’t tried the seaman’s knot but I am definitely doing it now!
THANK YOU. No idea how I can across this, but I got this exact serger a couple days ago and was just “practicing “ with the ugly thread it came with and dreading changing the tread lol.
Definitely a much better way to do it! Just make sure the knots don’t pass through the disks.
Thank you. I’m new to using a serger. I haven’t threaded yet. This is a huge difference. The part I have been nervous about. I will be grateful for this tip. Also, will try to learn a sea man’s knot.
i did factory work years ago and this is what we did all the time, there is also a knot that you can tie that also goes through the eye of the needle can’t remember how this one went sorry
This is interesting, I will do research about this knot. Thank you so much
I learned this trick when I bought my first 3 thread serger. I have used it with my regular machines also. It does save time and makes threading a breeze. Only problem I have now is seeing to thread the needle. These 80 yr old eyes don’t see as well as they use to. Any ideas to help with threading the needle?
Yes absolutely! I have an eyesight problem, I have been using glasses for a while now so this is an issue for me too. What it saved me is a little tool call manual threader, you can get it on amazon. You will love it I promise!! It’s a little blue and white tool very easy to use.
a tip i picked up from watching a pleater video, if you wet the thread and the needle hole it somehow manages to thread straight away. also cut the thread diagonally.
Really??? And this doesn’t damage the needles??
Thanks for this tip!! have the same serger, also learned a trick for threading the needle… melt a lil wax or put chapstick on the end of the thread to keep it stiff.. works like a charm 🙂 cheers
That is an amazing tip!! I am so going to try out that today. I have a lot of serving to do and I am always struggling with the needle thread! Thank you so much.