This eyeglasses case pattern to sew is a fantastic project for beginners and a perfect handmade gift for any of your friends.
We are midway through spring. And that only means that summer is around the corner!
And with it, the shiny sun and the super cool outfits with sunglasses.
That’s why I found that making an excellent fabric case for my favorite accessory was a great idea.
In this post, I will give you the free sewing pattern for this amazing case and show you exactly how to sew it together.

NOTE: This post contains affiliate links, which means that if you make a purchase using one of the links in this article, I may earn a commission at no extra cost to you (To know more about this, click here.)
As always, I live a couple of months ahead of everything.
Especially when it comes to making my next season’s clothes and planning my outfits!
I am making a couple of Magnolia dresses and a few Daisy Camisole Tops.
Of course, every summer I have to have my sunglasses with me. I just can’t live without them.
Why? Did you ask?

Well, as you know, I wear prescription glasses. So, my sunglasses have prescriptions too.
That’s why I have to take extra care of them!
They are not something you can just get in any store! And certainly not cheap.
I am too afraid of them getting lost, broken, or scratched.
So, to help me and help you too, I have made this cute yet straightforward free Sunglasses/ eyeglasses case pattern to sew in an afternoon.
How to Make a Quilted Sunglasses Case Pattern?

You can make a quilted outer layer for your sunglasses case pouch with small fabric blocks or the scrap-busting technique.
I am sure you have already noticed that I made this case using the scrap-busting technique.
Of course, this is an optional step.
I happened to have a lot of scraps that I needed to use, and this was my perfect excuse.
On the other hand, we will have extra protection for our glasses due to our quilted batting layer.
I just know that I will be throwing this case in my bag in a hurry or maybe leave it somewhere not that safe. So that’s the perfect solution for a padded layer of protection.
To finish, you can use a contrasting lining fabric color or pattern.
If you don’t know how to quilt your fabric, this is the perfect project to practice on a small scale.
I bet this will be the perfect start, so you can later make big quilts in one day.
How can I Customize an Eyeglasses Case Pattern with Sewing?
This design is completely customizable. You can choose interesting fabrics, fancy zippers tabs, and even add a wrist strap so you can carry it like a bag.
That last thing was a great option for someone as distracted as I am. I am used to leaving things all over the place.
But with a wristlet strap, I can be sure that my bags are always near me.
If you don’t know how to make this sort of accessory for your pouch, don’t worry, we have a great post on how to sew a wristlet strap.

It is super easy to sew, you can have it ready in only 6 steps, and you will be able to use it for other bags, too, even for your keys.
We can sew a bias tape edge with a matching or contrasting color to add a more interesting touch to our eyeglasses case pattern.
To do that, you can use any of the 3 bias tape sewing techniques you prefer. I used the sandwich one this time.
Also, if you just don’t find the right bias tape color for your design, you can always make your own homemade bias tape out of any fabric you already have.
How much fabric do I need to make a Sunglasses Case?
The great thing about this project is that you don’t need a lot of fabric. In fact, you can reuse all the leftover fabric scraps you have.
We will use a technique that I love, and it is called the scrap-busting technique.
This is a technique where you basically make new fabric by joining all the small pieces of leftover fabric scraps you have.
For this pattern, you will need less than a Fat-quarter.
How to make a eyeglasses case pattern to sew
1. Gather your Materials.
- Main Fabric
- Cotton Batting
- Lining
- Zipper (15 cm)
- Bias Tape
- Sewing Scissors

For this project, we will need 3 layers of fabrics.
The main fabric, which in this case is made with all the fabric scraps we have.
The second layer will be our batting. We used cotton batting, but you can use any wadding that you prefer. This layer will be quilted with our main fabric.
Finally, the third fabric will be the lining.
We chose to have a solid color to contrast with our scrap-busted design on the outside. Of course, you can choose whatever fabric you prefer.
You can download our free sewing pattern on our Facebook group, My Golden Thimble Sewing Club. We have lots of other cool free sewing patterns there on the group’s files.
Of course, if you want to have this pattern downloaded instantly, you can sign up here to get it delivered right to your inbox.
2. Quilt your fabric.

Pin the wrong side of your main fabric to the batting.
Sew a grid of vertical lines 1″ apart and horizontal lines 1″ apart.

I used my guide presser foot to make this easier.
When finished, it should look like this.
3. Remove the hanging threads.
You will probably end up with many loose thread tails after quilting your fabric.
Before moving forward, trim all of these so they won’t get caught on your next seams.
4. Sew the glasses fabric applique.

This step is also optional, but I think it is totally worth it.
Take the sunglasses pattern and cut it out of any fabric you like to make the applique with.
I advise you to press lightweight fusible interfacing on the back of this fabric BEFORE cutting out the pattern.
I first used a straight basting stitch to join the applique and then a blanket stitch.
If you are not sure how to make any of these stitches, I recommend you take a peek at our basic hand stitches guide and tutorial.
5. Fold and close the side

Fold your case in half, with the right side of the fabric facing together.
On the wrong side of the fabric, close the sides at ¼”.
6. Make a box corner and cut the excess.

Unfold the side and press it to form a corner.
The seam you just made must be at the exact center of the fold.
Measure 1” from the corner to the center of the seam and sew a straight line. Cut the excess fabric.
7. Join the lining

Repeat steps 6 and 7 with the lining fabric.
Then pin the lining with the main fabric piece. Make a basting stitch along the entire edge.
8. Sew the bias tape on the edge of the case.

Take your bias tape and use your favorite bias tape sewing technique to attach it to the edge of the case.
9. Join the zipper on one side.

Pin one end of the zipper from the side seam to the outside.
Sew over the bias tape to hold both case and zipper together. Make sure to now sew over the teeth of the zipper.
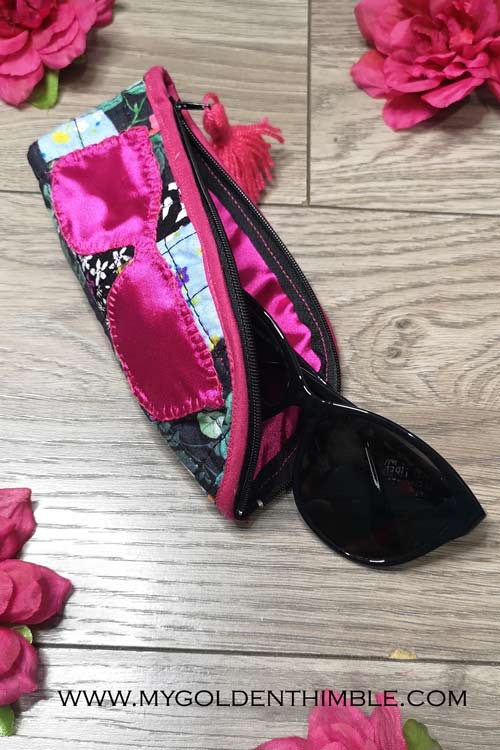
10. Join the zipper on the other side.
The only thing left to finish your amazing eyeglasses case pattern to sew the other side of the zipper on the opposite side.
And that’s it!! Here is how it should look at the end.
I hope you enjoyed this tutorial as much as I did.
Do you enjoy our freebies?? Support us so we can keep making freebies for you by buying us a cup of coffee here. We will be forever grateful!
Don’t forget to follow us on Social Media!!