
You are going to love this tutorial on How to Sew a Wristlet Strap that you can use on any of your DIY Purses or Clutches.
This project will be the perfect addition to any of your clutches. I love to use it on my leather triangle clutch pattern.
It makes any bag just easier to carry. And also, isn’t it just a better way to carry them, instead of having to hold them in your hand or under your armpit (I mean… poor bag!)
But a wristlet strap isn’t just for convenience. You can also make it a statement piece!
So, if you are here to make one for any of your bags, think outside the box and try going for an interesting fabric instead of matching the colors and materials of the bag.

NOTE: This post contains affiliate links, which means that if you make a purchase using one of the links in this article, I may earn a commission at no extra cost to you (To know more about this, click here.)
If you are going to a party or a night event, you probably won’t want to carry your day bag.
For this sort of event, a clutch is your ideal companion.
A clutch is a very nice and practical way to carry all of your essentials when you are going to a party.
It is small and lightweight. And it usually makes the perfect style companion to your outfit.
The thing is that not all clutches are very easy to hold on to.
I can’t tell you how many times I’ve forgotten mine at parties or restaurants… Although their size is helpful, it makes them easy to forget and handle.
That’s where the wristlet straps come to save the day!
There is no more forgetting your bag on any chair, no more having to ungracefully put it under your arm while you are trying to get a drink or simply using your hands.
This simple accessory will give you freedom of movement and peace of mind.

As I said at the beginning of this post, this little piece of fabric can be used for so much more than simply holding your bag.
You can turn any basic clutch into a statement piece with the right amount of inspiration. Simply change the wristlet!!
There are a lot of ways how to sew a wristlet strap to make it look cool.
You can, for example, add beads or pearls to it.
Or now that DIY scrunchies are back. You can gather fabric over the strip, just like I did with the elastic of my sleep mask pattern.
You can embroider small flowers and write smart quotes on them…
The best part is that you can change them with only one click of the clasp, creating a whole different bag in seconds.
Let’s start this fantastic project by answering some important questions first.
Materials:
- To sew a wristlet strap you will need the following materials:
- A fat quarter or a scrap of fabric that is at least 15” by 5”.
- Fusible stabilizer (same amount as above).
- A Swivel Clasp. The standard size for a regular clutch is ¾” or 1”
- A 1” D ring if you are going to make the attachment to your clutch.
- Sewing machine, Iron, and pins.
HOW LONG SHOULD A WRISTLET STRAP BE?
The standard length for a wristlet is 16” total. Nevertheless, the ideal length for a wristlet strap should be whatever size allows you to slip your hand in and out of it comfortably.
Yet you have to consider that it shouldn’t be so long that it falls off your wrist.
You can customize the length by yourself or use the standard measurement of 16”.
STRAP WIDTH VS CLASP WIDTH.
The swivel clasps come in a variety of shapes and sizes, from ½” to 1 ½”.
So, the width of your strap will depend directly on the clasp width you use.
The rule is to multiply by 4 times the width of your clasp to get the width of the strap.
- Use this table as a reference point:
- ½” clasp- 2” width
- ¾” clasp- 3” width
- 1” clasp- 4” width
HOW TO SEW A WRISTLET STRAP STEP-BY-STEP
Follow this easy video tutorial to make your fabric wristlet strap. Alternatively, scroll to the bottom of the video to read the step-by-step picture tutorial.
Step-by-step Picture Tutorial
1. Cut a fabric rectangle
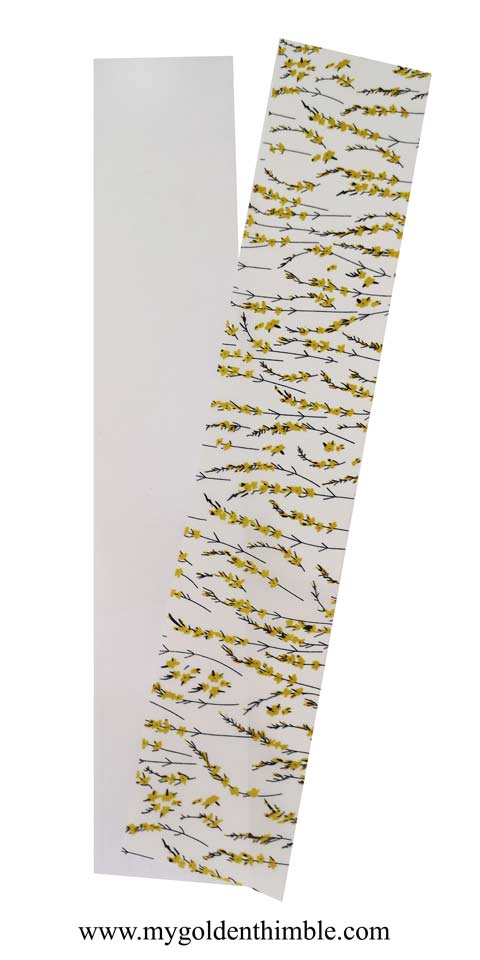
Using the chart above cut a fabric rectangle of 16” (or your custom length) by 4 times the width of your swivel clasp.
I am using a ¾” width clasp so my rectangle will measure 16” by 3”.
2. Press Fusible Interfacing
Cut a rectangle of the same size as your main fabric out of a fusible interface.
Press and fuse on the wrong side of the main fabric.
If you are using leather, vinyl, or another thick material, skip this step.
3. Fold and Press

Fold your strip in half lengthwise. Press.
Open and then fold the edges of the fabric to the center.
Press the edges.
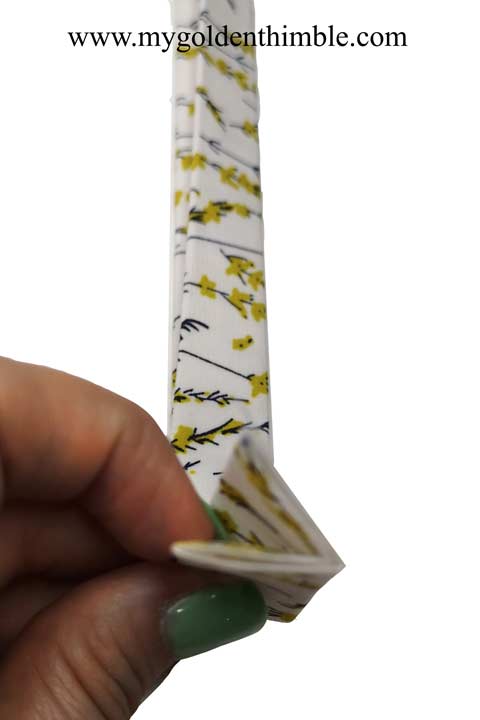
Close the piece and give it the last press.
4. Insert the Clasp and close.

Now you are going to insert the folded strap into the ring of the clasp.
Unfold the ends and pin them with the right sides of the fabric facing together.
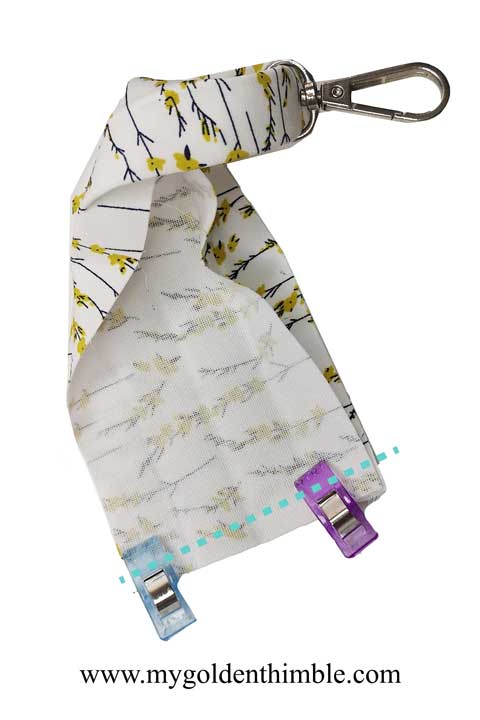
Close by sewing a straight stitch at ⅜”.

Press the seams open and fold the strap back in place. The clasp will be hanging from a circle now.
5. Topstitch
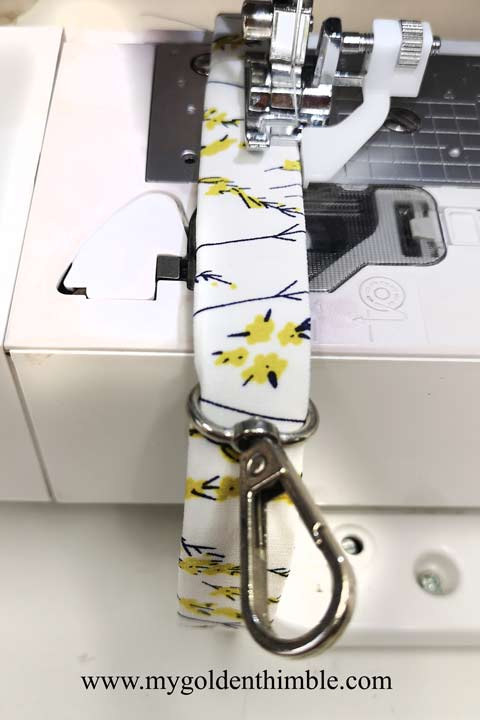
Change your pressing foot to sew with a blind hem presser foot.
Adjust the knob until the needle is at ⅛” from the edge of the fabric.
Make a top stitch on both sides of the strap. Use a matching color to have a clean finish or a contrasting color to make the design pop.
Make sure to move the clasp away from the needle as you sew so it won’t get caught under the presser foot or the needle.
Press.
6. Secure the Swivel Clasp

The final step will be to secure the swivel clasp.
Move the strap until the bar of the clasp match the closing seam of the strap.
Pin and make a basting stitch right next to the bar of the clasp to keep it between the two layers of the strap.
Change your presser foot to a zipper presser foot and sew as close to the clasp as you can. Then following the same seam, make a rectangle that is ⅜” tall.

Finish the seam until you get to the starting point with a backstitch.
You are done!
Do you want to know how to sew a wristlet strap in more styles? Check out these ideas.
HOW TO SEW A WRISTLET STRAP IN DIFFERENT STYLES.
There is a lot of things you can do to make your wristlet strap stand out. Here are some of my ideas.
I imitate the technique used in a scrunchie or my silk sleeping mask band, for the first one. I made a tube of fabric wider than the strap and 3 times longer.
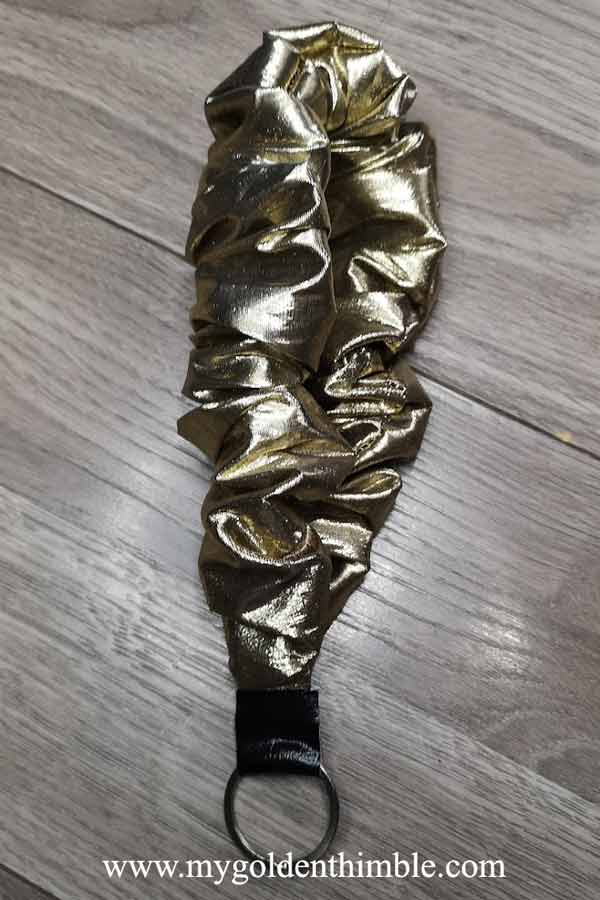
Then I inserted the strap and gathered the tube until all the ends matched together.
And rather than inserting the clasp to the fabric strap, I inserted it into a small vinyl rectangle. I used sewing clips to hold it in place.
Then, I proceeded to join the ends of the fabric strap and place them between the layers of vinyl.
After that, I placed the clasp into the strap and closed it by hand with an invisible stitch.
Finally, sewed the rectangle to keep it in its place.
For my beaded one, I followed the instructions exactly as the tutorial above.
Instead of doing that, I topstitched the strap without closing it.

Then I super glued the pearl beads along the length leaving 1” on the ends without beads.
At the end I simply sewed a square (instead of a small rectangle) around the leather piece, to hold the clasp in its place.
HOW TO ATTACH A WRISTLET TO YOUR PURSE OR BAGS?
Most clutches or small bags come with an attachment to clip your wristlet strap to. Some might have the form of a loop of fabric and others will have a “D” metal ring. That is where you will attach your clasp to.
If the bag you are sewing or the one you want to attach the wristlet strap to, doesn’t come with this attachment, don’t worry. You can make it yourself.
To make it, cut a rectangle of fabric that resembles the most to your bag.
Fold, and press it the same way you did with the strap.
Make a topstitch on both sides of the rectangle lengthwise.
Insert the “D” ring in the middle and join both ends with a hand or machine basting stitch.
To sew it into your bag or your bag sewing pattern, place it between the left side seams 1 ½” down from the top.
If you are putting it into an already-sewn bag you might need to rip some stitches place the attachment inside seams. And finally, close the seams back using an invisible stitch.
Psst…Is this article helpful to you?? Please support us so we can keep making awesome tutorials for you by buying us a cup of coffee here. We will be forever grateful!
Don’t forget to follow us on Social Media!!

How to Sew a Wristlet Strap
Make a beautiful fabric wristlet strap.
Materials
- A fat quarter or a scrap of fabric that is at least 15” by 5”.
- Fusible stabilizer (same amount as above).
- A Swivel Clasp. The standard size for a regular clutch is ¾” or 1”
- A 1” D ring if you are going to make the attachment to your clutch.
- Sewing machine, Iron, and pins.
Instructions
- Cut a 16" by 4" fabric rectangle and fusible interfacing.
- Fold the rectangle in half and press. Then fold the edges to the center of the rectangle and press again.
- Insert the clasp.
- Open the folds. Close the ends of the strip at 1/4".
- Press the seams open and fold again.
- Topstitch the edges.
- Secure the clasp by sewing a seam as close as you can on both layers of the strap.
Recommended Products
As an Amazon Associate and member of other affiliate programs, I earn from qualifying purchases.









Thank you! Loved it all!
Thank you! I think I liked the scrunchie one better!
This is great for making a lanyard for holding keys around your neck as well. Thank you for the easy tutorial.
Thank you, Elizabeth! Yes, indeed, it is. I have made one extra long for my “special” house keys (garage and so)
I really like attaching mine to my keys. It helps keep me from losing them
It’s wonderful for keys! I have made them for my spares too. I was always losing them.