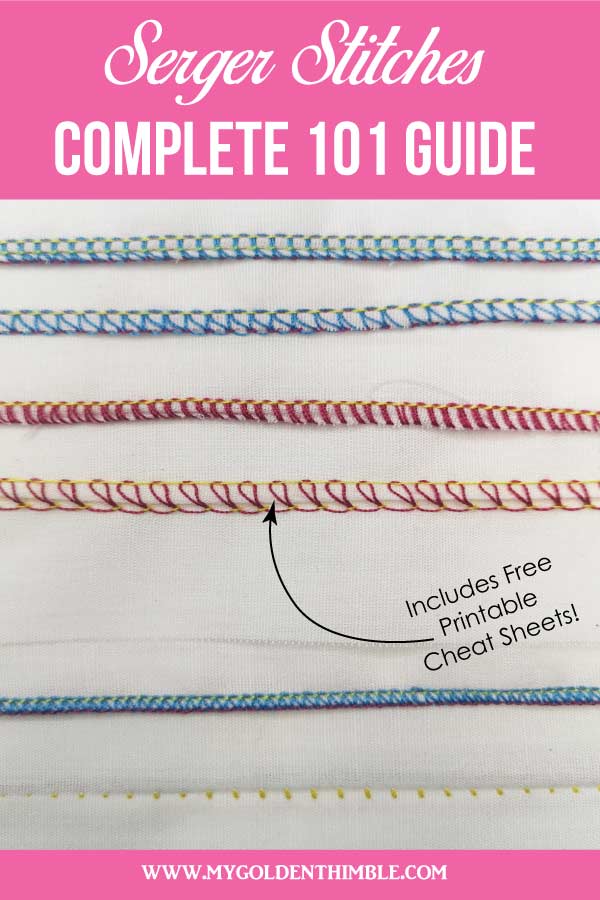
Discover all that you can do with your Serger Stitches.
This post will show you the different types of serger stitches and how to choose the best one depending on your sewing project.
A serger machine is one of the most significant upgrades you can get as you take a step forward in your sewing journey. This machine is a game-changer!
Use the cheat cheats and keep them near you. This way, you will know which one to use and how to use it on each project.
If you are reading this, the odds are that you already have a serger, but you want to know how to use it.
I completely get it.
You get your new serger machine, and you are so excited to get it started that you forget to explore all the fantastic features it has.
Most of us only use the 4-thread stitch to sew everything. Despite having the instructions on our serger manuals, we ignore that our machines have many more functions.
It’s completely normal. In fact, you can live a life without “needing” any other serger stitches.
But that doesn’t mean you shouldn’t know them or try them out.
I believe that we don’t change our serger stitches because we don’t actually know how to use a serger machine.
Why would we get into the trouble of changing the settings of our serger if we don’t even know why we are doing it?
That is why I made this list and serger cheat sheets. I will explain in detail the uses of each of the serger stitches. Also, how to configure your machine to do them.
Ready? Get your scraps of fabric, and let’s do this!
What is a Serger Stitch?
An overlock or serger stitch is a seam you can use to finish the raw edges of the fabric. This is to prevent them from fraying.
You need a particular sewing machine called an Overlock or Serger Machine to make this seam.
You can also use this stitch to sew knit fabrics garments with no additional seams.
Why do I need a Serger?
With a Serger Machine, you can quickly finish the inside raw edges of any fabric. It is an essential piece of equipment. Anyone who wants to get better and more professional finishes on their sewing projects should have one.
Although a function on your home sewing machines imitates the overlock seam, having a specialized machine will always be a better choice. It will simply give you a better and controlled finish.
At the same time, it will allow you to change settings. For example, change the stitch length and thread tension. This will give you a wide range of different serger stitches for each different project.
How do I know Which Serger Stitch to Use?

To select the correct serger stitch for your project, you need to determine these factors: the fabric weight, the type of project (garment, craft, home decoration items), and if you need a strong or a stretchy seam.
For example, if you are sewing with chiffon, you want a stitch that won’t be bulky or too visible through the fabric. On the other hand, if you are sewing leggings, you would want a stretchy stitch but strong.
The reasoning for this is that leggings are a very fitted garment. And as they are used to working out, the seams will be submitted to a lot of stress. Once you know that, use the following information to select the best stitch for your project.
Serger Stitches- How and When to Use Them.
Download these cheat sheets to print at home and have in hand whenever you need them. Get it for free by subscribing to our list.
What are the Main Serger Stitches?
- 4-Thread Overlock Seam
- 3-Thread Overlock Seam
- 2-Thread Overlock Seam
- 2-Thread Flatlock Seam
- Rolled Hem Overlock Seam
- Blind Hem Overlock Seam
4-Thread Overlock Basic Stitch

Uses: You can find the overlock stitch on the inside of most of your fast-fashion garments. This type of seam prevents the fraying of the edges of the fabrics. You can also use this stitch to join seams on knit garments that need to keep the stretch of the garment’s material and join two layers (or more) of fabric.
The 4-thread serger stitch uses both needles of your Overlock/Serger machine, and it is commonly called the overlock stitch.
It consists of four threads interlock within each other. Two of these threads are the upper looper and the lower looper. Both of these threads wrapped between each other at the edge of the fabric.
The other two threads are on the right and the left needle. Then, the left needle thread-locks both the upper and lower looper at the left side of the stitch.
The right needle makes an extra stitch right on the middle of the seam to give the seam more strength. If you want your seam to be as stretchy and resistible as possible, you need to use the 3-thread Overlock Stitch instead.
How to configure a 4-Thread Overlock Stitch on my Serger Machine?
Thread the lower and upper looper and two needles as instructed in your Serger Machine’s Manual. Then, choose to leave the knife to cut your excess fabric as you feed it.
3-Thread Overlock Stitch.

Uses: A 3-thread overlock stitch works pretty much the same as the 4-thread overlock stitch, but it isn’t as strong. Use this type of seam when you already have a main straight stitch, and you only want to stop your fabric from fraying. Ideally, on lightweight fabrics, as it is less bulky.
On wovens, it prevents the fabric from fraying. It works best for lightweight fabrics, such as cotton or poplin, that will not you won’t put under to a lot of wear or tear.
And knit fabrics can be used to join two or more layers.
With the difference that this stitch allows more stretch. This makes it ideal for t-shirts, sweaters, pants, or swimwear.
The composition of this seam requires the lower and upper looper and either the right or the left needles.
If you use this seam to prevent the fraying of mediumweight woven fabrics. Or use it to join elastic on the edge of knit fabrics, you should use the left needle.
On the other hand, if you work with lightweight fabrics that won’t have to support tears, you can use the seam with the right needle.
How to configure a 3-Thread Overlock Stitch on my Serger Machine?
To use a 3 thread stitch, remove one of your needles. You can choose to remove either the left needle and work with the right needle to make a 3 mm wide seam. Or you can remove the right needle and work with the left needle, which will make a 6 mm wide seam.
2-Thread Overlock Seam
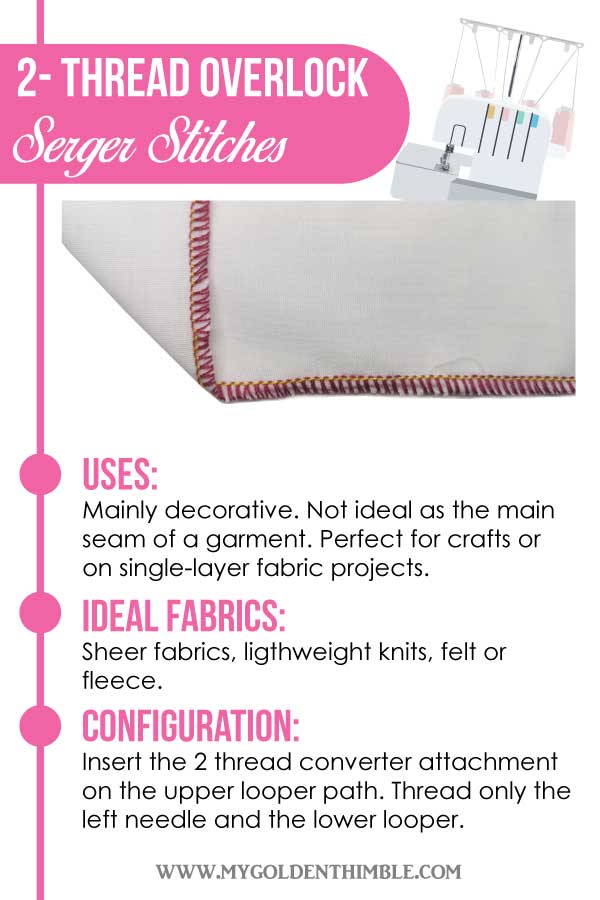
Uses: You can use a 2-Thread Overlock seam for decorative purposes. Also, when you are going to use a fabric that won’t fray as much. I strongly discourage you from using this as a seam to join fabrics. Due to its constitution, it won’t be strong enough to hold garments.
This seam isn’t bulky on the top and has a lot of stretch, so it is ideal for lightweight knit fabrics.You can also use it as an alternative to a Serger’s Rolled Hem Seam.
How to configure a 2-Thread Overlock Stitch on my Serger machine?
This seam usually requires putting a converter or an adaptor in your serger machine. It will use the upper and lower looper as well as one needle. This attachment will look different depending on the brand of your serger. Insert this attachment on the path of the upper looper last loop. So, instead of threading the last loop on the upper looper, you will use the attachment to pass the thread over it.
2-Thread Flatlock Overlock Seam

Uses: You can find the flatlock serger stitch on most sportswear garments as a decorative stitch. Although many people use this stitch to join two layers of fabric, we don’t recommend doing so. This stitch isn’t strong enough to hold garments together.
But it will work wonders on a craft project, and this will be a nice and easy seam to join the pieces. It has a lot of stretch, and it has two views. The first is the needle thread forming parallel lines, and the second is the loops from the upper and lower loopers.
How to configure a 2-Thread Overlock Stitch on my Serger Machine?

Place the attachment that comes with your Serger Machine on the upper looper section. Insert the wire on the last loop of this thread’s path.
Use a scrap to test your tension with two layers of fabric.
After you finish sewing, open the two layers of fabric to form the flatlock seam.
Serger’s Rolled Hem Seam.

Uses: The rolled hem overlock stitch is a fantastic feature that allows quick yet neat and clean narrow seams on any fabric. It works amazingly with lightweight fabrics on which making tiny hems is tricky.
You can create a lettuce hem on knits, a lovely decorative stitch mainly used on kids’ garments.
How to configure a Rolled Hem Seam on my Serger Machine?
Remove your left needle to make a rolled hem seam on your serger. Then depending on your brand’s machine, you will need to adjust the knife knob.
Finally, reduce the long stitch to have a full and more secure stitch, or increase it to reduce the bulkiness.
Here is a great step-by-step tutorial on how to do this seam.
Invisible Serger Hem Seam

Uses: This is a very clean seam barely visible on the right side of the fabric. As the name implies, an invisible overlock seam creates an invisible stitch that helps you hem knit fabric garments. Its configurations allow your garment to keep all the stretch needed. So, it is perfect to hem t-shirts, sportswear, and leggings.
How to configure an Invisible Seam on my Serger Machine?
This seam needs three threads, the one on the left needle and the two of the loopers. Set up your machine’s tension disks like this:
- Needle thread tension: between 0-2 (First disk)
- Upper looper thread tension: between 5-7 (Third disk)
- Lower looper thread tension: between 2-4 (Fourth disk)
Then fold the fabric as if you were sewing an invisible hem with a blind hem foot in your sewing machine.
Sew, making sure the left needle is catching the folded fabric. Finally, open and press the seam.Click here to watch the step-by-step video tutorial on making an invisible seam with your overlock machine.
I hope this was a helpful guide for you. Please let me know in the comments if you have any questions about serger stitches and how to use them.
Psst…Is this article helpful to you?? Please support us so we can keep making awesome tutorials for you by buying us a cup of coffee here. We will be forever grateful!
Don’t forget to follow us on Social Media!!


The serger stitches guide link does not work. Can you help? Please?
Hi Mercedes, it is working from my side. What issue are you expiriencing?
I see that you aren’t signed up to get the free sheets.
I am interested in your ebook but I would like to see one page first. Can you email a page to see if the page info is what I am am looking for. Can you send me the roll over hem. I need to see if each page has all the information like, thread tension setting etc for each stitch.
thank you
Sorry Veronica,
AS this book is free you can get the complete book by signing up with the process I explained above.
It says it’s $27. I am willing to pay for it, but not that much. Especially since it says free.
Hi Liz,
I am sorry for the confusion. The thing that is free is the Serger Stitches Gudie.
I think you are referring to the Serger Book. That is another resource I am recommending and that one is paid.
If you want the free serger stitches guide, then that one is free.
I hope I was able to help.