Learn how to make a fabric box with our easy step-by-step tutorial. Plus, our free fabric box sewing pattern comes in 3 different sizes!!
In this tutorial, I will be making fabric boxes with a liner that will work to organize your home or your sewing room organization.
Just what you needed to organize your home or your sewing room.

NOTE: This post contains affiliate links, which means that if you make a purchase using one of the links in this article, I may earn a commission at no extra cost to you (To know more about this, click here.)
Decorate and Organize your Home with a Fabric Basket
Spring is here; with it, all new things are in nature! Flowers are blooming, and the weather is getting warmer.
And for this homemaker, that means that it is time for renovations around the house, spring cleaning, and getting organized!!
I always get my cleaning mojo around this time of the year.
Decluttering and organizing are some things to do in spring. I have been getting into the habit since I moved into this house.
You see, It’s been almost a year since we moved to our home.
Although it came with pretty much what we needed (it was a preowned house), I haven’t had time to add my personal touch to the surrounding decorations.
The overall decoration is old, and I feel it doesn’t go with me.
As I have a tight budget to make home renovations, I will do a lot of DIY home decor.

This way, I can save money for the things I really want to invest in, like paint or some furnishings. I have never done any major home interior designs, so I don’t know how long this will take.
However, I am confident that I will make this work with a good home renovation plan and solid consistency.
That’s why I decided to start small.
The first room I will be working on will be my bathroom. And the thing it needs the most is some organization of all my junk!
How to use this Fabric Box Patterns and Tutorial?
Making a fabric box is very easy. You only need to gather your materials (fabric, lining, and batting), download our free sewing pattern, and follow our step-by-step instructions.
To get the free sewing pattern, scroll to the bottom of the post and go to the free pattern page.
Click on add to cart, and you will get instant free download access to the three fabric box sizes sewing patterns. You will be redirected to the download page, and an email with the same link will be sent to your inbox.
Cut your fabric pieces according to the pattern indications, and then follow the sewing instructions on this post.
You can choose to have your box with the main fabric quilted to have more structure or leave it only with fusible interfacing.
A quilted box looks significantly more attractive. I have to warn you, though. Sewing it with the main fabric quilted will take you longer.
So, if you want to speed up the process of sewing a fabric box, I recommend using only heavyweight fusible interfacing.
Another good tip to speed up the process of sewing these fabric boxes is using bias tape.
The process we show here will get you a fully lined box.
But if you sew the bias tape to finish the top of the box, you will save yourself a couple of good minutes. And it will look as good as the fully lined technique.
Which Fabric Box Size Should I Sew?
You can make fabric boxes in different sizes by choosing the height and width of the pattern you prefer. In this case, you can choose between 8″, 10″, and 12″ tall fabric boxes.
Don’t worry about wasting paper.
Our pattern has been optimized for saving printed form. You will have all three sizes on a single canvas so you can trace each size out with your favorite pattern maker’s paper.
Don’t forget to write down all the original pattern notes to your traced patterns. Especially the sizes.
This will help you access it more easily when you return to this pattern after a while.
If you are an organization lover like me, you will love this tutorial and the free fabric box sewing pattern that comes with it.
I made it in 3 convenient sizes for you to adapt the size for the room you want it in.
Sewing a box is super easy, and this one won’t be the exception.
Oh, and before you jump to the fabric box pattern tutorial, you might want to check out too these fabric hanging bins (also a free pattern!).
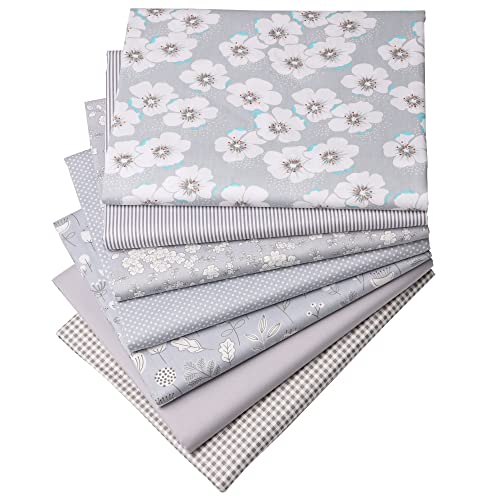
What Fabric works best to sew a Fabric Box?
The best material for a basket is sturdy and easy-to-clean fabric. There are a lot of home decor fabrics that you can use, such as Canvas and Duck fabrics.
These types of fabrics come with amazing original prints and colors and can be used indoors and outdoors.
Most of them have a waterproof coating, making them extra resistant and durable. Not to mention easy to clean.
Here are some options of fabrics you can get on Amazon to sew your fabric box pattern:
- Beige Magnolia Print Duck Fabric
- Solid Gray Canvas Fabric
- Classic Blue Stripes Canvas
- Bright Flower Print Duck Fabric
Using a Fabric Box for Home Decor and Organization
Are you wondering what to do with your fabric baskets? Here is where these amazing boxes come into place. They hide all the junk stuff you do need to keep but are just too ugly to leave out there.
These boxes look great in any place in your house. The reason is that they are made of fabric. This gives any room a more personal soft, warm feeling anywhere you place them.
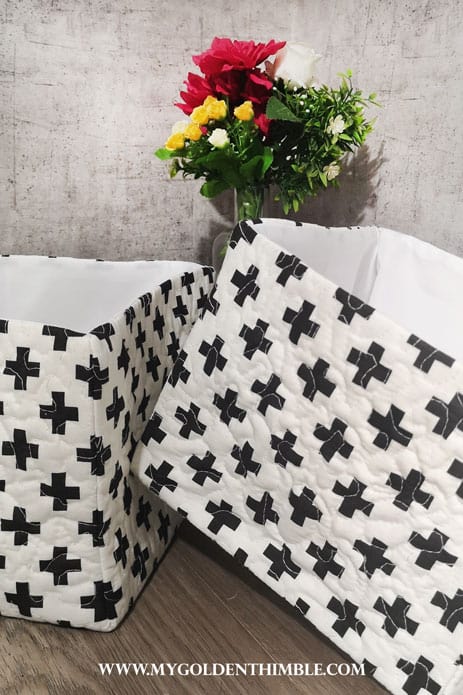
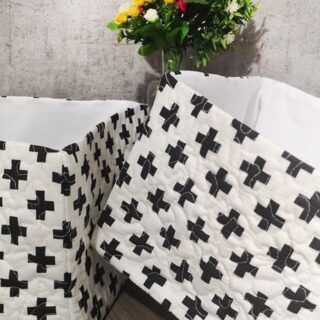
Do you know how I told you that I quilted my sewing machine cover to give it an extra design touch?
Well, I did the same with these fabric boxes; it was a smart choice!
The only difference is that this time I made a freehand quilt stitch.
Let me tell you; it’s a lot harder than it looks. But it’s totally worth it! And on the one in the video tutorial, I quilted it with diamonds.
Fabric Basket Options for Finishes and Materials.
An important note I want to make is that you can customize these fabric baskets however you want. I have made some different things with all the boxes I made from these patterns.
For example, I have lined the boxes entirely so there are no visible seams on the outside. But I have also finished the tops by sewing bias tape on them to finish them faster.
Both of these finishing options look great, so your choice will depend entirely on your preference.
Other options for finishes and materials are to press heavyweight fusible interfacing to make them ultra-sturdy. You can also add wire or boning to the sides and top seams so your boxes hold their shape better.
Do that by sewing a channel with bias tape to insert the wire in. Lastly, you can play with the materials and add your own elements.
Why not use a scrap of leather to make handles for our fabric boxes? You can get an idea of how to add a leather handle to a box in my tutorial for a DIY cardboard upcycle box.
How to Make a Fabric Box Pattern
Video Tutorial
Check out this quick video tutorial or the step-by-step sewing instructions below. And if you like, scroll to the bottom of this post to get the printable instructions.
If you can’t visualize this video tutorial, you can watch it on YouTube.
Sewing Picture Instructions
You can also print these instructions at home! Scroll to the bottom of this page to get your printable file.
1. Choose the fabric size box to make first.
This free fabric box Sewing Pattern comes in 3 different sizes 8″, 10″, and 12″.
For my bathroom, I made the 10″ and the 12″. And I made the 8″ pattern for the future, in case I need it.
I probably will use that last size in my sewing room organization.
These boxes are super convenient for every space.
I am thinking of using them also in my laundry room… Do you know which room you are using it? Then, choose the size you want and print and assemble your pattern.
2. Cut your fabric
Whatever size you choose, you will cut three layers of fabric.
One will be the main fabric, the second one will be the interfacing you will fuse into the main fabric, and the third will be the lining.
I recommend using a heavy-weight fusible interface so your box keeps its shape better.
Finally, if you are going to quilt your box like I did cut a layer of batting too. If you will, quilt your box like I did and cut a layer of batting too.

3. Prep your layers of fabric
The main thing to know about making a fabric box is that you have to give it some strength and body.
This will hold the cube shape better. To do that, first, fuse your interfacing to the main fabric.
Then if you like your fabric box to have a quilt finish.
Quilt away in your preferred quilt method. After that, I should use heavy-weight fusible interfacing (which I didn’t) so your box has more stability.

4. Sew the sides
Next, you will fold the box’s external layer diagonally so the walls’ sides meet. Use sewing clips or pins to hold them together. Then sew them at ⅜”.
It is not necessary to serge them as the box will be lined.
After you sew those sides, you will pin and sew the two other sides the same way.
The ones that are in the middle. This way, you are going to have the main outer fabric box.
After you sew those sides, you will pin and sew the two other sides the same way. Repeat the same steps with the lining fabric.


5. Sew the lining to the box
There are two ways you can do this.
The first one is with a closed seam. Turn the lining box inside out and cover the main fabric box with it. Sew around the top at ½” seam allowance, leaving 5″ open.
Then, pull up the box inside out and make an invisible stitch to close the open top.
For the second way to finish making your fabric boxes, insert the lining to the box with the wrong sides of the fabrics facing together.
Finally, finish your box by sewing your homemade bias tape around the top edge.

Note* You can also finish your box by sewing your homemade bias tape around the top edge.
6. Make the box sharper.
To define the edges of your box, you can do the following. First, press all the corners of the box. Sides and bottoms. Press carefully and at the rigth temperature so you don’t burn it.

Then make a couple of stitches on the corners to hold them together and to make them look sharp. This will also help your box to look sharper and hold its shape better.

And you are done!!
Let me know if you enjoyed this free box sewing pattern and if you liked making fabric boxes for your home. Or maybe another place?
Let me know in the comments below!! I would love to read to you.
Fabric Box Pattern. Instant Download.

To download this free Sewing Pattern, click the button below and add the product to your cart. Fill out your information and email, and click next.
You will be taken to the download page with the link for instant downloading all the files of this sewing pattern.
Remember to save your pattern in a secure folder on the cloud or your computer! But if you ever lose it, you can always come back to your account and download it again.
Other uses for Fabric Baskets.
The decoration is not the only way to use these Fabric Box Patterns. Here are some other options for you to take the most out of them:
- Gift box. Put a teddy bear, toys, flowers, or any gift, and add a pull-up fabric box for a waste-free gift wrap.
- Care Packages. Do you have a housewarming event or a family living away? Make care packages for them in these cute boxes. Fill them with their favorite stuff. They will love them.
- File storage. These boxes work great to keep your loose papers or to-look-later files. Keep them in your closet.
- Wardrobe Box. No one wants dirt on their clothes. When seasons change, you can use these boxes to classify sweaters, scarves, leggings, etc.
- Toy storage box. Having a set of fabric boxes without a lid will be a blessing in your kid’s rooms. They can use them to “throw” all their toys in after playing.
- Scrap bins. If you sew a lot, you know we eventually fill up our spaces with fabric scraps. These boxes are great to throw those scraps in until you are ready to use them for cool projects.
- Diaper box. You can have all the diapers you need at hand if you use one of these fabric box patterns in the nursery. (By the way, they are also a great baby shower gift).
- Bathroom Paper Bin. A great way to display an essential in the bathroom. That is the use I initially gave to my boxes in my bathroom decor plan.
Do you know other good uses for fabric baskets? Write them in the comments, please!
Printable Fabric Box Pattern Sewing Instructions.
How to Sew a Fabric Box
Follow these sewing instructions to make a fabric box pattern. You can use this free download to make fabric baskets in 3 different sizes depending on what place in your house you are using them. Warm up any place instantly with these fabric boxes.
Materials
Instructions
1. Cut your Materials.
Once you have downloaded and printed the free sewing pattern, follow the sewing pattern instructions to cut your fabrics. You should end up with one layer of main fabric, one layer of batting, and one layer of lining.
2. Quilt the Main Fabric.
Use your preferred quilting technique to quilt the batting to the main layer of the fabric. I used a free-hand quilt- But you can make lines, diamonds, or squares. Remember to give it good press.
3. Sew the sides.
Fold the piece diagonally to join two of the sides of the boxes. Use pins or sewing clips to hold it in place. Sew these sides at 1/4". Press.
4. Close the other side
Repeat step three with the other two sides of the box. Sew at 1/" and press.

5. Insert the lining.
Repeat steps 3 and 4 to sew the lining and then insert it into the box with the wrong sides of the fabrics facing together. Then pin the whole thing and sew bias tape on the edges to close.
If you want to do your box without bias tape, then insert the lining to the box with the right sides of the fabrics facing together, then sew the edge leaving 3" open. Turn the box inside out and close the open edge with an invisible stitch.
6. Press the edges and seams.
Once the fabric box is sewn, it's time to press the top edge and the seams so our box can be as sharp as possible.
7. Make a stitch at the corners.
To make the corners sharper, make a stay stitch joining the corner sides with a couple of stay stitches.
8. Enjoy!
Now you have a finished fabric box pattern. Now that you see how easy it is to make a fabric basket, it´s time to make some more in other sizes!!:'

Notes
Write additional notesUse heavyweight interfacing to make your box more sturdy.
Recommended Products
As an Amazon Associate and member of other affiliate programs, I earn from qualifying purchases.
-
 CHI Steam Iron for Clothes with Titanium Infused Ceramic Soleplate, 1700 Watts, Retractable Cord, 3-Way Auto Shutoff, 400+ Holes, Professional Grade, Gold (13116)
 -
Angel Crafts and Sewing Cotton Batting for Quilts: Purely Natural All Season Quilt Batting by the Roll - Low Loft Fabric for Quilting, Upholstery, Applique, Pillows - 108 by 96 inches, Queen Size
-
Hanjunzhao Quilting Fabric,Grey Fat Quarters Fabric Bundles,100% Cotton Fabric for Sewing Crafting,Print Floral Striped Polka Dot Gingham Fabric,18" x 22"(Grey)


Psst…Was this article helpful to you?? Please support us so we can keep making awesome tutorials for you by buying us a cup of coffee here. We will be forever grateful!
Don’t forget to follow us on Social Media!!


I dont know why you make it so difficult to get to the download for the free box pattern templates. I have wasted over a half hour looking and clicking on different places and to no good luck. Very frustrating; but you know what, I have it figured out anyway and can make my own.
Hi Lorraine!
OK, I am sorry you think getting these free of charge patterns is so difficult, but I am happy you figure it out and now you can make your own version. I hope it turns out as pretty as you want them to.
where i can find this box?
Hi Jannet,
At the very end of this post is a title called “Fabric Box Pattern Download” there is a button that will take you to the pattern page so you can download it for free.
Another way to access is going to the menu>sewing patterns>Home there you will find the product download.
Hello, I want to use your pattern to make some cubes to go in a three-by-three cube storage system for my grandson to use to store toys. Since he will be lifting the cubes in and out, I think I will need to attach a couple of handles. Do you have a suggestion of the best way to attach them to the cubes? Thank you.
You can attach them by stitching a perfect square on each end of the handle and then a cross using the corners of that square as guides. Attach them before sewing the lining 😉
Hi – thanks very much for this! Question: how do you figure out/measure/create the pattern for a box of a different/custom size? Could you please do a tutorial on how to go about that? Thanks very much (in advance)!
Hi IB, Do you mean besides the measurements I am offering here?
Every time I try to download the pattern I get redirected to the main page which says I can download the pattern AFTER I purchase…
?something? … not exactly a free pattern!?
What! No, that’s not right. You shouldn’t be purchasing anything to get this free pattern. Please can you write me a dm on our Facebook page so I can help you with this?
Thanks for the pattern, I’m actually using it as a starting point to make a box “hat” for my son’s costume (if you’ve ever seen Lankybox on Youtube, they have an adorable character named Boxy who is basically a giant marshmallow being in a box, with a hole cut out to show his face). Apparently, the box head is important to my 9yo, so I’m doing my best to accommodate since I have just enough time before Halloween. The different sizes are great for this goal, and after I can make more to store my fabric in, using fabric I like to make my sewing area fun and to my liking. 🙂
Thank you so much for your comment! I am glad that you are enjoying this pattern and I would love to see your box hat’s costume!
Thank you for this pattern! I made a tiny one last night. Now I am making a medium one and I just love it and the simple and elegant pattern design. My house is probably going to be full of these boxes everywhere now. Lol.
The tiny one is my favorite! So convenient box. I am putting it in my laundry for small towels.
love these boxes , were do i get the patterns ?
Right below step one, on the first sentence is the link to download the free sewing pattern of these fabric boxes
Hi Dafhtne! These are so cute. I don’t really have access to a printer. Can you tell me the measurements of the patterns? Thank you!
I don’t see the fabric quantities mentioned anywhere.
I used about 1 yard for both boxes on each fabric.
I love this, I will be making one for my guest room this week! Thanks!!
I would love to see them! If you can please share a picture with us on social media 😉