With this tutorial, you are going to learn How to Draft a Cap Sleeve directly into your finished garment.
Then we are going to translate this Alteration to the Sleeve Pattern.
This way you can have a new Sleeve Pattern ready to cut and sew for your next project.
Making Cap Sleeves is a very easy way to give all your Tops or Dresses a Feminine Stylized look.
This kind of sleeve is delicate while still keep your upper arms cover. The length of a Cap Sleeve can be anywhere between 1 1/2″ to 4″. It is up to you to decide which length to choose.

NOTE: This post contains affiliate links, which means that if you make a purchase using one of the links in this article, I may earn a commission at no extra cost to you (To know more about this click here.)<<
♥
Once you learn How to draft a Cap Sleeve you will be able to modify any Regular Sleeve Pattern you have.
Plus, you would also have the option to modify the simple sleeves of any finished garment you have.
Just like I did in this Tutorial.
I love T-shirts. There are one of the most comfortable garment anyone can have.
You can combine them with almost any layer of cloth or accessorize it and it would have a completely different and fashionable look.
But the thing with T-shirts is that they have this square flat and quite unflattering sleeves.
I mean there is nothing wrong with them.
They are meant to be that way. But that doesn’t mean that we can’t choose to give them a better look.
For this Sleeves Alteration Tutorial, I am going to modify the sleeves of my Favorite T-shirt I made with the Thimble-T (fitted) sewing pattern.
BEFORE:

You can find this lovely sewing pattern here for instant download.
The reason I decided to make a Cap Sleeve on a T-shirt is that, in my opinion, Cap Sleeves are the perfect easy way to add a feminine and stylish touch to any garment.
Who doesn’t want to have a more stylish T-shirt?
The best thing is that such a quick “fix”! I just had to share it with all of you. Are you ready for this T-shirt Cap Sleeve DIY?
Let’s sew this.
How to draft a Cap Sleeve out of a Finished garment.
You don’t need to have a deep knowledge of pattern making to know how to make cap sleeves on a T-shirt or on any Top really.
The only thing you need is a Simple Regular Sleeve and a Curve Ruler.

This Ruler is the one I used and it comes from a 4 pieces set you can buy on Amazon. I have had this very set for a little more than 7 years and is still like new. I’ve heard of seamstresses that only have one of these in a lifetime and is very recommended for all the people I know that have used them.
So this is definitely a good thing to have on your sewing tools wishing list.
But back to the Cap Sleeve Tutorial.
This pattern Alteration is one of the easiest ways you can add a feminine style to your Tops without breaking your mind.
First, we are going to learn How to Make a Cap Sleeve on a garment that is already sewn.
♥
How to draft a Cap Sleeve on a finished Top. The Garment Alteration.
The first thing you have to do is define the length you want your Cap sleeve to have. In general, a Cap Sleeve can measure anything between 1 ½” to 3” or 4” from the shoulder line…
To be extra sure you can put your t-shirt on and fold the sleeve until you are satisfied with the way it looks.
I do recommend that if you don’t have skinny arms like me try to don’t cut too much length off the sleeve.
Otherwise, you might end up getting more attention to your arms instead of making a stylized look.
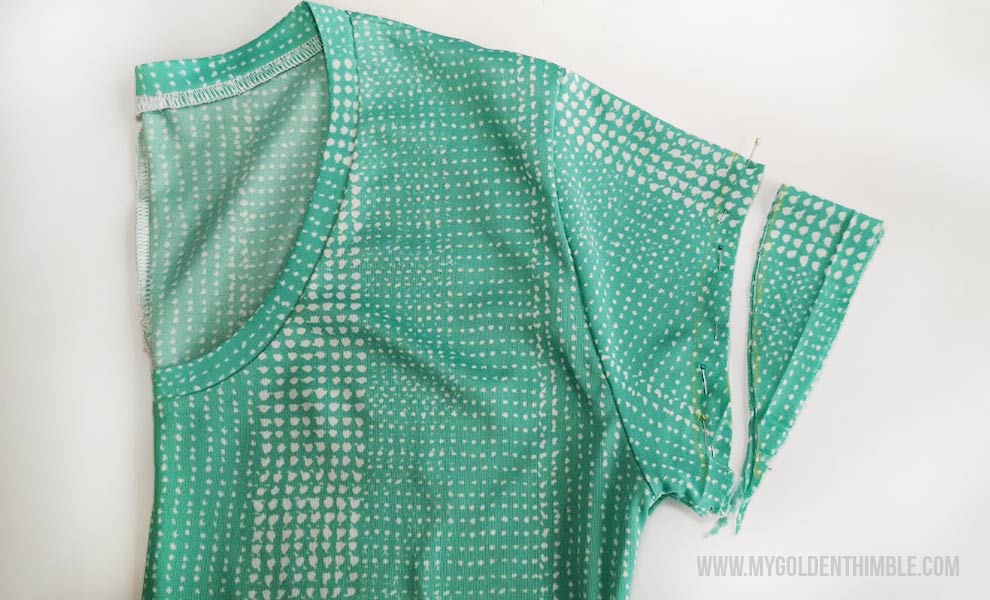
Start by laying your finished T-shirt on a flat surface.
Make sure the sleeve folds right in the middle.

Mark the length you choose on the fold of the sleeve.
And from there you are going to draw a ¼” line in at 90° based on the folded sleeve line.
Using your Curve Ruler draw a line that goes from the ¼” mark to the half of the sleeve.

Then turn your Ruler upside down and complete the line by drawing from the half of the line to the hem of the Sleeve.

Using the original Hem fold I defined how much seam allowance to leave for the new cap sleeve and I mark the hemline too.

In order for both Sleeves to have the same shape I folded the T-shirt in half and pin both sleeves mirrored.
After that, I just cut the excess of fabric.
But hey don’t throw it away just yet!!
Finally, I made a Blind Hem with my Serger Machine and this was the result.

Cap Sleeve Alteration on the T-shirt:
BEFORE | REGULAR SLEEVE

AFTER | CAP SLEEVE

Now let’s translate this Alteration to the Original Sleeve Pattern.
Related articles:
- How to sew a T-shirt. 2 easy ways + Sewing Pattern.
- How to make a Blind Hem with your Serger Machine. Even if you don’t have a Blind Hem foot!
- Thimble-T. The perfect T-shirt sewing pattern for men.
♥
How to Draft a Cap Sleeve on a Pattern.
To draft a Cap Sleeve on the pattern you can follow the same steps as above but there is and an even easier way to do it, once you modified your Top.
Draft a new copy of the original Regular Sleeve Pattern and take the part you just cut out of the T-shirt sleeve Alteration.

Place it over the Sleeve Pattern and copy the shape with a pencil.

To finish cut over that line and you’ll have your Cap Sleeve Sewing Pattern ready to go.

I hope you enjoyed this quick Sleeves Tutorial and that you now know how to make Cap Sleeves please tell me on which garments you would like to make this stylish Sleeve.


Just found you. Thank you for sharing this, I love cap sleeves. Do you think this will work on purchased T shirt and could I use this sleeve pattern to change a woven top Pattern. I have never sewn with knits and as you’ve not mentioned it, I’m guessing it doesn’t fray?
No knits, don’t fray! But you can still use the sewing knits tutorials to know what kind of stitches to use.
Very useful! I really enjoyed reading this post. Thanks for sharing an excellent blog.