
One of the first things we DIY Clothes lovers learn to do is How to Draft a Bodice Slopper.
This is the ultimate pattern that creates and transforms all kinds of bodice patterns your mind can imagine.
The tutorial I will show you today is the second chapter of every pattern drafting book (the first one is the skirt sloper).
Why?
Because that is where all patterns begin, whether you want to make a top, a dress, a t-shirt pattern, or a hoodie.
Any garment with a part laying on your bodice needs a Bodice Sloper Pattern.
So remember to save this post on Pinterest or print the how-to instructions printable card at the end of this post. You will be coming back to these instructions every time you want to create a new top pattern.
I will show you the method I use for all my patterns. I think it is very clear and easy to learn, so let’s start!

NOTE: This post contains affiliate links, which means that if you make a purchase using one of the links in this article, I may earn a commission at no extra cost to you (To know more about this, click here.)
Things you Need To Know About This Block Pattern.
In this post, you will learn how to draft a bodice sloper, the basic pattern for women, that will help you make your favorite garments.
With this sloper, you will be able to use your bodice block to draft t-shirts, tops, shirts, jackets, bras, sweatshirts, and more!
You may think that making patterns is difficult, but once you spend a while learning how to draft your own patterns, you will start to understand the reasoning behind each stroke and formula.
And, trust me, it is not that hard.
Every flat line on your pattern paper represents a line and curve of your body.
I am going to teach you how to draft a bodice pattern for beginners, guiding you step-by-step through the process.
First, we will start drafting the FRONT BODICE BLOCK, and we will use this as a reference to complete the BACK BODICE BLOCK.
Read the steps very slowly and carefully so you can draft your copy to perfection.
I promise you that once you start drafting more patterns, you will be able to look at the clothes in your closet and say the classic seamstress line:
“I can totally make that.”
So, let’s begin with the basic information you need to know about the bodice block pattern (A.K.A. the Bodice Sloper).
What is a bodice Block pattern?
The bodice sewing pattern is a template made on paper (or digital pattern software) and is used to create a perfectly fitting garment for your bodice at waist height and without sleeves.

A basic bodice pattern drafting has a front and a back, and you can also add sleeves if you want.
But that is the sleeve basic block drafting theory. For that, you will need the sleeve block drafting pattern instructions.
In this step by step beginner basic bodice block pattern drafting tutorial, you will learn how to make a block with your own measurements.
What materials do I need to draft a Sewing Pattern?
This is what you need to start drafting and creating your own sewing patterns.
Pattern Making rulers.
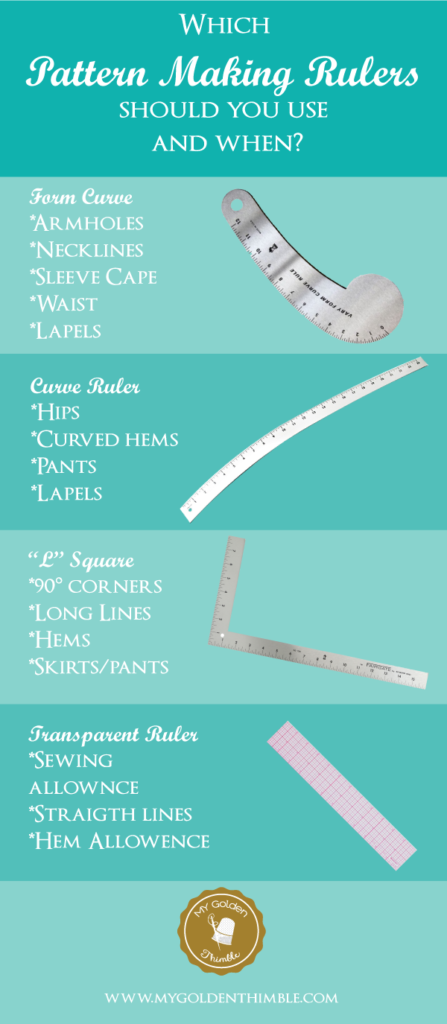
First of all, get a see-through 20”+ ruler. I love this ruler because I can see the lines of my pattern as I add my seam allowances or modify some lines. It has seam marks of ⅛”, ¼”, ½” and 1”. You must absolutely have the other rulers for pattern making: the L-Square, the French curve, and the curve ruler. And for that, my highest recommendation is the Fairgate Vogue Pattern-Making Rulers Kit. I have been using the same ruler kit since I started fashion school more than 12 years ago.
Measuring Tape.
A measuring tape is a soft and flexible tape marked with inches and/or centimeters. You can use it to take measurements of your own body to draft your patterns. A measuring tape is only one of the many measuring tools we use in sewing.
Pattern Making Paper.

There are a lot of types of pattern-making paper you can use to draft your patterns. This can be anything from newspaper to the one I use, the medical pattern paper roll. It is great because it is see-through and yet sturdy enough to draw, erase, and mark anything you need.
Pencil or Erasable Pen.
I personally prefer to use pencils. I like the thickness and smoothness of a line that a pencil makes. Also, I find it convenient to erase if I make mistakes. Try keeping it sharp so you can draw fine lines but not too sharp to perforate the paper as you draw.
Eraser.
Do not rely solely on the eraser at the end of your pencil. Those things do not erase all that good. Besides, it can damage and stain the paper.
Tracing Wheel.
This is used to trace marks and margins, darts, and notches on the paper or fabric. Check that you have light-thickness paper so that the teeth can mark two layers of it.
What measurements do I need for Bodice Pattern Drafting?

Now, let’s start making our free basic bodice pattern. The first thing we need is to have the following measurements. If you want to see how to take these measurements in more detail, you can see our post: how to take your own body measurements.
- Front Waist Length: From the start of the neck, over the shoulder line, past the point of the bust to the waistline.
- Neck Girth: Circumference at the nape of the neck, above the collarbone.
- Chest Girth: We measure the chest girth, passing under the arms, over the most prominent part of the bust, and keeping our tape horizontal.
- Chest Height: from the beginning of the neck, over the shoulder line to the bust point.
- Bust point to Bust Point: measurement from nipple to nipple.
- Waist Girth: the circumference of the narrower part of your bodice.
- Shoulder Length: from the side of the neck to the outermost part of the shoulder.
- Upper Arm Girth: the width of the largest arm without reaching the armpit.
- Back Waist Length: from the first cervical vertebra to the contour of the waist.
- Back Width: from the beginning of the arm to the beginning of the other arm.
Do you need something to write and keep your body measurements safe? We have a free Body Measurements Printable Booklet you can use!

How to Draft a Bodice Sloper. Pattern Drafting Tutorial for the Basic Block.
If you’ve ever dreamed of creating your own unique garments, learning how to draft a bodice pattern is an essential skill to master. With these step-by-step instructions, you’ll be able to design and sew stunning tops and dresses that fit like a glove. This guide will guide you through the process of drafting a bodice pattern from scratch, allowing you to unleash your creativity and create one-of-a-kind garments that flatter your figure perfectly.
Note: Now you can print these instructions! Just scroll down to the end of the post to get the printable version.
DRAFTING THE FRONT BODICE PATTERN:
1. Make a 2″ margin from the top down and then from the right to the left. (The right margin will be called Center Front). Use your “L” square ruler to draw the margin.

2. Measure ¼ (one-quarter) of the Chest Girth + ½” from the Center Front to the left, and square down using the “L” square ruler.

3. Starting from the horizontal margin, on the Center Front line, measure down the length of the front waist and close the rectangle.
To close the rectangle, use your “L” square ruler and draw a line to the left.

4. Mark the length of the Neck to Bust Point from the horizontal top margin on the Center Front line down and then square that point to the left. This will be the dart height line.

Draft the Neckline
5. From the top right corner to the left, measure 1/6 (one-sixth) of the neckline girth (neck girth/6). Then, starting from the same point and down, measure 1/6 (one-sixth) of the neckline girth + ½” or 1″.
Note: *The reason for choosing the extra 1/2″ or 1″ is to decide how close you want the neckline to be to your neck. For a loser fit, choose 1″.*
Square these points and form a rectangle. Then, use your French Curve Ruler to draw the neckline.

Draft the Armhole
6. Starting from the top left corner of the rectangle, measure down 2 ½”. This line is the shoulder slope.
From there, square to the right ½”.
Note: *On standard shoulders, the shoulder slope is 2 ½”. On high shoulders, 2″, and on dropped shoulders, 3″.*

7. Connect the end of the ½” shoulder slope line we made in step 6 to the top line of the neckline. This is the shoulder line.

8. From the 2 ½” shoulder slope mark that was marked in step 6, measure down the ½ (one-half) of the upper arm girth + ¾”. Then, from that mark, square 2 1/4″ to the right, and from there, square 2 1/2″ up.

9. Draw the armhole with your French curve ruler. Start from the end point of the shoulder line and pass through the square lines you made in step 8. Make sure to leave a 1″ straight line on the area of the armhole where the 2 1/2″ square line (guides of step 8) ends.

Make the Front Darts
10. On the Dart height line, measure 1/2 of the Bust Point to Bust Point starting from the Center Front line to the left. Then, use your “L” square ruler to square that line down. This line is the center of the waist dart.

11. On the bottom horizontal line (the waistline), starting from the Center Front, measure 1/4 of the waistline girth + 1/4″ + 1 1/4″.
Then, join the end of that line with the end of the armhole line you drew in step 9 with a straight line. This line is the front side of the bodice.

12. On the shoulder line, mark 1/2 of the shoulder length measurement from each of the ends of the line towards the center.
Then, make the dart by joining the left mark, the center of the waist dart you marked on step 10, and the right mark. This will become the shoulder dart.

13. On the horizontal bottom line (the waistline) from the center of the waist dart line, measure 5/8″ on each side.
Then, make a dart by joining the left mark, the center of the waist dart line (on the dart height line), and the right mark. This is the waist dart.

DRAFTING THE BACK BODICE PATTERN:
14. Extend the waistline and armhole line to the left using the “L” square ruler.

15. On the waistline, starting from the sideline to the left, mark 1/4 of the chest girth measurement.

16. From the waistline line up, measure the back waist length and use the “L” square ruler to square up and form a rectangle. The line you just square up is the Center Back.

Draft the Back Neckline
17. Starting from the left top corner, measure 1/6 (one-sixth) of the neck girth measurement to the right. Then, from that point, square down 1″ using your “L” square ruler.
Make a rectangle with the help of your “L” square ruler.

18. Use your French Curve ruler to draw the back neckline.

Draft The Back Armholes
19. Join a straight line from the neckline top end to the 2 ½” shoulder slope on the front armhole/shoulder line (step 6). This is the back shoulder line.
Then, on the center back line, measure the half point between the bottom end of the neckline and the armhole extended line.

20. From the previous mark to the right, and using the center back as a reference, measure and square 1/4 (one-fourth) of the back width + 1/4″. Then use your “L” square ruler to square down 1″ from that point. This is the backwidth line.
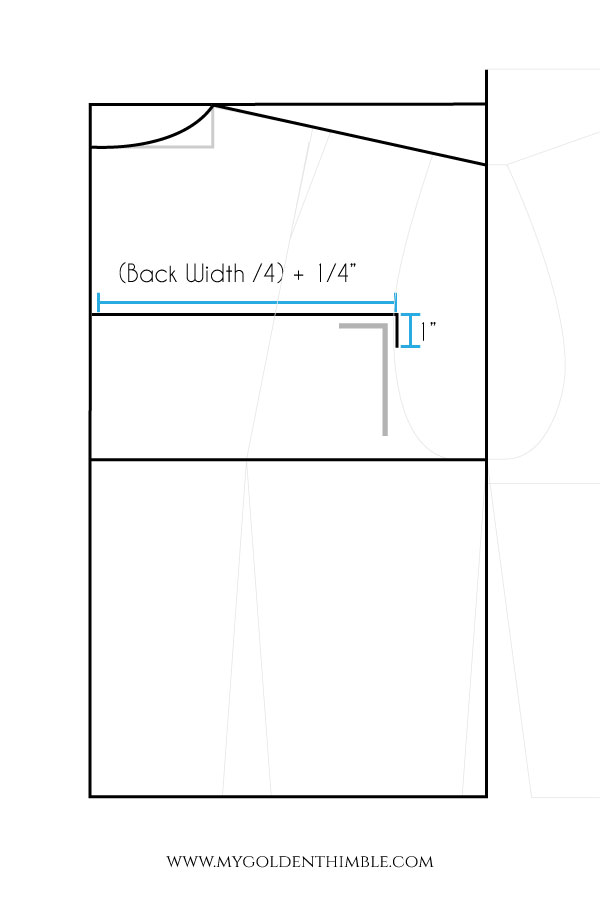
21. You are going to make three consecutive marks on the back shoulder line.
On the back shoulder line, starting from the neckline, measure 1/2 (one-half) of the shoulder length, then from that point, measure 1/2″, and from that point, measure again the 1/2 (one-half) of the shoulder length.

22. Using your French Curve ruler, connect the end of the back shoulder line (the third mark you made in step 21) with the back width line. Draw a straight line over the 1″ line you squared on step 20, and then use your French Curve ruler to complete the back armhole.

23. On the waistline, starting from the Center Back to the right, measure and mark 1/4 (one-quarter) of the waist girth + 1″. Then connect that point to the end of the back armhole with a straight line.
This last line is the backside seam/line.

Making the Back Darts
24. Divide the waistline into two halves and make a mark.
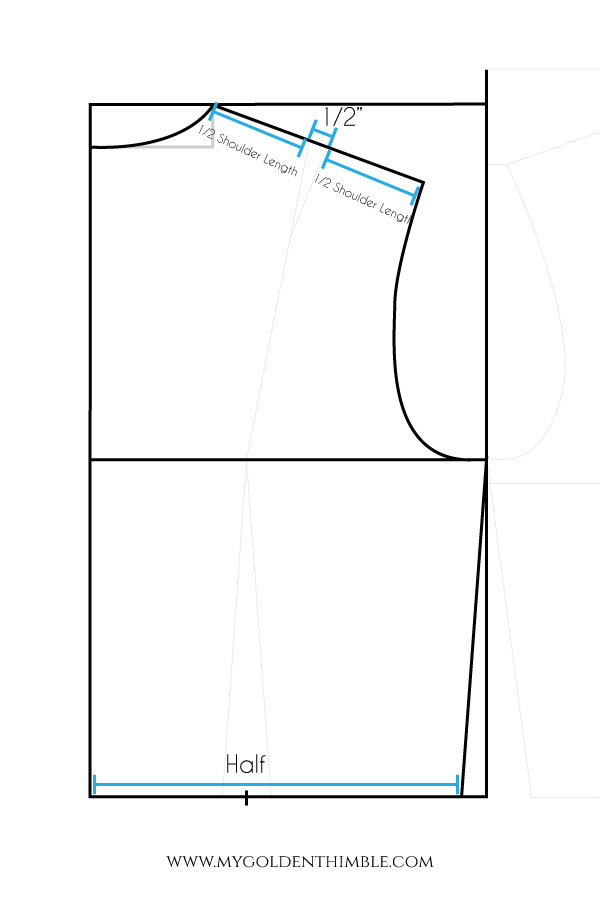
25. Square a straight line up from the half of the waistline mark to the armhole line. Then, connect that point to the left mark on the shoulder line.

26. Measure 2 1/2″ from the left shoulder line mark, down (on the dart line you drew on step 25). Then, connect that point with the right mark on the shoulder line. This is the back shoulder dart.

27. Next, we are going to make the waist dart. To do so, measure 1/2″ on each side of the half of the waistline line you square up in step 25. Connect each one of the marks with the half of the waistline line but on the armhole line.
This is the waist dart.

Compensate or True the Darts
28. Compensate the shoulder darts on front and back bodices as follows:

- Fold the paper over the end of the dart and close the dart to the side (bringing the sides of the dart lines together). Imagine that you are sewing the darts close.
- Use a Tracing Wheel and pass it over the closed darts on the shoulder and waistlines. This will create a dotted mark when you open the darts again. This will be the new dart shape, and you need to cut the pattern with these new dart lines.
- Finally, compare the shoulders and sides with the front and back of the pattern to verify that they match, as they should measure the same with the closed darts.
Add Sewing Pattern Symbols
All patterns should be marked with the pattern-cutting information. This will help us construct the garment. This information should include:

- Pattern piece name (this pattern is called Bodice Sloper or Bodice Pattern)
- Cutting Directions (how many times to cut each pattern piece)
- Fabric grainline Cutting Arrows (learn about the fabric grainline here)
- Notches
- Size of the pattern
The bodice block pattern doesn’t have closures because it is used as a base. That is why the pattern information states to cut each piece on the fold.
You can, of course, cut 2 of the back bodice mirrored, add a center back seam allowance and install a closure (like a zipper). This works great if you are making a muslin to test the pattern.
To understand all of this, you need to know how to learn to sew, at least on a beginner level.
This will help you understand why and how to read the pattern symbols.
The best way to learn it is by practicing.
Copying, Modifying, and Adding Seam Allowance to the Bodice Sloper.

When your pattern is ready, I recommend that you sew a test with muslin so you can see and correct any details without damaging your favorite fabric.
Never cut over your original pattern, as you can use it as a base to make many more patterns. Instead, use tracing paper to make copies.
Once you get the perfect fit of the sloper, draw it into a thicker and more resistant material such as craft paper. You can learn more about Pattern Making Paper to choose the best option for you.
The next step would be to modify your pattern depending on the garment you want and then add seam allowance.
After finishing your basic bodice pattern drafting, leave it as it is.
One way to use this basic pattern would be to make a t-shirt by tracing your pattern pieces without the darts and adding ½” seam allowance except for the neckline and armholes, which should have ¼” or 3/8″.
If you’d like to learn a simple way to make sleeves for your next projects, I recommend you check out our tutorial on how to make a cap sleeve.
Create garments that suit your style in any size with our tutorial grading between sizes and learn how to grade the patterns you already have to fit your measurements.
That’s it!
If you liked this tutorial, save it on Pinterest, and please leave us a comment below and tell us what other tutorials you would like to see. I’ll be reading them and answering your comments ASAP.
Psst…Is this article helpful to you?? Please support us so we can keep making awesome tutorials for you by buying us a cup of coffee here. We will be forever grateful!
Don’t forget to follow us on Social Media!!

How to Draft a Bodice Sloper Pattern
Follow these instructions to draft a bodice block sloper pattern for women. Front and Back.
Materials
- Pattern Making Paper
- Pencil or Pens
- Eraser
Instructions
DRAFTING THE FRONT BODICE PATTERN:
1. Make a 2" margin from the top down and then from the right to the left. (The right margin will be called Center Front). Use your "L" square ruler to draw the margin.
2. Measure ¼ (one-quarter) of the Chest Girth + ½" from the Center Front to the left, and square down using the "L" square ruler.
3. Starting from the horizontal margin, on the Center Front line, measure down the length of the front waist and close the rectangle.
To close the rectangle, use your "L" square ruler and draw a line to the left.
4. Mark the length of the Neck to Bust Point from the horizontal top margin on the Center Front line down and then square that point to the left. This will be the dart height line.
Draft the Neckline
5. From the top right corner to the left, measure 1/6 (one-sixth) of the neckline girth (neck girth/6). Then, starting from the same point and down, measure 1/6 (one-sixth) of the neckline girth + ½" or 1".
Note: *The reason for choosing the extra 1/2" or 1" is to decide how close you want the neckline to be to your neck. For a loser fit, choose 1".*
Square these points and form a rectangle. Then, use your French Curve Ruler to draw the neckline.
Draft the Armhole
6. Starting from the top left corner of the rectangle, measure down 2 ½". This line is the shoulder slope.
From there, square to the right ½".
Note: *On standard shoulders, the shoulder slope is 2 ½". On high shoulders, 2", and on dropped shoulders, 3".*
7. Connect the end of the ½" shoulder slope line we made in step 6 to the top line of the neckline. This is the shoulder line.
8. From the 2 ½" shoulder slope mark that was marked in step 6, measure down the ½ (one-half) of the upper arm girth + ¾". Then, from that mark, square 2 1/4" to the right, and from there, square 2 1/2" up.
9. Draw the armhole with your French curve ruler. Start from the end point of the shoulder line and pass through the square lines you made in step 8. Make sure to leave a 1" straight line on the area of the armhole where the 2 1/2" square line (guides of step 8) ends.
Make the Front Darts
10. On the Dart height line, measure 1/2 of the Bust Point to Bust Point starting from the Center Front line to the left. Then, use your "L" square ruler to square that line down. This line is the center of the waist dart.
11. On the bottom horizontal line (the waistline), starting from the Center Front, measure 1/4 of the waistline girth + 1/4" + 1 1/4".
Then, join the end of that line with the end of the armhole line you drew in step 9 with a straight line. This line is the front side of the bodice.
12. On the shoulder line, mark 1/2 of the shoulder length measurement from each of the ends of the line towards the center.
Then, make the dart by joining the left mark, the center of the waist dart you marked on step 10, and the right mark. This will become the shoulder dart.
13. On the horizontal bottom line (the waistline) from the center of the waist dart line, measure 5/8" on each side.
Then, make a dart by joining the left mark, the center of the waist dart line (on the dart height line), and the right mark. This is the waist dart.
DRAFTING THE BACK BODICE PATTERN:
14. Extend the waistline and armhole line to the left using the "L" square ruler.
15. On the waistline, starting from the sideline to the left, mark 1/4 of the chest girth measurement.
16. From the waistline line up, measure the back waist length and use the "L" square ruler to square up and form a rectangle. The line you just square up is the Center Back.
Draft the Back Neckline
17. Starting from the left top corner, measure 1/6 (one-sixth) of the neck girth measurement to the right. Then, from that point, square down 1" using your "L" square ruler.
Make a rectangle with the help of your "L" square ruler.
18. Use your French Curve ruler to draw the back neckline.
Draft The Back Armholes
19. Join a straight line from the neckline top end to the 2 ½" shoulder slope on the front armhole/shoulder line (step 6). This is the back shoulder line.
Then, on the center back line, measure the half point between the bottom end of the neckline and the armhole extended line.
20. From the previous mark to the right, and using the center back as a reference, measure and square 1/4 (one-fourth) of the back width + 1/4". Then use your "L" square ruler to square down 1" from that point. This is the backwidth line.
21. You are going to make three consecutive marks on the back shoulder line.
On the back shoulder line, starting from the neckline, measure 1/2 (one-half) of the shoulder length, then from that point, measure 1/2", and from that point, measure again the 1/2 (one-half) of the shoulder length.
22. Using your French Curve ruler, connect the end of the back shoulder line (the third mark you made in step 21) with the back width line. Draw a straight line over the 1" line you squared on step 20, and then use your French Curve ruler to complete the back armhole.
23. On the waistline, starting from the Center Back to the right, measure and mark 1/4 (one-quarter) of the waist girth + 1". Then connect that point to the end of the back armhole with a straight line.
This last line is the backside seam/line.
Making the Back Darts
24. Divide the waistline into two halves and make a mark.
25. Square a straight line up from the half of the waistline mark to the armhole line. Then, connect that point to the left mark on the shoulder line.
26. Measure 2 1/2" from the left shoulder line mark, down (on the dart line you drew on step 25). Then, connect that point with the right mark on the shoulder line. This is the back shoulder dart.
27. Next, we are going to make the waist dart. To do so, measure 1/2" on each side of the half of the waistline line you square up in step 25. Connect each one of the marks with the half of the waistline line but on the armhole line.
This is the waist dart.
Notes
Full step-by-step tutorial on www.mygoldenthimble.com
Recommended Products
As an Amazon Associate and member of other affiliate programs, I earn from qualifying purchases.
-

 Tape Measure, iBayam Measuring Tape for Body Weight Loss Fabric Sewing Tailor Cloth Vinyl Measurement Craft Supplies, 60-Inch Soft Double Scale Ruler, 5-Pack, Pastel Pink, Blue, Green, Purple, White
 -
 Vogue Fabrics Fairgate Pattern Making Ruler Kit
 -
 Medical Pattern Paper: 21" x 225' Single Roll of Patternmaking, Drafting, and Tracing Paper by Diagnostics Direct






Thanks for sharing this tutorial and letting us to get good knowledge, and hope to get more in future. BR Nasir.
Hi Nasir! You are most welcome. Thank you so much for visiting the blog!!
Is the printable link no longer on here?
It’s only the instructions dear. 😀
I want to know if all the body measurements are to be taken in inches or cm. e.g. From the top right corner to the left, measure 1/6 (one-sixth) of the neckline girth (neck girth/6). Then, starting from the same point and down, measure 1/6 (one-sixth) of the neckline girth + ½” or 1″.
Am I to divide my measurement in inches by 6?
That’s correct, it is all in inches. Assuming that your neckline girth is 15″ you will have to divide 15/6 which will give you 2.5″
thank you so much, a much easy approach to dratfing a basic bodice
Thank you so much! I am very glad that you have a basic bodice sloper now!
Step 14 says, “Extend the waistline and armhole line to the left using the “L” square ruler.” There is no indication of how long the line extensions should be.
Step 15 states, “On the waistline, starting from the sideline to the left, mark 1/4 of the chest girth measurement.” There is never a direction to draw a sideline on the left and no description of how far it should be from the right sideline. I do not know what to do.
Hi Carol,
Thank you for your questions. Here is the answer:
For step 14, the extension of the line is eye balling it. As it is only for you to have a guide. On the next steps you will find out that you are going to close the rectangle as wide as the indication of the very next step (step 15) asks you to.
Then on step 15, the side line of which I am refering is the side line of the front bodice you drew on the first part of the tutorial. The side line will be the left side line of the rectangle that we drew to draft the front bodice.
Does this makes sense? I am happy to explain further if needed!
Hello, I am stuck on step 7. It doesn’t make sense to me. Can you please clarify? Thank you!
Hi SA!
I am so sorry. The autocorrect made this step make no sense. I just corrected it. What you have to do in this step is form the shoulder line by connecting the end of the 1/2 square line to the point of the neckline. With a straight line. So this is going to be the shoulder, and on the next steps, we are going to mark the shoulder dart to the bust point.
I hope it made sense. Please write me if it didn’t so I can explain further.
Hello !
Many thanks for this super simple and helpful tutorial, however, I am stuck on the “contour arm” directions when making the armhole. Could you please elaborate on how you came up with the length that extends downward toward the bust line and what you mean by “contour arm”.
Many thanks in advance.
Best
ACA