Get ready and get your sewing machine because, with this guide, you will be making your own Tank Top Sewing Pattern in just a few hours.
This guide will give you, from start to finish, all the steps needed to sew a classic tank top sewing pattern from the comfort of your home.
Just get your favorite knit fabric and download our free tank top sewing pattern in Letter, A4, A0, or projector versions.
Keep reading to learn how to do this.
Save this tutorial on Pinterest.

A tank top is a great place to start if you have never made your own clothing with knit fabrics. With this free tank top sewing pattern and tutorial, I will walk you through all the steps you need to sew this tank top, from grabbing your materials to making detailed finishes.
Whether you are an experienced seamstress or a beginner, making a tank top sewing pattern should be on your top patterns to sew.
A tank top is one of my favorite top sewing patterns to make. A summer tank and a good dress pattern are essential in my wardrobe.

This can be one of the most fun and rewarding projects as it is super easy and fast to make. I only need 2 hours from start to finish to complete this project. And I am sure with you it will be the same.
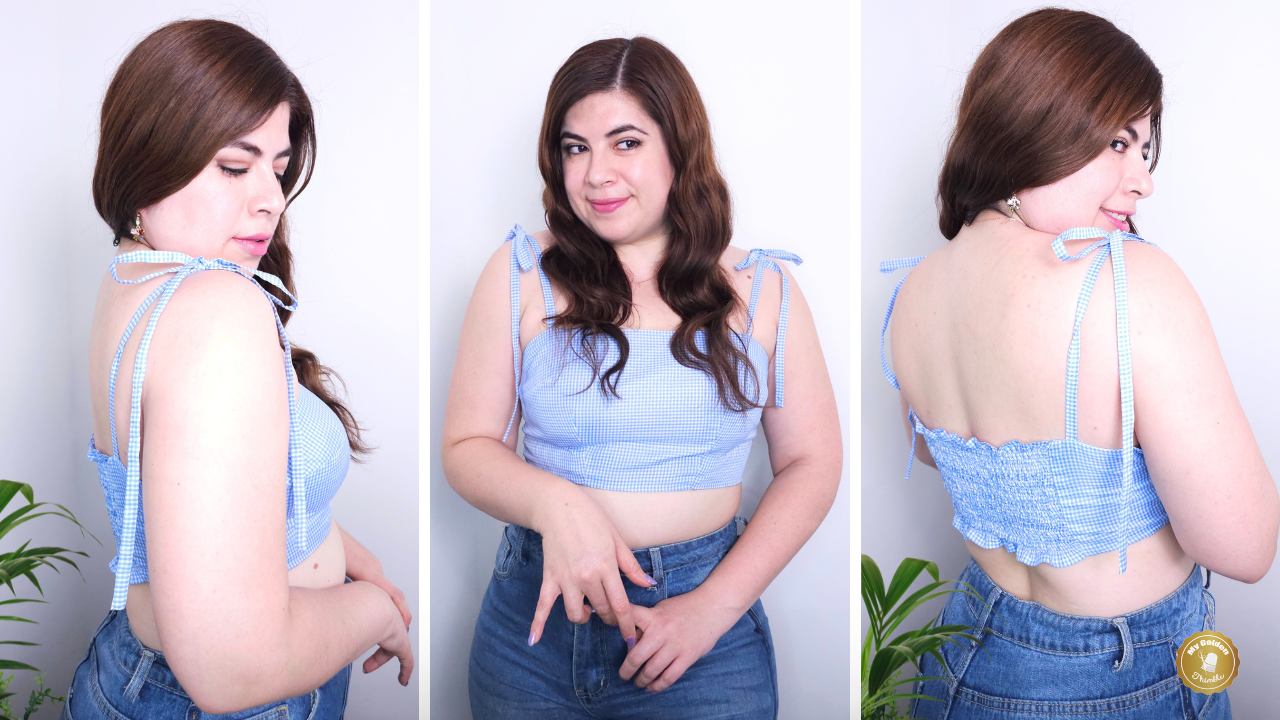
This cute tank top has a comfortable loose fit and back straps that will cover your bra straps without any problem.

By the end of this tutorial, you will have the perfect custom-made tank top for those summer afternoons, going to the gym, or layering with other garments for a casual outing.
Tips and Tricks to Sew a Tank Top.

Get your Supplies Ready.
Before starting any sewing project, it’s important to ensure you have all the proper sewing tools and materials you will need.
For this project, you will need knit fabric with at least 50% stretch crosswise. You can use any type of knit fabric you like. Just make sure it has a stretch of at least 50%. Once you choose your material, you need to pre-wash it properly. Take advantage of this step! It is one of the most critical steps when you start any garment.
Then grab your essential sewing tools, such as fabric scissors, pins, measuring tape, rulers, and thread. To make your tank top more interesting, you can choose different prints of fabrics and even add a small chest pocket in a contrasting color. Once you gather everything, take a little bit of time to lay out all your supplies to have them at hand reach.
Measure Yourself For The Perfect Fit.

Now that you have all your materials, it’s time to measure yourself to ensure your gorgeous new tank top sewing pattern will perfectly fit your body. The measurements you will need for this pattern are chest, waist, and hip girth.
If you still need to write it down in your sewing measurements tracker, then you can take your own measurements with this tutorial.
And before you ask, if you have different sizes out of those three measurements, don’t worry. You can easily grade the pattern between sizes.
Choose the right needle for your project.
If you are using a sewing and serger machine, then you need to make sure you use the proper needle size and type for the fabric you are sewing. For knit fabrics, the ideal needle is a ballpoint needle. As a general rule of thumb, the lighter the fabric you work with, the thinner the needle will be.
Remember the grainline.
Pay attention to the grainline of the fabric when cutting out your pattern pieces. Follow the pattern-cutting directions to ensure your finished tank top hangs correctly and won’t end up looking distorted.
How to Sew the Lottie Tank Top Sewing Pattern. Step-by-step Tutorial.
1. Gather your materials.
For this pattern, you will need the following materials.
- 1 to 1 ½ yards of knit fabric (50% crosswise stretch and above).
- The Lottie Tank Top Sewing Pattern (or grab the free version at the end of this post)
- Your favorite tracing pattern paper
- Fabric scissors
- Matching thread
- Serger Machine
- Sewing Machine
- Measuring gauge (optional)
2. Print and assemble your sewing pattern.
Once you download the Lottie Tank Top Sewing Pattern, you will need to decompress the ZIP folder.
Open the format you have on your printer (we have Letter, A4, A0, and projector files) and print the sewing pattern in real size.
Trimm the edges by the dotted line and place the pages side by side, matching the squares on the corners and the diamonds in the middle of the page.
Once your pattern is assembled, use your favorite pattern paper to trace your size.
3. Cut your fabrics.
Use the pattern symbols to cut your pattern pieces with the correct grainline of your fabric.
You should have one front bodice, one back bodice, one neckband, and two armbands.
4. Sew the shoulders.

Start by making sure the pins are facing away from you, then use a sewing machine or needle and thread to stitch around the edges of your tank top pattern.
Place the front bodice over the back bodice with the wrong sides of the fabrics facing together.
Serge the shoulders and press the seams towards the back bodice.
5. Join the neckband.

Join the two shorter ends of the neckband with the wrong sides of the fabrics facing together. Serge.
Fold the neckband in half lengthwise and divide it into four equal parts.
Open the bodices and divide the neckline into four equal parts.
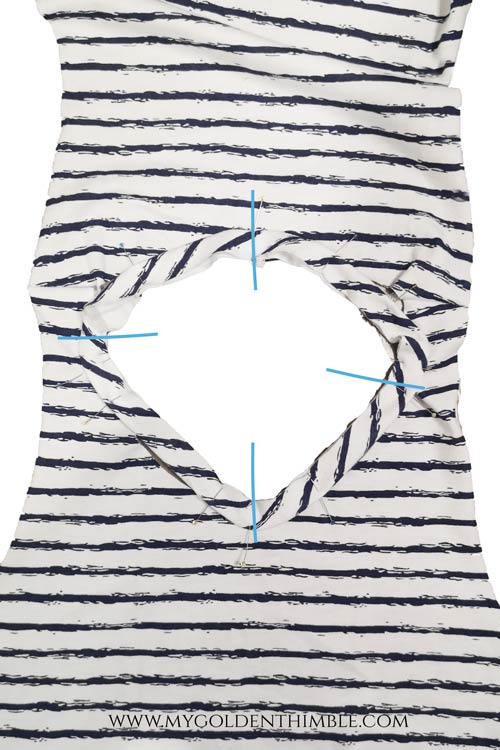
Match the seam of the neckband with the center back of the bodice. Then match the remaining 3 points.

Pin the rest of the neckband and serge. Press the seams towards the bodice.
6. Join the armbands.

Fold the armband strips in half (lengthwise).
Pin the start with the band with the armhole starting at the front or the back. Then pin the center of the band with the shoulder seam and the end of the band at the other end of the armhole.

Serge together.
Press the seams flat towards the bodice.
7. Close the sides.

Align the front and the back bodices together with the wrong side of the fabrics facing together.
Pin along the sides, ensuring you match the armhole bands’ seams.
Serge the sides together.
8. Make the hem.

After you’ve finished the sides, it’s time for the finishing touches. Neaten the edges of your hemline by double-stitching or zigzag stitching around its edges.
Fold the hem ½” twice and press it flat.

In this step, my measuring gauge ruler is an excellent help in neatly pressing the hem’s curves.
Use a stretch stitch to make the hem.
Finally, add any decorative details, such as fabric buttons or appliques, to give your tank top a unique look.
Tank tops with chest pockets are also popular, and you can take advantage of this design element to play with colors and textures.
And that’s it!
If you followed this step-by-step guide, then you should have the perfect tank top sewing pattern all assembled and ready to wear.
We know how fun and enjoyable sewing your own clothes is. But we also understand that some processes can be frustrating. Don’t worry. With enough practice, you will become an expert in sewing your own clothes.
So, if you have any questions about this tutorial, write them to me in the comment box below. That way, I can help you with this project!
Remember to post a picture of your final piece in My Golden Thimble Sewing Club.
Tank Top Free Sewing PDF Pattern Download
Sign up in this form and I will send you the free version of this sewing pattern in Letter and A4 formats for you to enjoy today.
Do you enjoy our freebies?? Support us so we can keep making freebies for you by buying us a cup of coffee here. We will be forever grateful!
Don’t forget to follow us on Social Media!!


I tried several times, but never received the free pattern
Hey Kathy remember to look for it on your promo and spam folders! Also make sure that the registration shows a success message 😉
What are the measurements for the various sizes?
Hi Susie. This pattern comes in 22 sizes from 4XL to 8XL (up to a 58″ chest girth) the exact measurements for each size are in the pattern card of the pattern, which is included in the file 😀
Shouldn’t the directions be right sides together?
You are correct! I am sorry.
Wow! Just looking for a quick sew project and here it is. really like the armhole design. Cool yet covered
Thanks for pattern and great directions. have been sewing for years and always learn something new from your lessons.
Thankyou so much!! I hope you enjoy it!