I’m so excited to share with you a brand new top I designed for my spring wardrobe collection—say hello to the DIY Shirred Back Crop Top for Summer!
This little cutie is super simple to sew, but it packs a punch with the most adorable detail ever: a shirred back panel (yes, the gathered stretchy kind that’s so trendy right now).

NOTE: This post contains affiliate links, which means that if you make a purchase using one of the links in this article, I may earn a commission at no extra cost to you (To know more about this, click here.)
About this pattern
This top was actually a fun remix of a pattern I made just a few weeks ago! I took that original design and gave it a breezy new twist with a cute cropped hem and the comfy shirred back.

And guess what? The original pattern is totally free, and you can find it over at our blog! I’ll drop the link down below so you can grab it if you don’t have it yet.

For this project, we’ll be modifying that free pattern, but you can totally draft your own version too if you’re feeling creative with the resources I have in the original post!
And don’t worry—I’m working on making it. I already posted the base version available in all sizes, so you can download them in a single file. That one is available for purchase for an easier experience.

But even if you don’t want to buy it, I left more resources to make the bodice for this pattern in the original post.
So grab your fabric, thread up that machine, and let’s sew this cute little top together! Here’s what you’ll need:
- 1 yard of cotton gingham fabric (because it’s cute AND classic)
- Elastic thread
- Matching thread
Yup, that’s it! Just a few materials and a bit of sewing magic, and you’ll have a sweet new top for sunny days.

Let’s get started!
Pattern Hack Modifications

Alright, sewing besties, let’s start this top by making that super cute shirred back panel that gives it its comfy fit and trendy vibe!
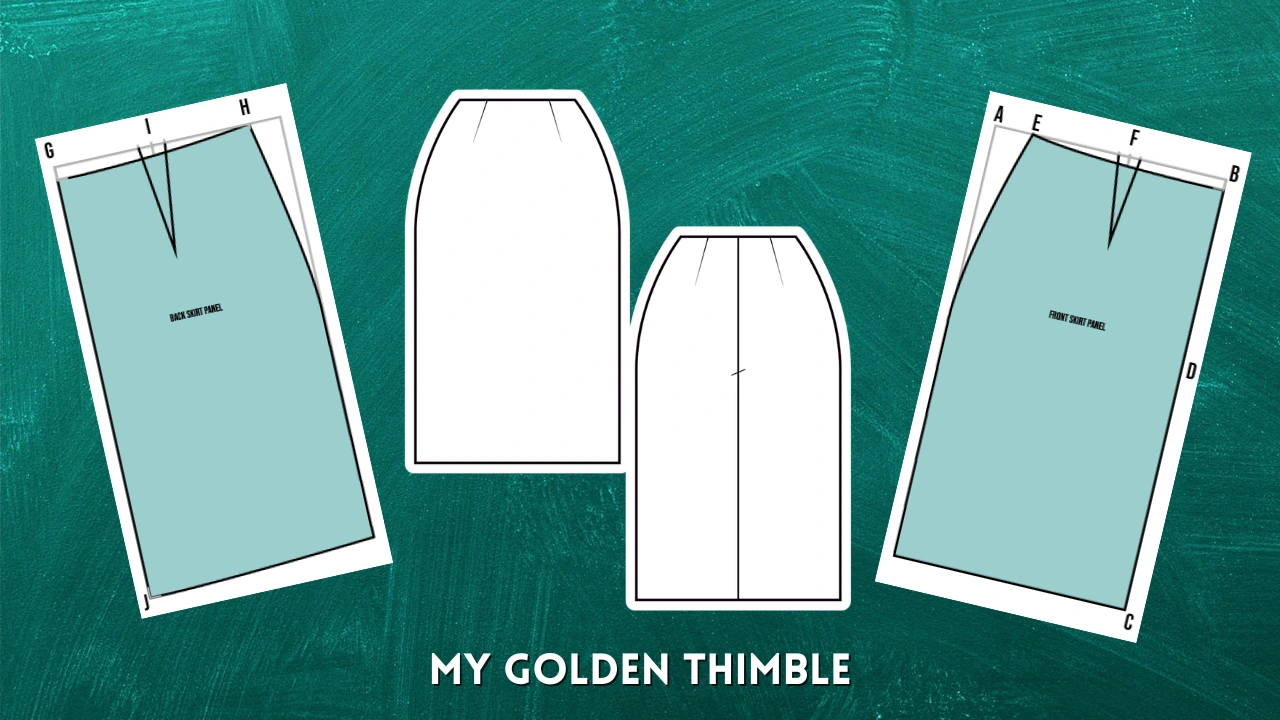
For my size version, I cut a rectangle that measures 16 ½” wide by 7″ tall. This works perfectly for the modified design I’m making, which is sized for a 39″ chest girth.
*Note: this is a bit tricky, but hang with me*
Let me walk you through the entire modification process.
First, I removed 2 inches of the width on the back center pieces. This so I could make a wider panel that could stretch more when I slide it on and off my body.

Just a little heads-up—the width of your shirred panel will need to change depending on your chest measurement.
What you want is for the total circumference of your top without shirring to be your chest girth plus about 3 to 4 inches—just enough wiggle room to slide it on without any fuss.
To do that, measure the hem on the back bodice (A) and the hem on the front bodice (B), then multiply that answer by 2.
We are multiplying it by two because the paper pattern is only half of the complete piece.
Once we have that amount, we are going to see how much measurement we need to complete the total of our chest girth + 4”.

So let’s make an example.
Let’s say I am working with the size for a 32” chest girth. And the hems on that pattern, after taking the 2” from the center back, are:
A= 2.6” (back hem) + B= 7.8” (front hem)
2.6” + 7.8” = 10.4”
10.4” x 2 = 20.8”
Now I will add to my 32” (chest girth) + 4” (ease), which equals = 36” (total chest girth for the top)
So now we subtract:
36” – 20.8” = 15.2”

Our back panel should be 15.2” wide. (Add ½” seam allowances on the shorter ends)
How to Sew the Shirred Back Panel Crop Top Pattern (Video Tutorial)
Now that you’ve done all that math, relax and watch this tutorial in video version!
P.S. If you can’t see the video, please turn off your ad blockers and refresh this page. Or you can also watch it on our YouTube channel.
You can also check out the written instructions here for printing.
Shirred Back Panel Crop Top Pattern (Written Tutorial)

DIY Shirred Back Crop Top
This DIY top features a comfortable elastic shirred back panel, a flattering fit, and adjustable straps—perfect for sunny days and layering. I designed it as part of my spring wardrobe collection, and now I’m sharing all the details so you can make one too!
Materials
Tools
Instructions
Step 1: Prep Your Panel
Let’s start by hemming the top and bottom of your shirred panel. Just fold each of the longer edges over ¼ inch twice, and sew them down to give your piece a clean finish. After that, use a fabric marker or chalk to draw horizontal lines across the panel, spacing them at least ½ inch apart. These lines will be your guide for adding the shirring.
Step 2: Shirr the Fabric
Wind your bobbin with elastic thread by hand and load it into your machine’s bobbin case. Raise the stitch length and tension on your machine to help the fabric gather better. Then simply sew over the lines you just marked, one by one, until your entire panel is shirred and delightfully scrunched up. It’s so satisfying to watch it transform! If you need more help with shirring, I’ve linked a full tutorial in the description.
Step 3: Sew the Darts and Assemble the Base
Now let’s shape the bodice of our top by sewing the darts. I used some pins to hold them in place and then stitched them down with a simple straight stitch. Once your darts are sewn, give them a good press. After that, take your back panels and sew them to the front panel at the side seams, right sides together, to start forming the body of your top.
Step 4: Make the Straps
To make the straps, cut four fabric strips measuring 28 inches long by 1 ½ inches wide. Fold each strip in half lengthwise with right sides together and sew along the edge with a ¼ inch seam allowance. Then use a loop turner (or whatever method you like) to turn the straps right side out. Once they’re done, set them aside for now so we can attach them later.
Step 5: Attach the Shirred Back Panel
Take the shirred panel we made earlier and get ready to attach it to the open back of the top. Start by marking ⅜ inch from the top and bottom edges of the back openings. With right sides together, line up the raw edge of the shirred panel with the back opening of the bodice. I used lots of sewing clips to hold it in place—elastic thread can be a bit bouncy! Then sew it down with a basting stitch to secure it. Repeat this for the other side of the panel as well.
Step 6: Add the Straps
Now it’s time to place the straps! On the front neckline, pin the straps 5 inches in from each side seam. On the back, measure 1 ½ inches in from the center back and pin the straps there. Sew them in place, and then tuck them inside the bodice to keep them out of the way for the next step.
Step 7: Sew the Lining and Neckline
Take your lining piece and place it right sides together with the bodice. Starting at one end, line up the raw edges along the shirred panel and neckline, and slowly pin all the way around. Sew the side seams with a ½ inch seam allowance, then switch to a ⅜ inch seam allowance for the neckline curve, and finally go back to ½ inch when sewing the other shirred panel. Once you’ve sewn all the way around, turn the top right side out and give everything a check to make sure it looks smooth and lovely.
Step 8: Close the Bottom Hem
Turn your top to the wrong side again and match the dart seams and side seams at the bottom edge of the top, right sides together. Pin everything in place and sew along the hem, pulling the fabric gently as you go to accommodate the shirring. Stop sewing about 3 inches before you reach the end so you have an opening to turn the whole top right side out. Before turning, clip the corners to reduce bulk, then flip your top to the right side and give it a nice press.
Step 9: Optional – Add Bra Cups
If you want to add cups for a bit of extra support, now’s the perfect time. Roll your cups and slide them through the open space at the hem. Use your hands to position them in the right place, using the darts as a guide—or try the top on and adjust them exactly where you want. Pin them in place and then use a hidden ladder stitch right along the dart seams on the inside to hold them securely and invisibly.
Step 10: Finish the Top
All that’s left now is to close up the opening at the hem with a neat ladder stitch. Give your top one last press—and ta-da! You’ve just made your very own DIY shirred back summer crop top, and it looks amazing!
Notes
To make the pattern hack download the free sewing pattern here, and then visit the full tutorial here to make the hack.
Recommended Products
As an Amazon Associate and member of other affiliate programs, I earn from qualifying purchases.


Closing Remarks
And that’s a wrap, sewing bestie!
I hope you loved making this shirred back summer crop top as much as I did. It’s one of my favorite pieces from my spring wardrobe, and honestly—it’s just too cute not to wear on repeat.
That stretchy back panel makes it super comfy, and the straps keep everything in place while still looking effortlessly chic. Plus, how fun was it to play with shirring? I know it looks fancy, but once you get the hang of it, it’s kind of addictive!
Don’t forget—if you want to make your own version, you can grab the free base pattern I used from mygoldentimble.com. I’ll leave all the links you need down in the description so you can download it and start sewing right away. And keep an eye out, because I’ll be releasing this modified version in all sizes really soon—yay!
If you make this top, I would love to see it! Tag me over on Instagram @mygoldentimble or use the hashtag #mygoldentimble so we can all admire your amazing work.
Happy sewing and see you in the next tutorial!