Are you ready to make your very own custom half-circle skirt pattern?
With fast fashion becoming increasingly high on our wallets, it’s time to take matters of Sewing Our Clothes more seriously.
What better way to do so that to make a gorgeous custom-made wardrobe with easy sewing patterns?
Not only will you have complete control over the style, length, and fabric of your new half-circle skirt pattern, but you will also be able to take pride in making something with your own two hands.
Plus, you know that fast fashion will never care what we ladies need the most in garments. Yes… I am talking about pockets! Because this skirt will definitely have the deepest pockets you want.
So, go ahead and grab your pattern paper, and your fabrics, fire up that sewing machine, and let’s start with our half circle skirt tutorial.

NOTE: This post contains affiliate links, which means that if you make a purchase using one of the links in this article, I may earn a commission at no extra cost to you (To know more about this, click here.)

I absolutely love circular skirt patterns.
Not only due to their convenience to draft but also because they are one of the easiest garments to construct. Usually, you will find half-circle skirts with elastic waistbands, but personally, I prefer to use a classic waistband with more structure and a zipper as a closure.
And that’s the type of skirt I will be showing you how to make here.
What is a Half Circle Skirt?

A half-circle skirt is one of the five variations that comes from a base pattern of the full-circle skirt sewing pattern, which is a skirt that forms a perfect circle when laid flat. In this case, the half-circle skirt forms a half-circle shape if laid on the floor.
This pattern is made by calculating the waist radius from the waist measurement and the desired length of the skirt.
Making a half-circle skirt pattern is very easy. So easy that it is one of the most popular beginner sewing projects for everyone that is just learning how to sew their own clothes. You only need to make a few strokes and add the seam allowance.
You can customize this pattern in various skirt lengths, from mini to maxi. This skirt creates a full and flowy look whose structure can vary depending on the fabric weights you choose for your skirt.
How Much Fabric Do I Need for a Half-Circle Skirt?
As I said in my full circle skirt sewing tutorial, the amount of fabric you need to sew a circle skirt depends on the size and the skirt length you are making.
To determine the amount of material you need for a half-circle skirt, multiply the waist measurement by two, and this will be the least fabric width you need. Then multiply your desired length by 2.5, which will be the least fabric length you need.

Take into consideration the grainline cutting directions on the pattern. For example, you will need more fabric if the pattern indicates cutting it on the bias.
I always recommend getting more fabric than required for your first time sewing each new pattern in case you need to cut a new piece.
For this below-the-calf length skirt, I used 3.5 yards of a 60″ wide tulle and 4 yards of a 45″ wide lining. I cut each pattern twice in each fabric.
Choosing Your Fabrics.

The fabric selection for your circle skirt patterns is imperative and will determine the shape and structure of your finished garment.
Consider the weight and drape of fabric to achieve your desired look on your DIY Half circle skirt. The drape of the material is how the fabric falls and moves with you. Some fabrics are more fluid, while others are stiffer.
For example, lightweight fabrics such as chiffon or silk create a flowy feminine look, while other fabrics like leather or denim provide structure and volume.
In this picture, you can compare the drape of circular skirts made with leather, satin, chiffon, and jersey.

On the other hand, you also need to consider factors like the season and the fabric care instructions.
When creating a skirt for summertime, it is best to opt for breathable materials such as cotton or linen. However, for wintertime or autumn, wool or corduroy fabrics may be more suitable. If crafting a skirt for a special occasion (as I did for my friend’s bridal shower), consider using a satin, chiffon, tulle, or silk fabric.
For those seeking to save both time and money, consider purchasing fabrics online from trusted stores such as fabric.com or Amazon. These platforms offer an extensive array of options for sewing projects, providing near-limitless possibilities.
How to Draft a Half-circle Pattern.
To make a Half-Circle Skirt pattern, you will need two body measurements: the waist circumference and the skirt length from the waist down. Use this guide to take your body measurements by yourself. I recommend using a new measuring tape to do this.
Then follow these Half Circle Skirt Pattern free drafting instructions.
The Half Circle Skirt Formula is the measurement of the (Waist Girth/6.28)(2) – ¼.”
To make your own pattern, use this waist radius measurement to draw a half circle to form the waist of your pattern. Then Mark the length of the skirt from the half-circle line out. This will help you create the hemline, which is another half-circle.
The half circle will determine the Hem radius you’ll draft with the help of the skirt length measurement.
Follow these instructions to draft a half-circle skirt from the beginning. You will also find the other four circle skirt free sewing pattern instructions here.
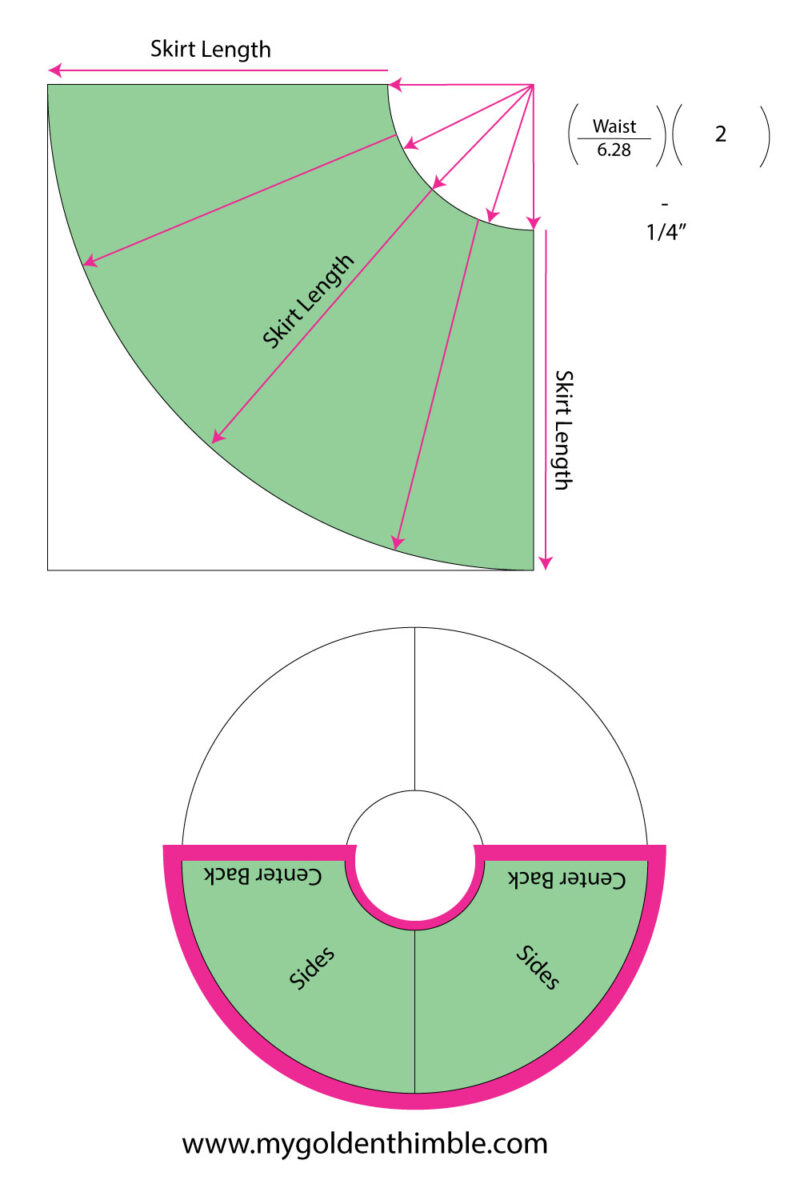
The Half Circle skirt uses only half a circle with a full waist measurement.
You can draft it by drawing half of the circle from the top edge to the opposite top edge of the paper. These top edges/lines will be the back (or side) seam. It’s better and easier if you only make one seam for this skirt. But you can also cut the pattern in half again and have two side seams instead.
In this case, I want to add pockets to my skirt because… Who doesn’t wants pockets? That means I must divide this pattern into two side seams (where the pockets will be) and one back seam (for closure).
I will add inseam side pockets to make it as easy as possible. That way, I won’t have to alter the basic pattern all that much.
How to Draft a Half-Circle Skirt With Side Pockets.
After I made the basic half-circle skirt pattern, I made the following modifications:

- Fold the pattern in half. Mark one of these halves as the front of the skirt and add the following cutting directions: Half-Circle Front Skirt, Cut one time on the bias, and finally, add your waist measurement to remember which size it is. This is the pink part of the pattern illustration below.
- Fold in half the remaining half of the original pattern to draft the back of the skirt. Add the following cutting directions: Half-Circle Skirt Back, Cut two times, and finally, add your waist measurement to remember which size it is. This is the purple part of the pattern illustration below.
- Add the seam allowances on the waist, sides, and back seams. I added a 1/2″ seam allowance for everything.
Half Circle Skirt Pattern Sewing Tutorial
1. Cut your fabrics.
To cut your fabric pieces, follow the pattern-cutting indications. The indications will be the ones I instructed you to write in the drafting instructions above.
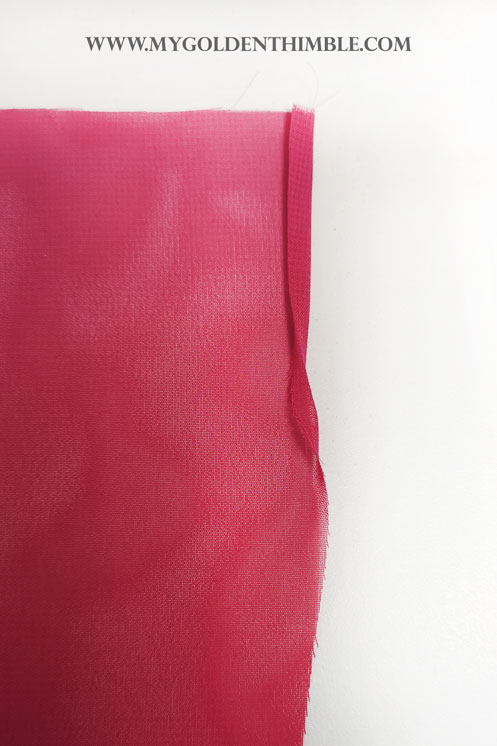
This pattern will be cut on the fabric’s bias (learn more about fabric grainline here). I want the bias on the center front of the skirt as I want the side’s seamlines to have less stretch as possible.
In other blog posts, I have mentioned the importance of cutting fabrics by following the grainline directions. Cutting fabric on the bias has many benefits, including a better fit and drape of the garment.
When you cut fabric on the bias, this fabric will tend to grow and stretch as it hangs. That is why I want to have my side seams on the grainline. That way, they won’t grow or stretch as I sew them, and later, I can use them as a reference to even out the hemline.
So, this is how you will position your patterns on the fabric to cut the pattern pieces.

Cut one time for the main fabric and one time for the lining.
In my case, I cut one layer of tulle and one layer of main fabric and treated these as the outer fabrics.
2. Gather the waistlines
Sew two parallel lines at the waistline ⅛” apart from each other with 0-1 thread tension and 5 mm stitch length.
Pull on the threads to gather the waistline until you end up with half of the total waistline measurement + seam allowances.
For example. My waist measurement is 30”, and the seam allowance I used was ½” on each side.
30”/2 = 15”
15” + ½” + ½” = 16”
So for the front, I need to gather the waistline until it measures 16”.
The back pattern is divided into two parts because we will have a zipper in the center back. Each one of these parts represents one-quarter of the skirt pattern.
In this case, you will divide the waist measurement by four and add the seam allowances. I used ½” on the side and ½” on the center back.
30”/4 = 7 ½”
7 ½” + ½” + ½” = 8 ½”
So, for the back pieces, I need to gather the waistline until it measures 8 ½”.

3. Sew the Pockets.
I rarely make a paper pattern when I add inseam pockets to skirts like this.
What I do is place my phone tilted down on one side of the fabric edge, and from there, I hand-draw a pocket shape around the phone.
Then I cut that shape four times—two for each pocket.

To sew the pockets, I stitched one layer to the sides and sewed them at ½” from the waist down. But as you can appreciate in this picture, I didn’t sew it all the way down as I stopped ½” before the pocket ended.
I repeated the same process for the back pockets sewing them on the sides seams of the back skirt panels at ½”.
After doing that, it is time to join the pockets.

Place the back panels of the skirt over the front panel by aligning the waistline and the pockets. Leave the right sides of the fabrics facing together. Finally, pin the pockets with the right sides of the fabrics facing together.
Sew the pocket’s at ½”, and if you like, finish the raw edges of the fabrics with a serger seam.

Make a small cut on the side seam allowance of the skirt (not the pockets).
Press the pockets and the pocket’s seam allowances to the front side of the skirt.
4. Sew the Side Seams.

Sew the side seams of the skirt from the cut you made in the last step to the hem.
Use a ½” seam. Then press the seams open.
In my case, I had two layers of tulle and one layer of the main fabric. I sew each one individually.
If you have one outer layer fabric, this will be easier as you will only have to sew once per side.
5. Make the waistband.

To make the waistband draw a rectangle on the fabric that measures your waist circumference by 1 ½”. Add ½” of seam allowance on every side of the rectangle.
Cut this rectangle once on your main fabric and once on your lining fabric.
Then place both waistbands with the right sides of the fabrics facing together and sew the long top edge at ½”.
Fold the waistband with the wrong sides of the fabrics facing together and press the seamline. You can now add a topstitch to the lining side if you want.
6. Attach the waistband to the skirt.

The most popular choice for a circular skirt pattern is to use an elastic waistband. But I find the zipper closures to be more elegant, as we end up with a clean and neat waistband without gathers.
Ok, now we will be working with the main fabric side of the waistband, which means the side of the waistband that will be on the outside of the skirt.
Place this side over the skirt’s waistline with the right sides of the fabrics facing together. Sew them at ½”.
Then press the seams towards the waistband. You should end up with something like this.
*Note: I will be adding a half-circle skirt with an elastic waistband in another tutorial. Let me know if you are interested in that in the comment section below.*
7. Sew the invisible zipper.

I like to sew the invisible zipper and the back seam before I attach the lining.
To do so, place your zipper on the center back of the skirt. If the zipper is laid on the table facing up, the left side of it will go on the left center back, and vice versa.
Place the left side of the zipper over the left back center with the right sides facing together. Use a zipper foot to attach the zipper.
Now, repeat the process for the right side of the center back.
Make sure that the invisible zipper is sewn correctly.
Then sew the back seam by placing both center back sides together (right sides of the fabrics facing together) and sew it from the end of the zipper seam towards the hem of the skirt.
I sewed the seams of each layer of the main skirt separately by making a notch cut on the center back seam allowances just below the zipper seam end. I made the notch like the one on the side seam allowances above.

That way, I could achieve the desired effect. If this is too advanced for you, sew all the layers as if they were a single layer.
8. Attach the lining.

Sew the lining skirt first. Place the back panels over the front panel matching the sides and the waistline with the right sides of the fabrics facing together.
Sew the sides from the waistline to the hemline at ½”. Press the seams open.
Gather the lining waistline the same way you gathered the waistline on the main fabric.
Then, attach the lining skirt by matching it with the WAISTLINE with the bottom of the lining WAISTBAND with the right sides of the fabrics facing together.
Sew the waistline at ½”. Press the seams towards the waistband.
In this picture, the lining is on the lower part of the image. You should end up with something like this.
9. Close the skirt.

In this step, we will close the lining so the skirt is fully lined.
To do so, fold the lining towards the main skirt making the right sides of the fabric face together.
Align the back centers covering the zipper with the lining center back. Pin and sew the lining with the other layers at ½” until the zipper ends.
Then, sew the back center seam by aligning the edges with the right sides of the fabrics facing together.
Then, sew from the end of the last seam to the hemline at ½”. Press the seams open. This will be the center back seam.
10. Make the hem.
To finish your skirt, you need to make the hem. You can choose many different options to finish the edges of the hemline.
For example, you can make a rolled hem with your serger. Or you can fold the hemline twice to make a simple hem.
I chose to make a rolled hem on the lining and the main fabric layers, and I left the tulle fabric part with exposed raw edges.
This created a visual effect in which the tulle layers of the skirt seem longer, which creates an ethereal effect.
And that is it! You have a gorgeous half-circle skirt ready to wear.

As I was writing this, I realized that the process seemed easier in my head than in writing, so if you have any questions about how I sew this skirt, write them in the comment section below or on our Facebook Sewing Club.
You can also write down in the comments if you want me to do a video tutorial about this skirt. That might be helpful for you so you can replicate this design.
I really hope you enjoyed this tutorial as much as I did making it for you. Let me know what else you would like for me to write about.
And as always. Happy Sewing!


This is a really well thought out process. Just wondered when cutting the skirt with pockets, the back centre seam s would be on the bias?
Hi Kimberly! I do not like to have the center back seam on the bias, because that’s where the zipper is. If we were to cut it to the bias that area will stretch as we sew it, which will totally ruin our zipper area.