Today, we’re making a set of adorable Christmas Coasters DIY featuring charming little trees created with the crumb quilting technique.
This is one of those easy Christmas coaster DIY projects that ticks all the boxes: it’s simple, beginner-friendly, and an excellent way to use up those fabric scraps you’ve been saving. These adorable homemade coasters make for a thoughtful holiday gift, or you can keep them to add a cozy touch to your own decor!
The best part? I’m including a free coaster sewing pattern to help you bring these cuties to life. So, get those scraps ready and dive into some festive DIY coaster ideas!

NOTE: This post contains affiliate links, which means that if you make a purchase using one of the links in this article, I may earn a commission at no extra cost to you (To know more about this, click here.)
My Inspiration
You know me: I’m absolutely obsessed with fabric scraps projects! I know I say it every time, but every time is true. And if you know me, you know I’ve been head-over-heels for the crumb quilting technique for a few years now—it’s the perfect way to use tiny scraps in a one-of-a-kind design.

When I started planning this project, I knew I wanted to use my green scraps to create cute little Christmas trees. So, I did what any self-respecting sewing fanatic would do: I dove into my hidden fabric storage (you know, the one we all pretend isn’t overflowing) and pulled out every green scrap I could find. After playing around with the colors and textures, I landed on a combination that felt just right.
As I pieced everything together, I couldn’t stop thinking about how perfect these simple Christmas coasters DIY gifts would be.
Plus, every tree is unique—just like the people you’re gifting them to!
How to Customize Your Coasters

The best part of this project is how customizable it is! You can mix and match fabrics, add embroidery for a personal touch, or even quilt them for extra texture. They’re a fantastic way to use up those beautiful holiday prints you’ve been saving.
Christmas Coasters DIY | Step-by-Step Tutorial

In the full tutorial, I’ll walk you through each step, from cutting the fabric to sewing the layers together. I’ll also share some tips for making your coasters perfectly square and looking polished.
Let’s make this holiday season extra merry with these festive Christmas fabric coasters. Grab your supplies, and let’s get started!
What You’ll Need
- Christmas Coasters Free Pattern by My Golden Thimble (Download at the end of this post)
- Christmas-themed fabric scraps
- Heavyweight muslin
- A sewing machine (or you can hand-stitch if you prefer!)
- Basic sewing tools (scissors, thread, etc.)
- Optional: batting for extra cushion
Step 1: Create Your Crumb Quilted Canvas

To start, we’ll make the crumb quilted canvas for our Christmas tree design. If you’re new to this technique, don’t worry—I’ve got you covered!
I have a detailed crumb quilting tutorial that walks you through every step of crumb quilting, so be sure to check it out here. It’s such a fun way to use up your tiniest fabric scraps and create a completely unique fabric canvas for your projects.

Once your crumb-quilted masterpiece is ready, it’s time to make it more stable. Cut a piece of lightweight fusible interfacing to match the size of your canvas. Then, fuse it to the back, following the instructions on your interfacing. I recommend using the low heat setting on your sewing machine. This will give your canvas the structure it needs for clean, polished coasters that can handle all the holiday cheer (and hot cocoa mugs)!
Step 2: Cut Your Fabrics
Each coaster needs two circles—one for the front and one for the back. Start by cutting these from your main body pattern. I used heavyweight muslin.

Next, it’s time to add the tree shape to the front circle. Using the same main body pattern, trace the tree shape onto the center of your circle. To make sure the tree stays perfectly aligned, place pins at each vertex of the tree outline.
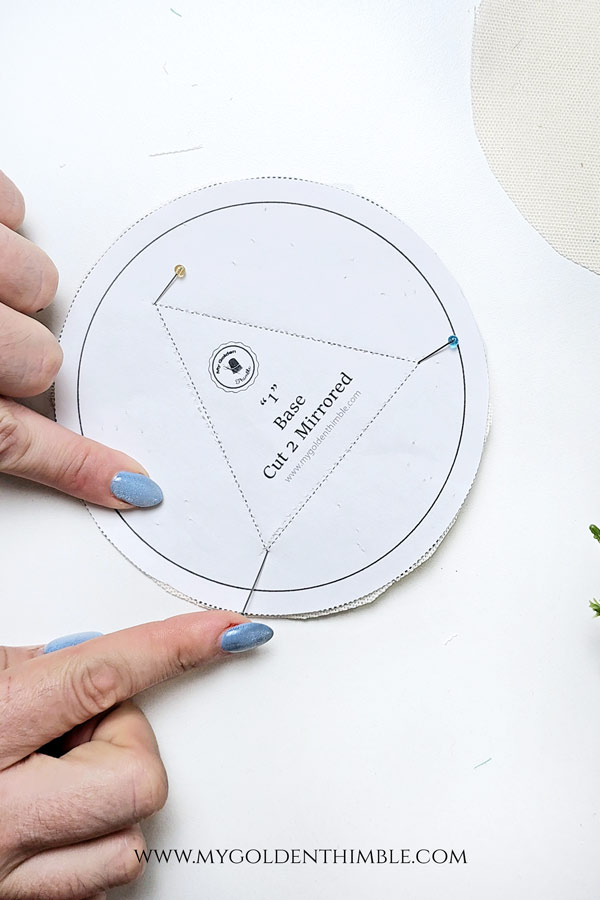
Then, grab a ruler and draw the triangle shape exactly where it’s marked on the pattern.

Cut a piece of muslin fabric large enough to cover the triangle with at least 1/2 inch seam allowance all around. Pin this muslin piece to the back of your circle, making sure it covers the entire triangle outline.

Sew along the triangle lines, then carefully cut a slit in the center of both fabric layers, leaving about 1/4 inch seam allowance around the edges.
Don’t forget to clip the corners of the triangle—this will help the fabric turn neatly in the next step!

Now, gently push the smaller muslin piece through the slit so it flips to the opposite side, hiding the seam allowance between the two layers.

Press everything nice and flat, and you’ll have a clean, crisp triangle tree shape right in the center of your circle.
Step 3: Attach the Crumb Quilted Tree

Now that your tree shape is all crisp and turned out, it’s time to place the crumb quilted pattern piece under the tree hole. Carefully line it up so that the tree shape is centered perfectly on the quilted fabric.
To secure it, use a running hand stitch about 1/8 inch from the edge of the tree. This stitch brings such a charming, handmade vibe that I absolutely love!

If you’re short on time or want a sleeker look, feel free to use your sewing machine. But honestly, there’s something so cozy and special about hand stitching that just makes everything feel like it’s made with love.
Step 4: Assemble and Close the Coasters
Now it’s time to sew the back part of the coaster! To make turning your pattern smooth, I like to use a basting stitch that’s about 2 1/2 inches long on one part of both circles. This will be the section we leave open, and trust me, it makes closing the final coaster seams so much easier. It’s a little trick I use when sewing circles to help everything line up neatly.

Once the basting stitch is in place, sew around the entire circle at 1/4 inch seam allowance, leaving the basting section open. After you’ve sewn the circle, it’s time to make some clippings around the seam allowance to help the fabric turn more smoothly.

Now, flip the coaster to the right side through the open section. Gently push the edges out so the coaster looks nice and neat.

Finally, close the open seam with a ladder stitch, carefully stitching the edges together for a clean, polished finish.
Christmas Coasters DIY–Final Thoughts And Pattern Download
And that’s it—your adorable Christmas Coasters DIY are all finished! I had so much fun sharing this project with you, and I hope you enjoyed it as much as I did. There’s something so special about creating little handmade pieces that bring extra cheer to the holidays, don’t you think?

I absolutely love how each coaster comes out with a unique pattern, especially with the crumb quilting technique—it’s like every tree has its own personality! If you make a set, be sure to send me a picture or tag me on social media—I’d love to see how they turn out.
Merry Christmas, friend! I hope your holiday season is filled with warmth, joy, and lots of cute handmade projects like this one!
FREE Pattern Download
Hey there! Want this amazing free download? Just pop your name and email into the form below, and we’ll send it your way. Oh, and remember to check your promo or spam folders in case the email takes a detour there by mistake. If it does, just nudge it into your main inbox so you don’t miss any more freebies from us!
Don’t see the form? Disable your ad blocker and refresh the page!