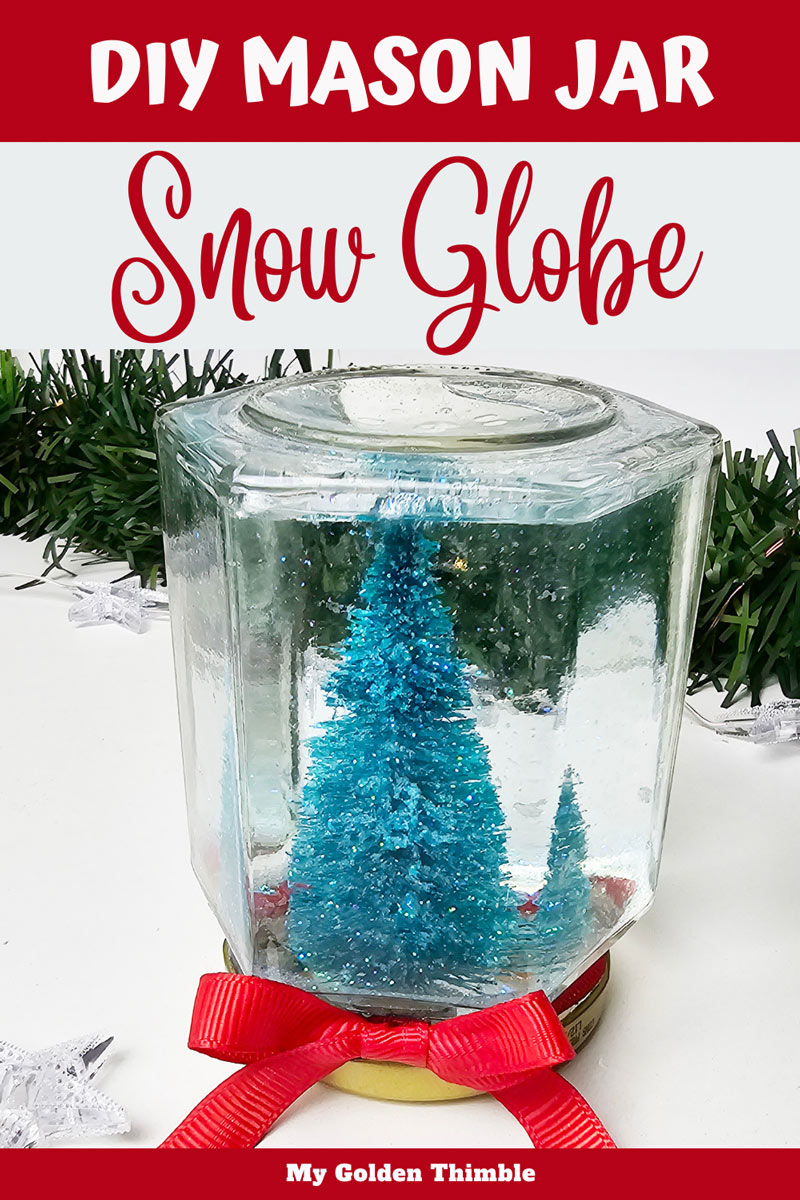
In this tutorial, I will teach you how to make a DIY Mason Jar Snow Globe that’s perfect for your shelves, a cozy mantel, or even as a festive centerpiece for your dining table.
Create the most adorable Christmas decoration with just a few materials in just a few steps!
And here’s the best part: if you follow my step-by-step guide, your handmade snow globe will last for years, so you can use it to add a touch of magic to your holiday season time and time again.
NOTE: This post contains affiliate links, which means that if you make a purchase using one of the links in this article, I may earn a commission at no extra cost to you (To know more about this, click here.)
Confessions of a Jar Hoarder
I’ll be honest: I have two crafting weaknesses. One is cardboard boxes (don’t even ask how many I have stacked in my closet). The other? Mason jars.
Now, I’m not talking about mason jars I buy for crafting (oh no, that would be too practical). My addiction stems from my love for a Mexican salsa called Salsa Macha. I go through at least one jar a week, and those jars are way too cute to toss. So, naturally, I clean them, remove the labels, and—voilà!—my ever-growing collection of mason jars is born.

Yeah… I might have a problem.
I do realize that many of my crafting projects begin with me hoarding random supplies. But hey, it all works out because it leads to tutorials like this one! Don’t you think??So grab a jar (or three if you’re as obsessed as I am), and let’s make something magical!
Tips and Tricks for Perfect Snow Globes

Before we dive into crafting, let me share a few hard-earned lessons from my first attempts at this project.
- Clean and dry everything: Glue won’t stick properly to damp surfaces, and decorations might fall off.
- Wash your trees: Many mini trees come coated in washable green paint that can stain the water. Give them a good scrub with soap and water.
- Glitter moderation: I know, glitter is the best. But too much will block the view of your lovely tree. Start small!
- Avoid bubbles: Fill the jar as much as possible to reduce air bubbles.
Seal the lid: Hot glue around the lid ensures no leaking and makes your snow globe spill-proof.
Let’s Make It! Step-by-step DIY Mason Jar Snow Globe

Materials You’ll Need
- Mini plastic Christmas trees (I got these ones from Amazon)
- White or iridescent glitter
- Mason jars
- Glue gun
- Liquid glycerin or transparent craft glue
- Clear spray coating
Prep Your Trees
I learned a valuable lesson on my first try! I ended up having to remove the glue and start fresh. It was a bit of a challenge, but I noticed that the paint stained the water and turned it into a shade of blue. It was quite the experience!
Start by washing your mini Christmas trees with soap and water to remove loose paint. Trust me, skipping this step could turn your snow globe into a murky mess (I learned this the hard way!).
Let the trees dry completely—at least half a day in the sun is ideal. Once dry, spray them with a clear coating to protect them.
Secure the Tree

Before gluing, check the tree’s metal stem. I decided to cover the tree’s center metal part with glue to avoid rust (if possible). If it’s exposed, cover it with a layer of glue to prevent rust.

Then, use your hot glue gun to attach the tree securely to the inside of the mason jar lid.

Give it a little wiggle test to make sure it’s not going anywhere.
Add the Sparkly Snow

When you’re adding glitter to your mason jar, try measuring out just ¼ to ½ teaspoon and gently spoon it in. I know it can be tempting to dump in more, but a little goes a long way!

Keeping the amount of glitter smaller will let the beauty of your miniature tree shine through and really stand out against the lovely sparkle of the glitter. Trust me, adding more glitter will only prevent you from seeing your figurines. It’s worth taking your time with this step!
Fill It Up
Start by grabbing a clean jar and adding a teaspoon of liquid glycerin—it’s the secret ingredient that will make your glitter float more slowly and look extra magical!
If you don’t have glycerin, no worries at all—you can totally use liquid, transparent craft glue as a backup. And if your craft stash is running low on both, don’t panic! You can still make your snow globe shine using just regular water and super fine glitter.

Here’s the catch, though: if you’re tempted to use that chunky, sparkly glitter (I get it, it’s so pretty!), it might be a bit of a diva and sink right to the bottom without glycerin or glue to slow it down. But fine glitter? Oh, it’s the star of the show—it swirls and sparkles like a dream in plain water.
Once you’ve mixed that in, fill the jar up almost to the top with water. Just remember to leave a little space at the top so you can fit in your cute little tree. This way, everything will look perfect together without any spills!
Assemble Your Globe

Carefully screw the lid onto the jar, making sure your little tree is snug and happy inside its new snowy home. Once it’s secure, give the jar a gentle shake to check for leaks (trust me, it’s better to catch them now than after glitter is everywhere). Then, grab your trusty hot glue gun and seal that lid like your life depends on it.

Not only will this keep the water safely inside (yay for no spills!), but it’s also a great way to stop curious little hands—or nosy pets—from popping it open. Because, let’s be honest, nothing says “holiday chaos” like a dog chasing glittery water across your floor!
Finishing Touches
If the hot glue around your lid is looking a little less-than-perfect (we’ve all been there), don’t stress—just grab a festive ribbon and wrap it around the lid to hide the evidence. Tie it into the cutest little bow, and voilà! Now your snow globe looks like it came straight out of a fancy boutique instead of your kitchen table.

Plus, the ribbon adds such a cheerful holiday vibe that no one will ever guess it’s secretly doing double-duty as a glue cover-up. Sneaky and stylish—who doesn’t love that?
DIY Mason Jar Snow Globe Final Thoughts
Not only are these snow globes super budget-friendly (yay for saving money during the holidays!), but they’re also a fabulous way to give those old mason jars a second life. Who knew salsa jars could turn into such festive little masterpieces? And here’s a pro tip: add a cute personalized tag with a holiday greeting, and you’ve got the perfect Christmas gift. Your friends and family will think you’re a holiday crafting wizard!

And the best part? These little snow globes are built to last. With the clear coating and careful sealing, they’ll stay magical year after year—becoming a sweet tradition you’ll love unboxing every holiday season.
If you try this project, I’d be thrilled to hear what you think! Leave me a comment below to share your thoughts or any fun twists you added.
And don’t forget to tag me in your snow globe pictures on social media—I absolutely adore seeing your crafty creations! Let’s spread that holiday sparkle together!


It’s a great idea as I’m not a snow globe person . I would love to do lighted trees and snow or a guilted pattern on the lid . ❤️
That sounds super lovely too! And a great way to use those jars.