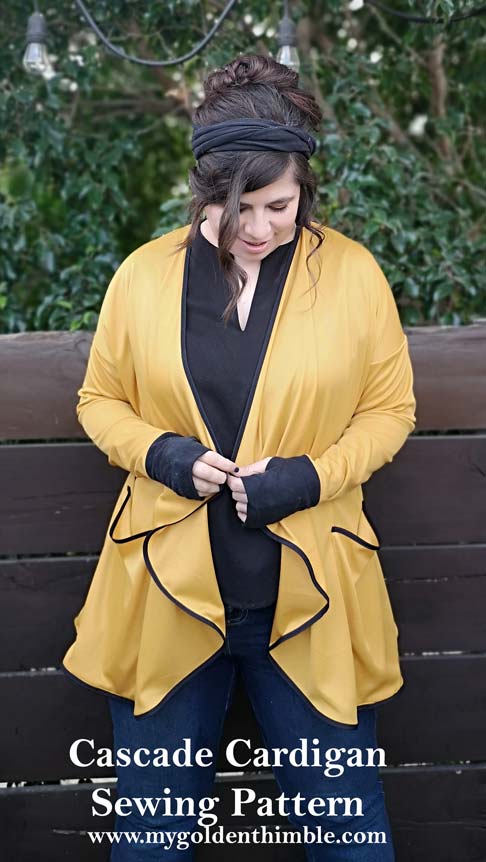
Your hands will now be always cozy and warm once you learn how to add them with our Thumbhole Cuffs Free Sewing Pattern.
I decided to give you a little taste of how our new Cascade Cardigan with thumbhole cuffs feels like by teaching you how to add it to your sleeves.
You can use this pattern on any sleeves of any pattern you have. It can be for a long sleeve t-shirt, a sweater pattern, or a cardigan as in our Cascade Cardi here.

NOTE: This post contains affiliate links, which means that if you make a purchase using one of the links in this article, I may earn a commission at no extra cost to you (To know more about this, click here.)
When I did my research to write this post, I found out a lot of videos that teach you how to make this kind of cuff for your garments.
But I am all about sewing hacks to make things easier.
So, my method here, although it might seem confusing at first, is actually easier to sew and handle than the others out there.
I have never used or made thumbhole cuffs before, and I have to say that I am sure that you are going to love this free sewing pattern as much as I do.
In fact, if you don’t feel like making a new top to attach these cuffs to you can make only the cuffs and use them under your sweaters or cardigans!!
A whole new interchangeable accessory at the tip of your hands. (Pun intended)
So let’s get to it.
Along with the written instructions I have also made a video tutorial to show you live how to put this pattern together.
Also there is the link to download the free sewing pattern.
Thumbholes Cuffs Video Tutorial
Now if you need to check this live here is the video tutorial for you.
I hope this helps in making it a little less confusing.
I strongly recommend though you at least scroll down to the step-by-step picture instructions before.
This will give you a better understanding of what is going on.
Thumbhole Cuffs Free Sewing Pattern and Tutorial.
Step 1. Download your free sewing pattern.
To get your copy of the thumbhole cuffs free sewing pattern click here and sign up to get it right in your inbox.
You can print it at home easily. Just make sure you print real size.
Step 2. Measure and alter
If you are going to attach this cuff to a current wrist sleeve, do this.
First measure the circumference of the closed sleeve wrist.
Then go to your thumbhole cuff pattern and match that measurement + ½” on the pattern width.
Cut the excess of the paper pattern.

Step 3. Cut and mark the notches.
Use a pattern notcher to cut off each one of the notches on your paper pattern.
This way you will be able to mark these very important reference points on the fabric.
Step 4. Cut your fabric.
Place your pattern over 2 layers of mirrored fabric.
Mark each one of the notches either with a sewing marking tool or by making a small snip to it.
If you are using a marking tool make sure the notches are on the same level on both layers of the fabric.
Step 5. Sew close.
Fold each cuff in half long sides together and match the notches on both sides.
Sew with a narrow zig-zag stitch or a stretch stitch at 1/4” the following sections.
Press the seams open.

Step 6. Form the thumbhole
Match points “A” and “B” of the seam allowances together with the right side of the fabric facing together.

Then sew only from notch to notch (or from “A to B).

Repeat with seam allowances “C” and” D”.
It’s important to make sure that you won’t grab fabric from the cuff by accident.
You have to sew only the seam allowance.

Step 7. Turn and secure.
Turn inside out.

You can make a back tack on each end of the opening to secure it.
But that is optional.

The next and final step is matching the seams of the cuff and the sleeve together. Pin around the hem of the sleeve as illustrated in the picture below.
Hand baste the cuff for better finishing and serge around the cuff.
If you don’t have a Serger use a zigzag stitch.
Press seams towards the sleeve.

And you are done!!
Please let me know if you liked this freebie in the comment box below.
And if you can tag me on your projects!! That is all you can do to make me happy!
Don’t forget to follow us on Social Media!!


Do these need to be made with stretch fabric, if I’m not attaching to a sleeve? I have some pile-lined suede and I’d like to use it to make something like this for my daughters and granddaughters. Thanks!
Hi Linda!
Yes, you need to use knit fabric for this pattern because it has negative ease. It won’t work with suede :S
I’m super excited to add these to ballet shrugs I’m making for my girls! Backstage is chilly!
Quick question – the vertical arrows on the pattern, are they grain line direction or stretch direction? Thank you for the pattern!
I can’t wait to see them! They arrows are the grainline direction!
Nice tutorial. Would like to have the free pattern to test it out, but I have requested it several times and not yet received it.
Hello Barbara,
Did you signed up in the link? Check out your promo or spam folders 😉 gmail is having issues right now to get our freebies.