
One of the most important things to learn when sewing is knowing how to wind a bobbin the right way.
When learning how to use your sewing machine for the first time ever, winding a bobbin might be an underrated skill.
But the fact is that a wrongly threaded bobbin may be the reason for a lot of your sewing problems! And with everything that can go wrong with your sewing machine, the last place you might be looking will be the bobbin.
That is why I am going to teach you everything you need to know about threading a bobbin in this post.

NOTE: This post contains affiliate links, which means that if you make a purchase using one of the links in this article, I may earn a commission at no extra cost to you (To know more about this, click here.)
I am so glad that I finally decided to write this post.
Along with my sewing life, I have had many issues related to bobbins that I’ve been learning how to fix.
By losing a lot of time in the process, that is.
And I realized how important it was for every sewist to learn how to wind a bobbin correctly from the very first time.
If you learned how to sew on your own, meaning that you didn’t go to a professional school, it is more likely that you don’t know a lot of the information we will talk about here.
That’s ok!
You are here now, and you will learn all about it so you can tackle all your bobbin’s issues in the future.
And to avoid them altogether.
Who is this post for?
This doesn’t mean, that if you are a pro sewist, this post won’t be of any use to you.
The more we learn, the easier it gets for us to remember the basics. Such as the importance of using our pressing tools or the best pattern paper for us.
Believe me; you don’t want to start creating bad habits. Otherwise, you will be making some of the top sewing mistakes a seamstress can make.
So let’s get started!
Types of bobbins.

The most common types of bobbins you will find are the L-style, the class 15, and the M-style.
You can find most of these styles in different materials such as metal, aluminum, and the most common for sewing machines, plastic.
They are used as follows:
- L-style bobbin: This is the most common type of bobbin. Most home sewing machines come with a wounded bobbin like this. It has a .8” diameter and a .35” tall.
- Class 15 bobbin: The second most popular type of bobbin. It has the same diameter as an L-style bobbin (.8”), but it’s a bit taller (.45”), which allows it to hold more thread.
- M-style bobbin: This bobbin is wider and taller, which makes it perfect for industrial sewing machines as it can hold a lot more thread on them, with a size of .98” (width) by .42”(height). They are usually made of metal.
It’s pretty essential to know which kind of bobbin you should be using with your sewing machine.
Not every machine can hold every type of bobbin. And if you put the wrong kind on your machine you might be encountering sewing problems.
If you want to learn how to identify all the bobbin types, Sewing Parts Online has a great article on not that common bobbin types.
Which is the correct type of bobbin for my sewing machine?
To know which is the type of bobbin you should use for your sewing machine, refer to your sewing manual. The chances are that if you own a home sewing machine, you will need either an L-style or a Class 15.
You must know one curious (and important) thing about these two types.

You can use an L-style or a class 15 bobbin in a machine that says that it uses class 15. But you shouldn’t use a class 15 bobbin on an L-style machine.
This is because the class 15 bobbin is slightly taller and won’t fit the needs of an L-style machine.
The safest thing to do, though, is to stick with what your sewing manual says.
How do I know if my bobbin is not correctly wounded?
There are a couple of things you should check on your bobbin to see if you threaded it right.
The first one is wounded, nice, and even. You shouldn’t see any bumps of thread or hanging loops.
The second thing is to see if you didn’t leave out any starting thread hanging.
When we start to wind a bobbin, we first wrap by hand our thread a couple of times. This might leave a little bit of thread string hanging after you finish winding your bobbin.
Make sure you cut out that string as close as you can to the bobbin case. That way, it won’t be in the way of your stitches.
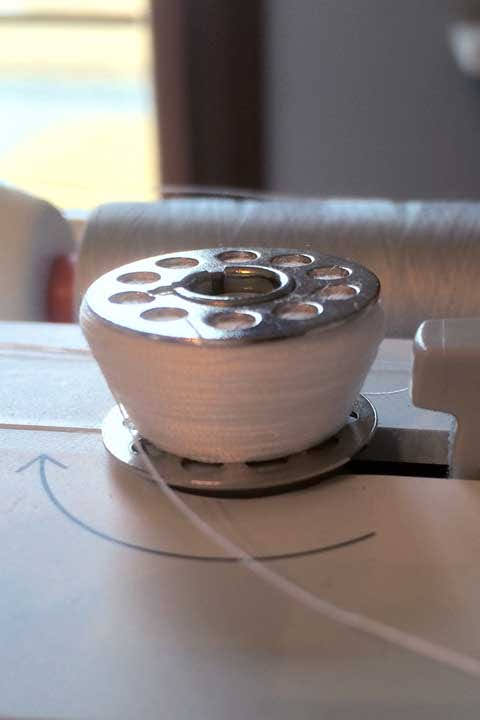
You should also make sure that you push the bobbin all the way down into the winder. Wait until you hear a click.
If the bobbin is not fully engaged, it won’t thread evenly.
Finally, check that none of your bobbins have any factory defects.
It might be a scratch or a slightly broken part. It doesn’t matter how small you might think this defect is. If your bobbin is not factory perfect. DON’T USE IT.
How to Wind a Bobbin. Easy Step-by-step tutorial.
Now you know what to do, what to check for, and what not to do. Let’s see how to actually wind our bobbins.
Don’t forget to read the step-by-step picture tutorial at the bottom of this video to see in more detail the process of how to wind a bobbin.
1. Identify the bobbin thread path.

Every machine has its own way to thread its bobbins. But they are all very similar.
So take a look at these parts of a sewing machine you will use to wind your bobbin.
Sewing Machine Parts to Wind a Bobbin:
- Spool pin: Here is where you will insert your spool of thread. Is better if you have a spool cap to put at the end so the spool won’t move.
- Thread Guide: The first place to thread. Most guides have a slot to push the thread into.
- Thread Guide cover: Your machine might or might not have this guide. If it does, it will be the second place to pass your thread through.
- Pretension Disk: This part of the machine will help us to keep the thread straight for an even winding.
- Bobbin Winder: The most important part for the bobbin. This pin will hold and spin the bobbin to be threaded.
2. Insert the bobbin into the bobbin winder

Place the bobbin on the bobbin winder shaft. Make sure that the notch of the bobbin aligns with the spring of the shaft.
Slide it down until it clicks into place. To check that it was correctly placed, try moving it gently with your fingers to check it doesn’t twist.
3. Place your spool thread into the spool pin.
Slide the spool of thread into the spool pin.
If your machine has a spool cap then slide that into the pin too. This will keep the thread in its place. Also, it will prevent tangles.
Remember to use the same thread type, size, and if possible color to assure the best stitches.
4. Pass the threads into the guides.

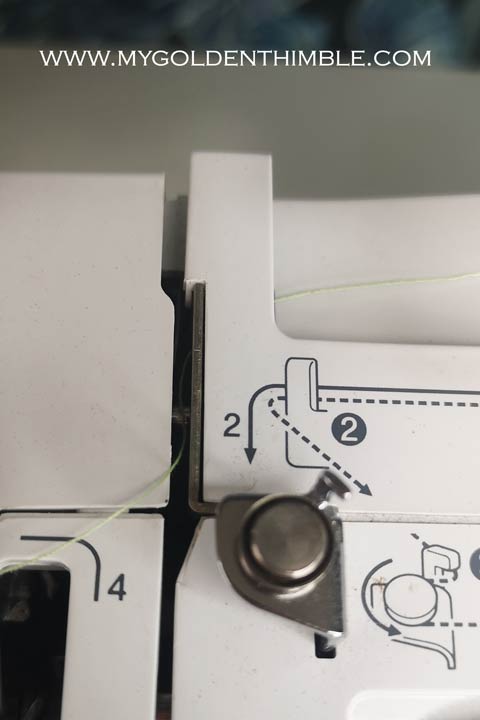
Using both hands, pass the thread under the thread guide.
Then slide it behind and under the thread guide cover towards you.
5. Pass the thread through the bobbin pretension disk.


Most machines will have a small thread guide before the tension disk.
This guide might look different depending on your machine. Some machines have a hook-like mine here, others have a metallic loop.
Thread that guide and then slide the thread between the tension disks making a wrapping motion from the back to the front right.
6. Wrap the thread around the bobbin by hand.
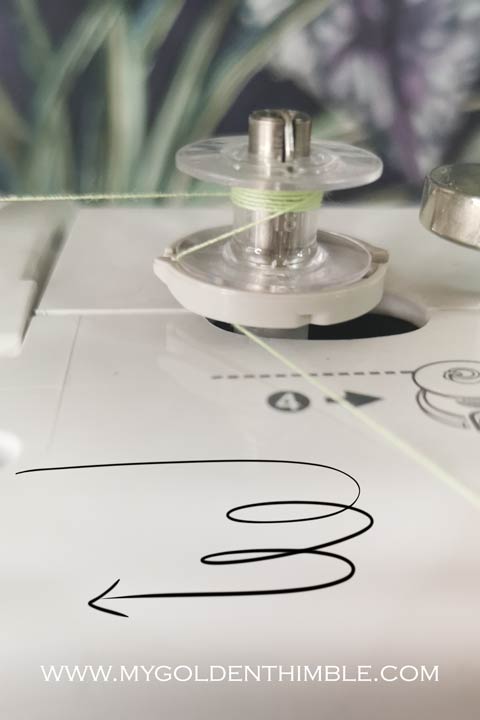
There are a lot of people who prefer threading the hole of the bobbin before making the firsts wraps. This helps the thread keep in place on the first spins of the bobbin.
I have always found it very tedious and unnecessary. But if you feel like you need it to go ahead and do this first.
Pass the thread behind the bobbin and wrap 5 or 6 times your thread clockwise.

After that, you can pass the tail of the remaining thread through the bobbin hole so it won’t move.
In my case, my sewing machine has a built-in cutter. So, what I do is use that to cut the thread and that will hold it in place.
7. Push the bobbin to the right.

I was going to put this step as a continuation of the last one. But I felt like some of you missed it through all the explanations.
And this is too much of an important step to go missing!
After winding with your hand a couple of times and securing the thread, you need to push the bobbin holder to the right.
This will lock in the needle on most of the machines, and allow the bobbin winder to spin.
8. Push the foot controller.
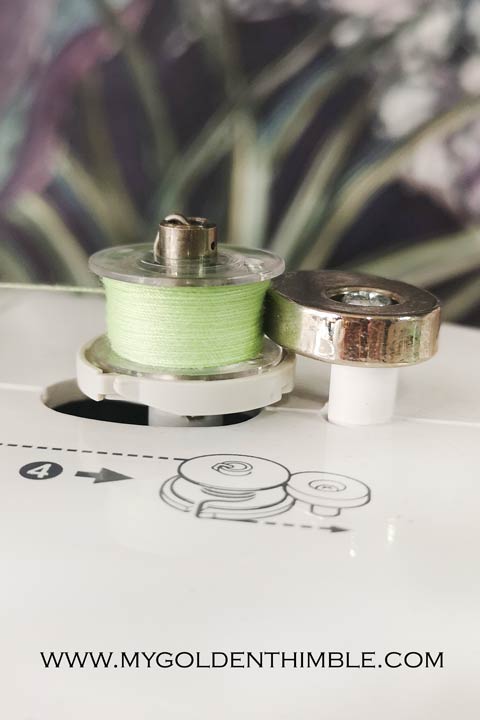
Press down the foot controller so the bobbin begins to wind.
You don’t need to be afraid to press more or less as the bobbin winding mechanism will do what it has to do.
Stop when your bobbin is full.
How do I know when my bobbin is full?
Stop pressing the controller foot to wind your bobbins as the winder slows down.
Most machines have a stopper that will tell the machine when the bobbin has enough thread. You won’t be able to fill it more than it has to with this stopper.
9. Slide left and remove the bobbin.

Push your bobbin winder to the left until it snaps into place and then, remove the bobbin.
Cut the thread and put it back where it belongs.
10. How to put back my bobbin into my sewing machine?
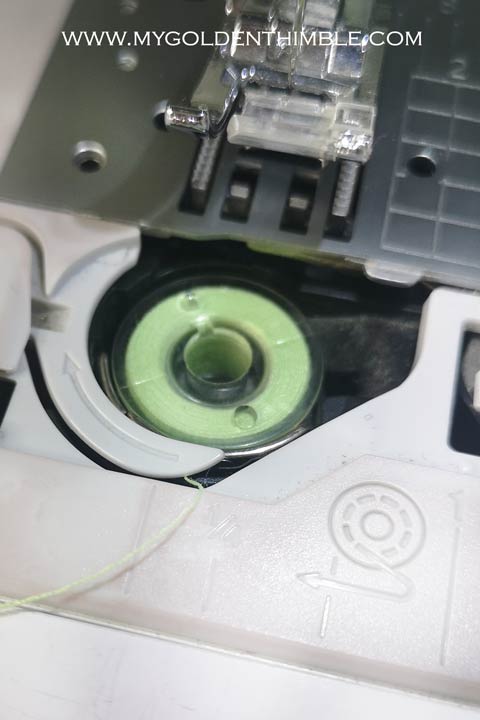

Open the bobbin cover of your machine and insert the bobbin in.
Make sure that the thread unwinds to the left.
Hold down the bobbin and guide the thread around the tab of the needle plate.
Cut the thread and close the cover. Now you can start sewing!
I hope you found this guide on how to wind your bobbin useful. Please let me know what you think about it in the comment box below. I’d love to read to you.
Don’t forget to follow us on Social Media!!
Psst…Is this article helpful to you?? Please support us so we can keep making awesome tutorials for you by buying us a cup of coffee here. We will be forever grateful!

How to Wind a Bobbin
Follow these steps to wind a bobbin on a home sewing machine.
Tools
- Bobbin
- Home Sewing Machine
Instructions
- Identify the bobbin threading path in your sewing machine.
- Insert the bobbin into the bobbin winder.
- Pull your thread and insert it into the bobbin winder threading path. First, thread the hook and then pass the thread under the cover guide. Slide the thread between the pre-tension disks.
- Wind the bobbin a couple of times by hand.
- Push the bobbin to the right until you hear a click.
- Start winding the bobbin by pushing the foot controller.
- Stop winding the bobbin when the bobbin starts slowing down.
- Push the bobbin to the left.
- Remove the Bobbin and put it back into its case.
Recommended Products
As an Amazon Associate and member of other affiliate programs, I earn from qualifying purchases.
-

 PeavyTailor Bobbin Holder 48Pcs Bobbin Clips Spool Huggers for Sewing Machines Thread Organizing. The Bobbin Clamps, peels Thread Huggers are Sewing kit Organizer to Avoid unwinding Thread Tails.
 -
 Neatbuddy 3 Pack Bobbin Holders, Silicone Bobbin Rings, Different Color Sewing Machine Bobbin Organizer and 24 Transparent Bobbins for Daily Sewing Supplies(Grey&Blue&Purple)
 -
 Simthread 25pcs Assorted Colors Size A Class 15 (SA156) 60WT Prewound Bobbins Thread with Clear Storage Plastic Box for Brother Embroidery Thread Sewing Thread Machine DIY








I have older machines that take a class 66 bobbin, and both the winding mechanism and the bobbin holder are completely different. Plus, pictures which show individual bobbins, identified as to type, would help.
Thank you B! Will check that out for future references.
This is such a helpful post! Properly winding a bobbin is so important, yet it’s often overlooked by newer sewers. I appreciate you breaking down the process step-by-step with clear photos. It really helps cement the correct techniques. I especially found the tips on identifying when a bobbin is wound improperly useful – those subtle issues can cause major frustrations.
That’s totally right! Sometimes you won’t even realize why are your seams looking so bad, especially if you don’t know this!
Thank you for leaving your comment!