
This is a pretty exciting day for me, today we are learning how to make pleats with a fork.
This technique will be useful to make knife pleats quickly and evenly very fast.
Once you tackle this technique you will be able to use it in a lot of ways within your sewing projects.

I’ve known about the existence of the fork pleating technique for a while now, but I have never actually used it before.
But I gotta say I was pretty fascinated.
I mean, making pleats with a fork???
That has to be the coolest sewing hack there is out there.
Definitely the person who came up with that is a genius.
And now that I have actually tried it for one of my projects, I am convinced of that.
This fork pleating technique takes a second to figure it out.
But once you get it you will see how easy and fast you can go making beautiful and even pleats.
Making pleats with a fork = Knife Pleats
No, I am not trying to gather all your silverware, this is actually the name of the pleats we are going to make with the fork.
Knife pleats are folds on the fabric with equal space facing to one side, which is often used on decorative finishes or to make pleated skirts.

You will find this type of pleat on your basic school girl uniform.
But they can be used in so many ways.
How can I use my fork pleated fabric to sew?
Besides the basic, which is the skirt mentioned above, the fabric that you pleat with a fork can be used on many other things.
For example, the pleated trim can be used to finish the hem of a skirt, a neckline, or sleeves.
Just like I did with my Magnolia Dress Sewing Pattern.
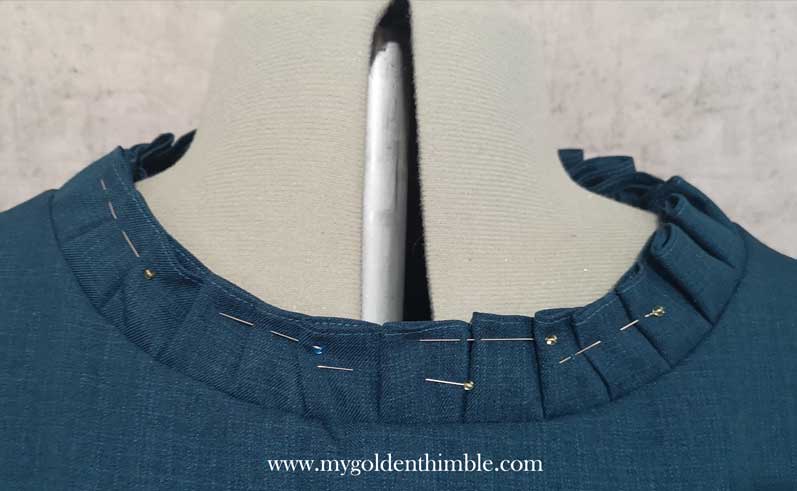
Actually, that was the main reason I learned how to pleat with a fork in the first place.
The trim can also be used to decorate your DIY throw pillows, to make a bed skirt, or to finish kitchen towels.
In one sentence is a beautiful way to upgrade any sewing project.
How to make even pleats?
To make even pleats with the fork technique you have to use the same dent of the fork each time.
Also, every time you make a new pleat you have to align the top, the bottom, and the side to match with the latest pleat.
I know that sounds like a lot but I promise you that is the easiest thing.
How do you secure pleats?
Some times we need our pleats to stay in place. Just like I needed to do with my neckline on the picture above.
To secure your pleats you can make a basting stitch in between the pleats on the right or the wrong side of the fabric. Like this.

How to calculate how much length you need to do pleats with a fork.
Knife pleats (AKA the pleats resulting from using a fork) use 3 times the width of each pleat lengthwise.
This means that if you want pleats that measure 1″ wide you will need 3″ of length for each pleat.
Now, if you are sewing pleats with a fork the width of it will depend on which slot you use to make them.
You will get that in a minute.
But to the answer’s sake let’s imagine that we have 1″ pleats and we need a strip of pleats that measures 10″.
You will have to multiply the 1″ width of one pleat times 3 and then multiply that by the length you want.
In this case, the math will go like this. 1×3=3 and then 3×10=30
So, for starters, you will need a 30″ long strip.
But wait!!! You will need to add to that measure something else.
Can you guess what?
Yes! The seam allowance. And don’t worry because in this tutorial I also will teach you how to add the seam allowance you need.
OK. Now we know the basics, let’s go to the good stuff.
- Read these super cool tutorials too:
- Easy Skirt Pattern and Tutorial in only 30 minutes!
- How to prewash fabric. When you definitely need to do it and when you don’t.
- How to Sew a T-shirt. 2 Easy and Quick Ways.
- How to clean a candle jar and use the leftover wax!
How to make pleats with a fork.
1. Feed the edge of the fabric in your machine considering its seam allowance.
In this step, you gotta check that the seam allowance on the right side of the fabric stays the same all the way.
In this case, I am using a ¼” seam allowance.
The measure of the seam allowance you are going to use will have to be the same as the seam should pass exactly over it.
2. Insert the fabric into the bottom slot of the fork all the way through.
Take the fork and face the front towards you.
Then depending on the width you want for your pleats is the slot you want to insert the fabric in.
The basic pleat for a trimming decoration I use works with the bottom slot.

3. Turn the fork down so you can see the back of it.
Pretty self-explanatory, but you want to basically twist down the fork.
Keep turning until the front of the fork face upwards.


4. Slide the fork towards the machine’s foot and take it out to make pleats.
Carefully slide the fork towards the foot.
At the same time check that the strip of fabric is aligned perfectly.
Press the fabric in place with your fingers and remove the fork.

5. Start sewing until the middle of the pleat.
Now the easy part comes.
Start sewing and stop in the middle of the pleat.
You want to do this because in this way it will be easier to form and align the next pleat.

6. Repeat the process until you have the length you need.
Repeat until you have the length you need.
Don’t forget to leave enough space at the end of the seam allowance.
I always try to make one or two extra pleats just in case.
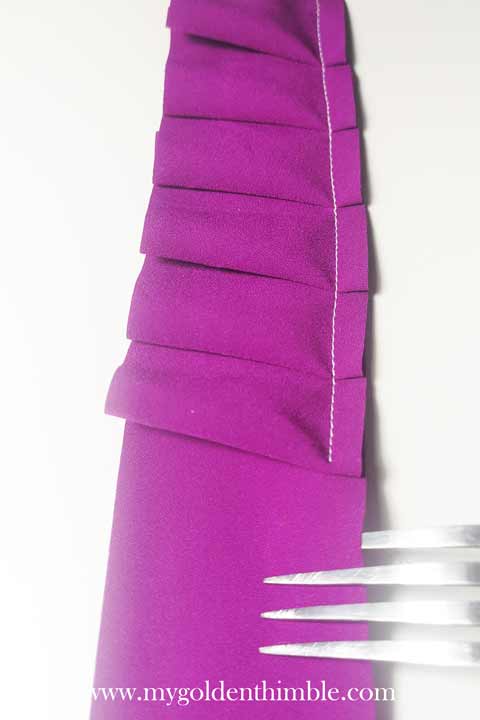
7. Mark the seam allowance in both ends of the strip, sew over it, and cut the excess.
On the beginning of the strip, starting from the line of the first pleat to the left, mark your desired seam allowance.
Ideally, if you did your math correctly the end of the length you wanted should end with the last pleat.
But in the case of fork pleating, let’s be honest, no one is measuring!
Measure the length you want from the first pleat and make a mark, if it happens to be in the middle of a pleat just unstitch that one.
Then mark the seam allowance and you are good to close.

How to Make Pleats with a Fork Video + “Adding extra length as you go” Hack.
Now that you know how to make pleats with a fork, on which sewing projects you want to use this technique?
Tell me in the comments below!! I’d love to read from you.
Don’t forget to follow us on Social Media!!








when putting the binding on the quilt how do you do the corners
We have a tutorial on how to do binding corners here. I think you will like it!
when putting this binding on the quilt how do you do the corners
I just gave you a link for that tutorial 😀
Thank you for the above, will definitely try it.
Let me know how it goes! Fork pleating is very satisfying!
This is really cool!!! This just might get me sewing again… I shared this video.
And I LOVED the music!!
I am very glad that you liked this! The fork pleating sewing hack is great to inspire and upgrade clothes and projects!