
These No Sew Cord Keeper projects are one of my favorite quick DIY gifts to make, especially when I need something practical, affordable, and actually useful.
This faux-leather cord keeper DIY is the perfect handmade gift for Father’s Day, especially for the guy who always has tangled chargers, messy headphones, or random cables floating around.
Best of all, this quick DIY project can be made in under 15 minutes from start to finish, making it one of my favorite DIY last-minute gifts for men.

NOTE: This post contains affiliate links, which means that if you make a purchase using one of the links in this article, I may earn a commission at no extra cost to you (To know more about this, click here.)
About This Project
I have actually made these exact faux leather cord keepers as party favors before, and every single person loved them.
A few people even asked me if I could make extra packs for them because they ended up using them every single day.

And honestly… I completely understand why. These little DIY cable organizers are so simple, but they make a big difference in keeping cords neat and easy to grab.
At this point, almost every cable in my house has at least one of these cord keepers wrapped around a charger somewhere.

They measure 3” by 1”, which is perfect to keep most cables in order.
I also use the fabric version I made with my other free sewing pattern tutorial, which you can check out if you prefer sewn projects over Cricut projects.

Materials I Used

For this easy Cricut project, I used faux leather because it is beginner-friendly, affordable, and comes in so many beautiful colors and textures.
Faux Leather Recommendations:


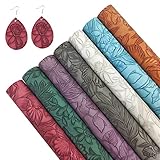
However, you can absolutely use genuine leather if you want a more elevated look or a sturdier finish.

Of course, for cutting, I used my Cricut Maker Machine, which I adore, and used the regular blade (the one that comes with the machine).


The snap buttons I used came from a snap button kit that includes tons of different color options, but since I was making these as DIY gifts for techy men and Father’s Day gifts, I decided to stick with more muted shades like blue and green.

I’m so excited to share this cord wrap SVG and tutorial with you because it’s one of those small, handmade gifts that people genuinely end up using every single day.
Remember, you can subscribe to get these files for free at the end of this post.
How To Make a No-Sew Cord Keeper

Step 1: Gather Your Materials
Start by gathering everything you need for this quick DIY project. For this faux leather cord keeper, you will need your SVG file (download at the end of the post), faux leather or genuine leather, snap buttons, snap button pliers, a Cricut machine, a standard Cricut blade, and your cutting mat (I used the purple one).
I decided to make a whole batch of these DIY cable organizers at once because they are such great handmade gifts and party favors. Since they cut so quickly, it honestly makes sense to make several at a time.
Step 2: Upload The SVG File To Cricut Design Space
Once you download the cord wrap SVG file, upload it to Cricut Design Space.
After uploading the design, select all the pieces and click “Attach.” This is a very important step because it keeps the pattern together exactly as intended. Otherwise, Cricut will try to cut all the little shapes separately instead of keeping the cord keeper pattern properly aligned.
Once your design is attached, you can duplicate it as many times as you want to fill your cutting area. I used a 12×12 mat and copied several of the cord keepers to maximize my material and make multiple quick DIY gifts at once.
Step 3: Arrange Your Faux Leather
Cut a piece of faux leather large enough to cover the area you plan to cut.
I was working with leftover scraps of faux leather for this project, so I moved the designs around in Cricut Design Space until everything fit nicely onto the material I already had. This is honestly such a great scrap-busting Cricut project.

Before sending your design to cut, double-check the placement carefully to make sure all the pieces fit inside your faux leather area correctly.
Step 4: Cut The Cord Keepers
For my material settings, I selected the Faux Leather option in Cricut Design Space and used the regular blade that comes with the Cricut machine.
Once everything is ready, load your mat and send the design to cut.

When the machine finishes, you will end up with tons of perfectly cut cord keeper shapes.
One thing I absolutely love about this SVG is that it also cuts the tiny holes for the snap buttons automatically. That means you do not have to manually punch the holes yourself later, which saves so much time.
Step 5: Remove The Small Cut Pieces
Carefully peel away all the excess faux leather pieces from your mat.


Then, use an awl tool to gently push out the tiny little circles from the snap button holes if they are still attached.

Since Cricut already cut them for us, this part is super fast and easy.
Step 6: Prepare The Snap Buttons
Take out your snap button kit and prepare two complete button sets.
For each cord keeper, you will need:
- Two caps
- One socket
- One stud

Make sure you are using one socket and one stud. If you accidentally install two identical pieces, your snap buttons will not close properly.
Insert the caps through the small holes on the faux leather piece so everything is ready for installation.
Step 7: Install The Snap Buttons
Place the cap and socket into your snap button pliers and press firmly.
The rounded side of the cap should sit against the black side of the pliers.
Try to press the pliers evenly in one motion without shifting the button around too much. This helps create a cleaner and more secure finish.

As you press, the small metal point from the cap will flatten down and hold the snap piece securely in place.
Repeat the exact same process with the second cap and the stud on the opposite side of the cord keeper.
Step 8: Finish Your DIY Cord Keeper
That’s it — your no sew cord keeper is finished!

Now you can have fun mixing and matching different snap button colors to make your cable keepers even more unique.

I personally used more muted colors like blue and green for Father’s Day gifts, but brighter colors would also look adorable for party favors or everyday organization.
See how easy that was? This is one of those easy Cricut projects that people genuinely end up using every single day, which makes it such a practical handmade gift idea.
Conclusion
I absolutely love projects like this because they are quick, practical, affordable, and genuinely useful. This No Sew Cord Keeper is one of those easy DIY projects that comes together in just a few minutes but still feels thoughtful and handmade, especially when you are making it as a gift for someone special.
I also love that you can completely customize them by mixing different faux leather colors and snap button combinations to match your style. Once you make one, it is honestly hard to stop because they are just that quick and addictive to create.
If you make this DIY cable organizer, I would absolutely love to see your version. And don’t forget to download the free SVG pattern so you can start making your own easy Cricut projects in just a few minutes.
Pattern Download
Hey there! Want this amazing free download? Just pop your name and email into the form below, and we’ll send it your way. Oh, and remember to check your promo or spam folders in case the email takes a detour there by mistake. If it does, just nudge it into your main inbox so you don’t miss any more freebies from us!






Recommendation of faux leather for cord holder that works for circut.
I just added a list of my recommendations to the post!
Pattern and directions for cord holder please. Thanks
Hi gorgeous! You have to sign up at the bottom of the post on the section about the download.