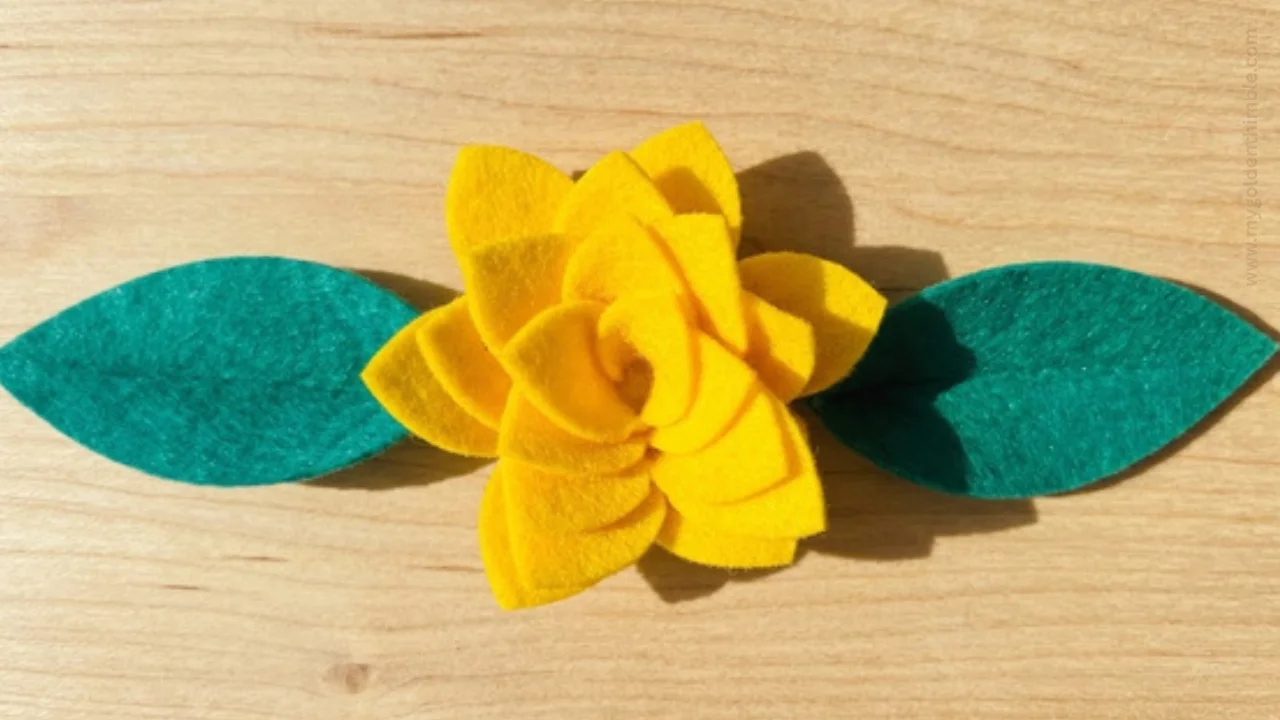
Rolled felt flowers are one of those little crafts that are just too cute for how surprisingly easy they are to make!
If you have a few felt scraps sitting around, this is the perfect little project to turn them into something pretty instead of letting them disappear into your craft stash.
In this tutorial, I’ll show you how to make these adorable flowers using a simple rolling technique.
That’s it! No complicated sewing or fancy techniques required, which makes this a great felt flower tutorial for beginners (and a very satisfying one if you ask me!).
I’ve also made a free felt flower template that you can download and use to cut your flowers. So you don’t have to figure out the shape yourself—we’re keeping things nice and easy.

NOTE: This post contains affiliate links, which means that if you make a purchase using one of the links in this article, I may earn a commission at no extra cost to you (To know more about this, click here.)
What Can You Do With Your Finished Rolled Felt Flowers?
There are so many ways you can use these rolled felt flowers! And while you can absolutely pop a few in a vase and use them to decorate your home, that’s just the beginning.

You can use them to make felt flower garlands, which is actually the whole reason I made these templates in the first place! I had a garland project in mind from the beginning, and I can’t wait to show you the one I made with these templates next week. So stay tuned for that one!
You can also use your felt flowers as a gift wrapping topper. Instead of putting the same old bow on your presents, add a handmade flower on top and instantly make your gift feel a little more special and unique.

They also make adorable hair accessories, handmade cards, party decorations, wreaths, garlands, and so much more.
And here’s another thing I love about this project: once you understand how the flowers are made, you can easily experiment with different sizes. Just resize your felt flower template before cutting, and you can make tiny little blooms or go completely over the top with a giant flower.
Because seriously… who doesn’t love a giant flower?
Want to Skip the Hand Cutting? Get the Cricut SVG Files
Let’s be honest: cutting out a whole bunch of flowers by hand can get a little time-consuming. Especially when you have a big project in mind and need to cut what feels like a million little flower shapes!

That’s actually why I use my Cricut machine to cut these now. It makes the whole process so much faster and easier, especially when I’m making lots of flowers at once.
If you’d rather skip the hand cutting, I’ve also made all of these flower designs available as SVG files ready for Cricut machines.

And I really wanted to make these files affordable for you, so they’re only $1.99. If you’re planning to make a bunch of flowers, I definitely think it’s worth it just for the time you’ll save.
Of course, you can absolutely use the free felt flower template and cut everything by hand.
And if you decide to purchase the files, thank you! Every little purchase helps support My Golden Thimble and allows me to keep creating free sewing tutorials, patterns, and fun projects for you.
Want to make a whole bunch of flowers without all the cutting? Check out the Cricut SVG files in my shop.
How to Make Rolled Felt Flowers
Materials:
- Felt Sheets (thicker felt gets better results)
- Glue Gun
- Quilter Freezer Paper
- Tweezers (optional)
- Cricut Machine (optional)


Now that you have your materials ready, let’s make some flowers!
The great thing about this project is that once you understand the basic technique, you can make all kinds of felt flowers just by changing the template, the size, or how tightly you roll them.
Step 1: Download the Free or Premium Templates
Start by downloading the free Rolled Flower Template file by filling in the form at the bottom (or the cutting template bundle if you want more options).
The free template I’m giving you today includes three different flower designs and one leaf template to complement the whole set in a PDF. I wanted to give you a few different shapes so you can mix and match them when making your projects.

For cutting machine users, SVG files for Cricut or Silhouette are available in our shop for $1.99, perfect for making multiple flowers quickly.

You can also download the free PDF templates by filling out the form at the end of this post with your name and email. If the form doesn’t appear, try disabling your ad blocker and reloading the page.
Once you have your template, use it to cut your flowers and leaves from felt.
If you’re using the paper template, place it on top of your felt and either trace around it or pin it in place before cutting.

Another method I really like is using freezer paper sheets. You can press the freezer paper onto the felt and then cut around the template, which makes it much easier to get those nice, sharp lines when cutting your flowers.
If you’re using a Cricut or Silhouette, simply upload the SVG file to your cutting software and send it to cut.
Step 2: Start Rolling the Felt
Once your flower is cut, it’s time for the fun part!
Start rolling the felt from the outside of the spiral, working your way toward the center. The smaller the petals become as you get closer to the center, the trickier they can be to hold, so don’t be afraid to use a pair of tweezers to help you. They make this part much easier, especially when you’re working with smaller flowers.

Start by rolling the first petal into itself. Add a small amount of hot glue and glue it onto the next petal to hold the beginning of the flower in place.
Then simply keep rolling the flower into itself, adding a little glue as needed, until you reach the end of the spiral.
Step 3: Adjust the Tightness as You Roll
As you roll the felt, the spiral will naturally start creating the flower shape. But here’s where you can really customize your flowers: the tightness of the roll makes a big difference in how the finished flower looks.
If you roll it more loosely, you’ll get a larger, more open-looking flower. If you roll it tightly, the flower will look smaller and more compressed.

I like to go somewhere in the middle and adjust the flower right in the palm of my hand as I roll it. This lets me see how the petals are coming together and gives me a better idea of what the finished flower will look like before I secure everything.

My best advice is to play around with it! Try rolling one flower tightly and another one more loosely, and you’ll see just how much the shape can change.
Step 4: Secure the Flower
Once you’re happy with the shape, it’s time to secure all those petals in place.
At the center of the spiral, you’ll find a small circle at the very end of the template. Add a little hot glue to this circle, then press it against the back of the flower, where the final part of the spiral sits.

This will secure the entire flower and keep all of the petals in place, so you can handle and manipulate the flower without it coming apart.
One little tip: if you’re not completely sure about the shape you want, don’t glue this final circle yet.

Keep adjusting the tightness of the roll and shaping the petals until you’re happy with how your flower looks. Once you glue that final piece down, the shape is secured.
Step 5: Shape and Fluff the Petals
The last step is to give your flower a little personality.
Gently open the petals and fluff them out with your fingers. You can also fold some of the petals slightly outward to make the flower look fuller and more open.
There really isn’t one “correct” way to shape them. You can make them tight and compact, loose and fluffy, or somewhere in between. That’s part of what makes this easy felt flower tutorial so much fun.
Once you get the hang of the rolling technique, try making a few flowers with different levels of tightness. You’ll quickly see how much the final shape changes, and you can choose the look that works best for your project.
How to Resize the Felt Flower Template
One of my favorite things about these flowers is how easy they are to customize. You don’t have to stick to the exact size of the template! You can make tiny little flowers, oversized blooms, or anything in between.
Resizing the Paper Template
If you’re using the PDF felt flower pattern, resizing it is really simple because you can change the scale before printing.
When you open the PDF to print, look for the Scale or Custom Scale option in your printer settings. Instead of printing at 100%, you can increase the percentage to make the flower larger.

For example, printing at 150% will make the pattern about one and a half times its original size, while 200% will make it twice as large.
Keep in mind that once you go larger than the size of your paper, the entire flower won’t fit on a single sheet. In that case, you’ll need to print the pattern across multiple pages and join the pieces together before cutting your felt.
Resizing the SVG Template
If you’re using the SVG files with a Cricut or Silhouette, you can resize the flower there too. Simply adjust the size of the design in your cutting software before sending it to your machine.
The main limitation when making the flower larger will be the size of your cutting mat and the maximum cutting area your machine allows.

For example, with my Cricut and the mat I use, the biggest flower I can cut in one piece is 12 x 12 inches. So keep the size of your mat in mind when you’re planning your flower, especially if you’re dreaming of making one of those giant flowers.
And speaking of giant flowers…
Want to Make a BIGGER Felt Flower?
You can actually get around the size limitation by joining two flower templates together to create one enormous flower with twice as many petals. I haven’t tried this method myself yet, so if you do, please let me know how it goes!
To do this, you’ll need to cut the circle off the end of one template and then connect the last petal of the new flower to the first petal of the original one. Essentially, you’re extending the spiral so you can keep rolling it and create a much bigger flower.

The result should be a thicker, fuller flower with tons more petals because you’re essentially making it from two templates instead of one.
I think a giant felt flower like this could be so much fun for a backdrop, party decoration, or oversized home decor piece. If you give it a try, I definitely want to hear about it!
Final Thoughts
And that’s it! Now you know how to make these cute rolled felt flowers and customize them with different colors, sizes, and flower shapes. Don’t forget to download the free template and have fun experimenting with your own combinations.
And if you’re planning to make a whole bunch, the Cricut SVG files can save you a lot of cutting time. I can’t wait to see what you make with them!