
Welcome back, my sewing friends! Today I’ve got something absolutely adorable for you—DIY pumpkin coasters with a free sewing pattern. If you’ve been itching to start a fall project, this one is quick, beginner-friendly, and just the right amount of cozy.
Fall is honestly the best excuse to gather your loved ones around the table.
That’s why these themed pumpkin coasters are such a fun project—they’ll not only keep your table safe from drink rings, but they’ll also get your guests saying, “Oh my gosh, where did you get these?”
This is a perfect and easy sewing project to kick off the season. And the best part? You can use the same free sewing pattern to make more than just coasters.
I’ll share some fun ideas for turning these pumpkins into matching placemats, pillows, or even other little pieces of home décor.

NOTE: This post contains affiliate links, which means that if you make a purchase using one of the links in this article, I may earn a commission at no extra cost to you (To know more about this, click here.)
Behind the Scenes
Okay, friend, let me spill a little tea about these coasters—I may or may not have spent way too much time obsessing over the tiniest details. You know how it goes… once you fall in love with a project, every little decision feels like it could make or break it!
The first major debate centered on the pumpkin stem. Should it be textured and rustic, or smooth and simple?

I couldn’t decide on my own, so I did what any sensible sewist would do—I asked my sewing friends in the Golden Thimble Sewing Club. The poll results were so close it felt like a nail-biting reality show finale.
In the end, the smoother stem fabric pulled ahead by just a smidge, and I went with it. Honestly? I’m so glad I did—it really ties everything together so nicely without stealing the spotlight from the pumpkin itself.

And here’s the fun part—this pattern isn’t just limited to coasters. Nope! You can totally use it for other projects too, like matching placemats, cute fall pillows, or even as a raw appliqué accent on other home décor.
So while today we’re keeping it coaster-sized. Keep reading because I will give you more ideas for this pattern at the end!
50+ Fall Sewing Projects You’ll Want to Start Right Now
Pumpkin Coasters DIY

Materials You’ll Need
Alright, let’s dig into the fun part—gathering our supplies!
Don’t worry, this project doesn’t need a huge shopping list. In fact, it’s a fabulous way to use up those fabric scraps you’ve been hoarding. I know you have a basket full, just like me!
Here’s what I used to make my set of DIY pumpkin coasters. Shop my suggestions by clicking on the material list 😉
- Free Pumpkin Coasters Sewing Pattern By My Golden Thimble– Download at the end.
- Muslin fabric – This pattern will be our foundation. I love its woven texture, which gives a beautifully distressed look when we stitch the raw edges.
- Fall fabric scraps – Any scraps will do! I used a lovely burnt orange fabric with flowers for my pumpkins and some brown scraps for the stems.
- Batting – This goes in the middle to give your coaster some soft body and make it feel more “finished.”
- Repositionable spray glue – My lifesaver for projects! It keeps layers together effortlessly.
- Fusible web (like HeatnBond or Wonder Under) – This product simplifies raw appliqué. Iron it onto your fabric, peel off the backing, and fuse it to your base for a smooth and steady stitch.
- Threads – You’ll need black, dark green, and beige thread. The beige one will blend in with the muslin base, while the colored ones will make your pumpkin details pop.
- Pins – Lots and lots of pins. They’re your besties for keeping things in place.
- Optional but wonderful: A free-motion presser foot – If you have one, it makes stitching around the appliqué shapes super fun and easy, but don’t worry if you don’t have it—you can totally do this project without.
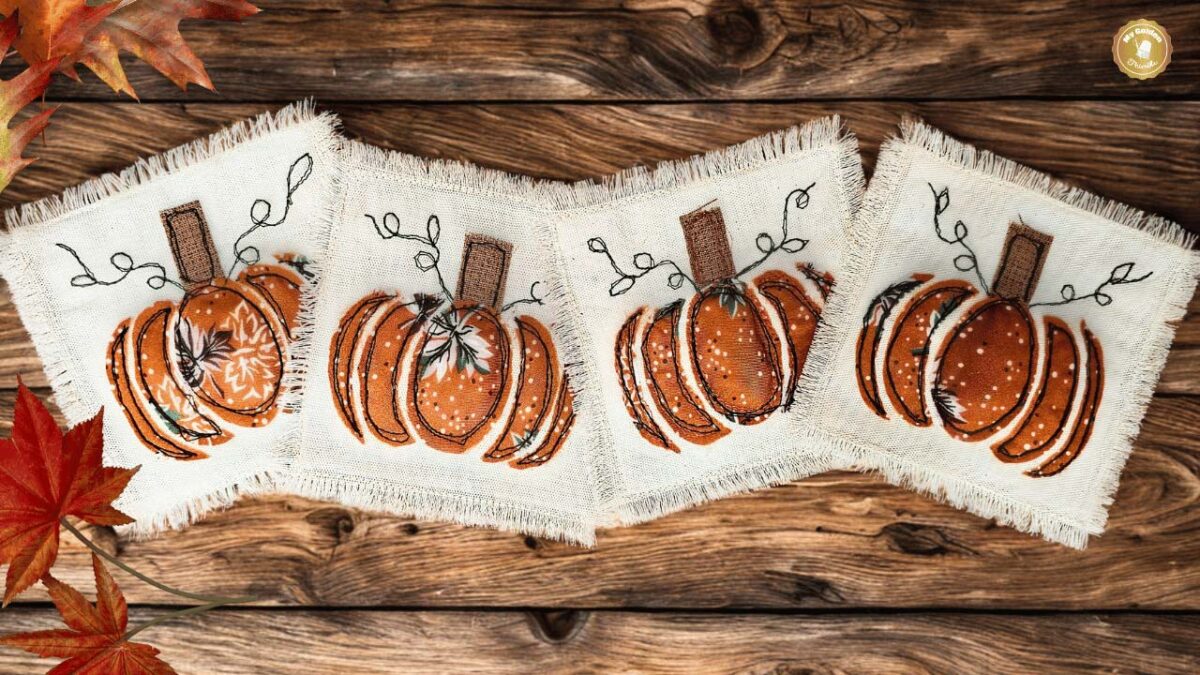
Tip: Since we’re going for that cute raw edge appliqué technique, make sure your base fabric is woven, not stretchy. The little frays are part of the charm!
Step 1: Cutting & Prepping Your Pieces
Alright, let’s grab those scissors because our first step is all about cutting! Each coaster needs two layers of base squares—one for the top (where we’ll do the appliqué magic) and one for the batting. We’ll start by working with the upper layer first.

Now for the fun part—the pumpkin pieces! This pattern has five little appliqué pieces that will make up the body of your pumpkin. Go ahead and cut those out from your orange fabric, and then cut one small stem from your brown fabric scraps. To keep yourself organized, you can use any fabric marking tool you love to jot down the piece order.
Here’s a little cutting tip: if you want your pieces to stay sharp and stable, apply some fusible HeatnBond (or any fusible web) to the back of your fabric before cutting.
It’s like giving your pumpkin pieces a little backbone—they won’t shift around and will be much easier to place.
Step 2: Prepping the Base & Batting
Next up, let’s give our coaster base a little cushion!

Flip your batting to the wrong side and spray a light coat of repositionable spray glue. Place it on the wrong side of your base fabric square (the one we’ll use for the top layer).

If you’d rather skip the spray glue, pins will also do the job, but honestly, the glue makes this step a breeze.
Step 3: Positioning the Pumpkin Pieces
Now we get to build our little pumpkin! Place your orange appliqué pieces right in the center of your muslin base square, and don’t forget to tuck in the brown stem piece.

There are two ways you can do this:
- If you used fusible HeatnBond: Peel off the paper backing and stick your pumpkin pieces down like stickers. Then give them a quick press with your iron to fuse them in place—super steady and easy.
- If you’re using spray glue instead: Just mist a very light coat on the wrong side of your fabric pieces (don’t go overboard, less is more here!) and press them onto your base fabric.
Once your pumpkin is all in place, grab your erasable fabric pen and lightly mark the center of your pumpkin. This will come in handy for stitching later.
Easiest DIY Ever: No-Sew Fabric Pumpkins That Look Store-Bought
Step 4: Sewing the Pumpkin with Raw Edge Appliqué
Now that your pumpkin pieces are all in place, it’s time to head over to the sewing machine.
For this part, we are going to use the raw edge appliqué technique to stitch everything down.
First, lower your feed dogs so you can freely move your fabric around, and switch to an embroidery presser foot or an open-toe presser foot to clearly see where you’re going.

I’m not going into full detail here because I already have a whole tutorial on raw-edge appliqué that you can check out if you’d like all the extra tips and tricks.
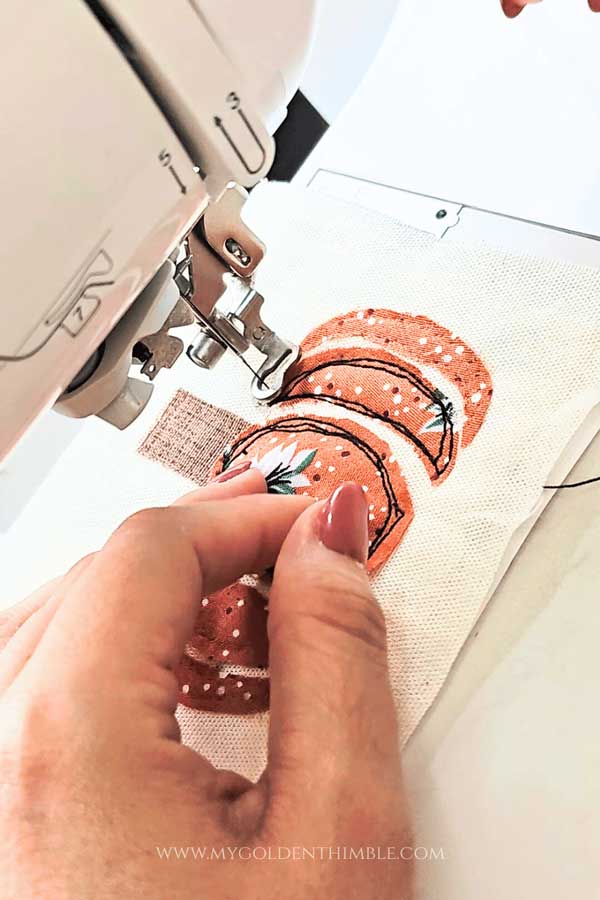
But the overall idea is to “draw” around your pumpkin pieces with your thread, almost like sketching on fabric. If you prefer more stability, you can also just use your regular presser foot.

For my coasters, I used black thread to outline both the stem and the pumpkin body. Then I switched over to a dark green thread to sew in some little vines and leaves curling out of the pumpkin.

I drew my leaves freehand because I wanted that whimsical, sketchy look.
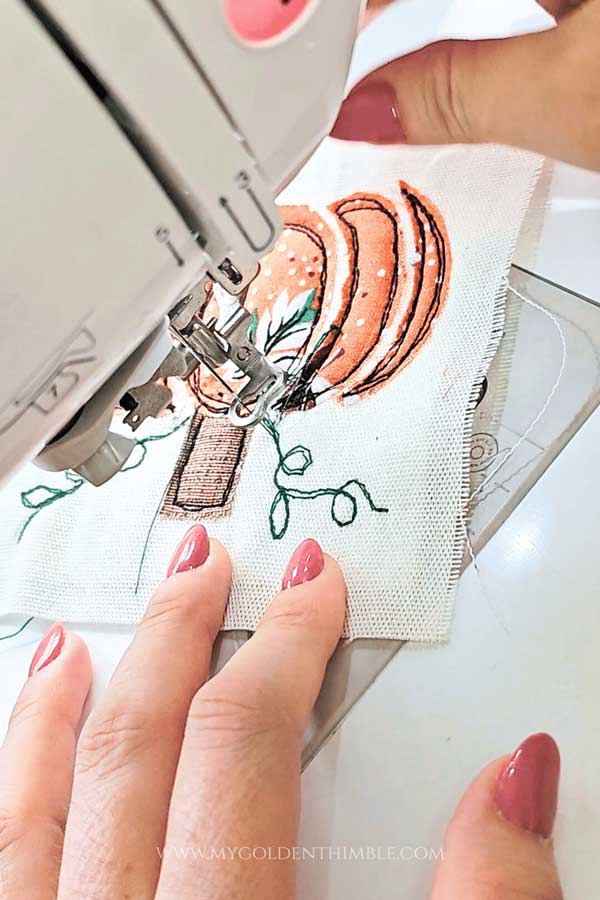
But if freehand isn’t your style, you can also trace the leaf shapes from the pattern first and stitch right on top of those lines.
Step 5: Layering and Finishing the Coaster
Once your appliqué stitching is complete, it’s time to turn our fabric into a proper coaster.

First, trim away any loose threads with embroidery scissors so that everything looks clean and tidy. Then place your second muslin square behind your design, wrong sides together, and pin it in place so it doesn’t shift.

Next, change your presser foot back to a regular one, raise your feed dogs, and thread your machine with a color that matches your muslin base. Sew all the way around the coaster at a quarter-inch seam allowance, and then go around a second time for extra stability.
Don’t forget to backstitch at the end before removing it from the machine.
Step 6: Distressing the Raw Edges
Now comes my favorite part—the distressing!
This is where the coaster really gets that rustic, cozy look. With the help of your embroidery scissors, a seam ripper, or even a point turner, start pulling gently at the long threads along the edges of your coaster.
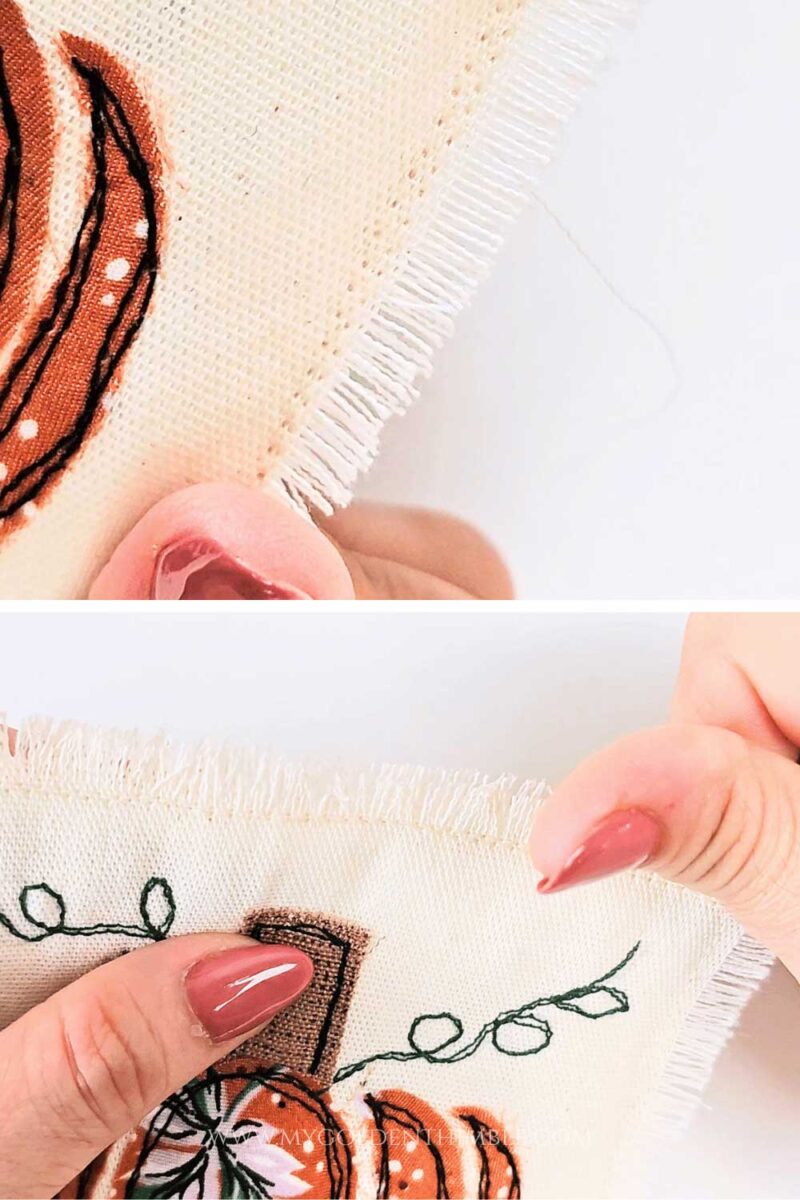
The goal is to fray the edges so that only the smaller threads remain inside the seam allowance, giving it that raw, worn-in finish.
At first, it might not look quite as distressed as you want it to, but that’s easy to fix.
You can either keep roughing up the edges by hand. Or toss your coasters straight into the washing machine with your regular laundry. Once they’ve been washed and dried, they’ll have that dreamy, distressed denim vibe that makes them look perfectly rustic and oh-so-cute.
And just like that, your pumpkin coasters are done! They’re rustic, cozy, and guaranteed to bring fall charm to any table setting.
Variations & Fun Ideas
Now that you’ve got your coasters finished, let’s talk about all the other fun things you can do with this same pumpkin appliqué pattern. Because honestly, once you start making these little pumpkins, you’re not going to want to stop at just coasters!
One idea is to size up the pattern and make a set of matching placemats. Can you imagine a whole Thanksgiving table decked out with pumpkin placemats and coasters?
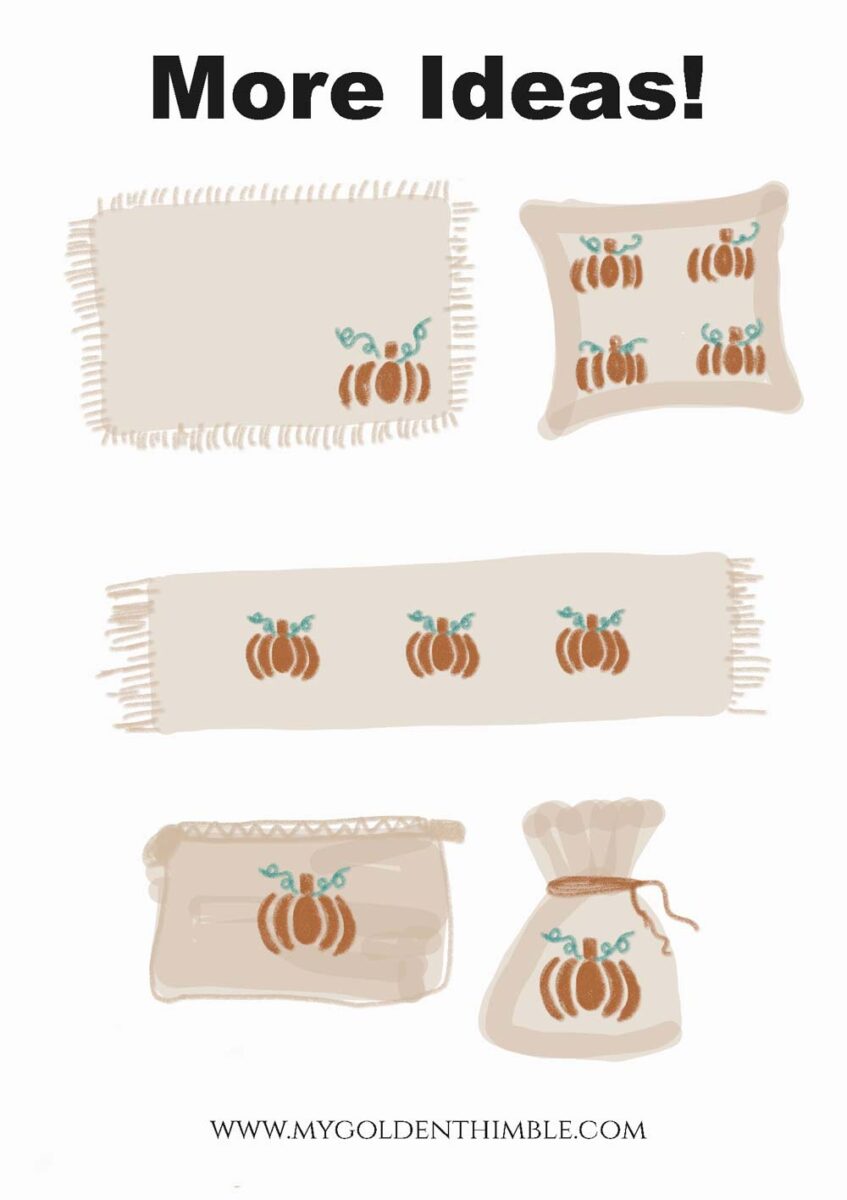
You could also use the pattern to sew a few pumpkin pillows. Just stitch the appliqué onto the front of a pillow cover, and suddenly your couch is giving full cozy fall vibes. If you’re into farmhouse-style décor, try using plaid, gingham, or even denim scraps for your pumpkins. It gives them such a charming, rustic look.
Another fun idea is to use the pumpkin appliqué as a raw edge accent on other sewing projects, like tote bags, fabric napkins, or even a fall table runner.
So, don’t stop at just one project—let your imagination run wild. These coasters are just the beginning of what could turn into a whole collection of fall fabric scrap projects that you can enjoy year after year.
Gorgeous Fall Quilt Patterns That Will Steal the Show
Final Thoughts
And there you have it, my friend—your very own set of rustic, cozy, and totally adorable DIY pumpkin coasters. Aren’t they just the cutest? I love how this project comes together with just a few scraps of fabric and some simple stitching, yet the finished coasters look like something you’d find in a fancy fall
They’re easy enough for beginners, fun for using up fabric scraps, and versatile enough that you can keep playing with the pattern to make placemats, pillows, or even other Thanksgiving fabric crafts.
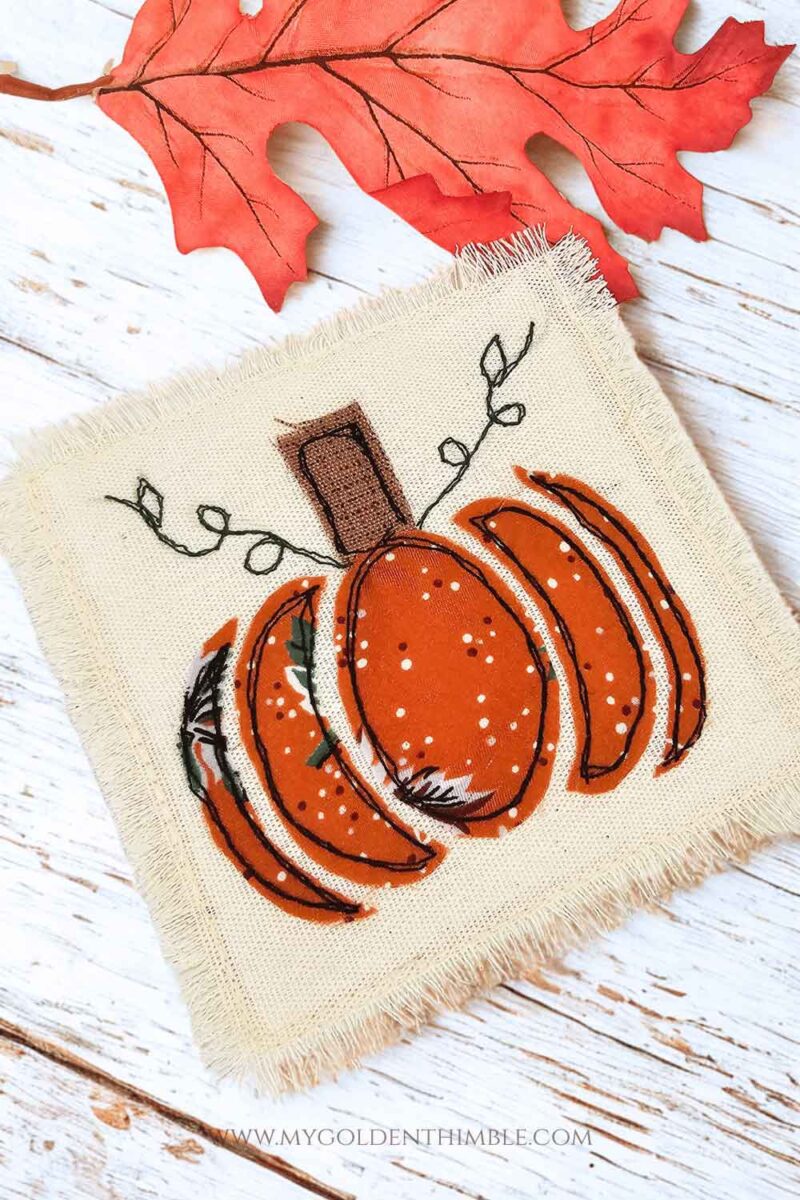
If you give this project a try, I would absolutely love to see your finished coasters!
Share them with me in the Golden Thimble Sewing Club or tag me on social media so I can swoon over your pumpkins. And if you’re ready for more cozy fall sewing fun, be sure to check out my other easy fall sewing projects—I’ve got plenty of tutorials and free patterns waiting for you.
Happy sewing, my friend, and may your fall be full of cozy stitches and lots of pumpkin spice!
Pumpkin Coaster PDF Download
Hey there! Want this amazing free download? Just pop your name and email into the form below, and we’ll send it your way. Oh, and remember to check your promo or spam folders in case the email takes a detour there by mistake. If it does, just nudge it into your main inbox so you don’t miss any more freebies from us!
Don’t see the form? Disable your ad blocker and refresh the page!





These are so cute! I am definitely going to need to try to make these! If they get dirty, are they machine washable or do you have to wash them by hand? I can totally see my little ones wanting to use them and then spilling juice all over, so I would love to be prepared. Thanks so much for sharing!
Hi Alex! I wash them with my machine, but I do put them in the delicates bag first (a mesh bag with a zipper), for extra protection.
I’d love that you are making them for the little ones! How fun!
I would like the pattern for the pumpkin coasters
Hi Donna! You have to sign up in the form at the end of this post (the orange one) and they will be sent to your email ASAP 😀
Where do I find the Pumpkin Coaster PDF Download ?
Hi pretty one! At the end of the post in the section about DOWNLOAD there is an orange form you can fill and the pattern will be sent to your email.
Pumpkin Coaster PDF Download
Hi Ema!
To download the pattern you have to follow the instructions in the download section of this post. It is the last section!
Really a very cute and usefullittle design. I can see this on pouches, coasters, mats and….
So Thanks
You are most welcome my dear Peg! I am happy you liked them