
Today I’m going to show you how to make freestanding embroidery lace leaves—a project that looks super challenging but is actually really easy once you get the hang of it.
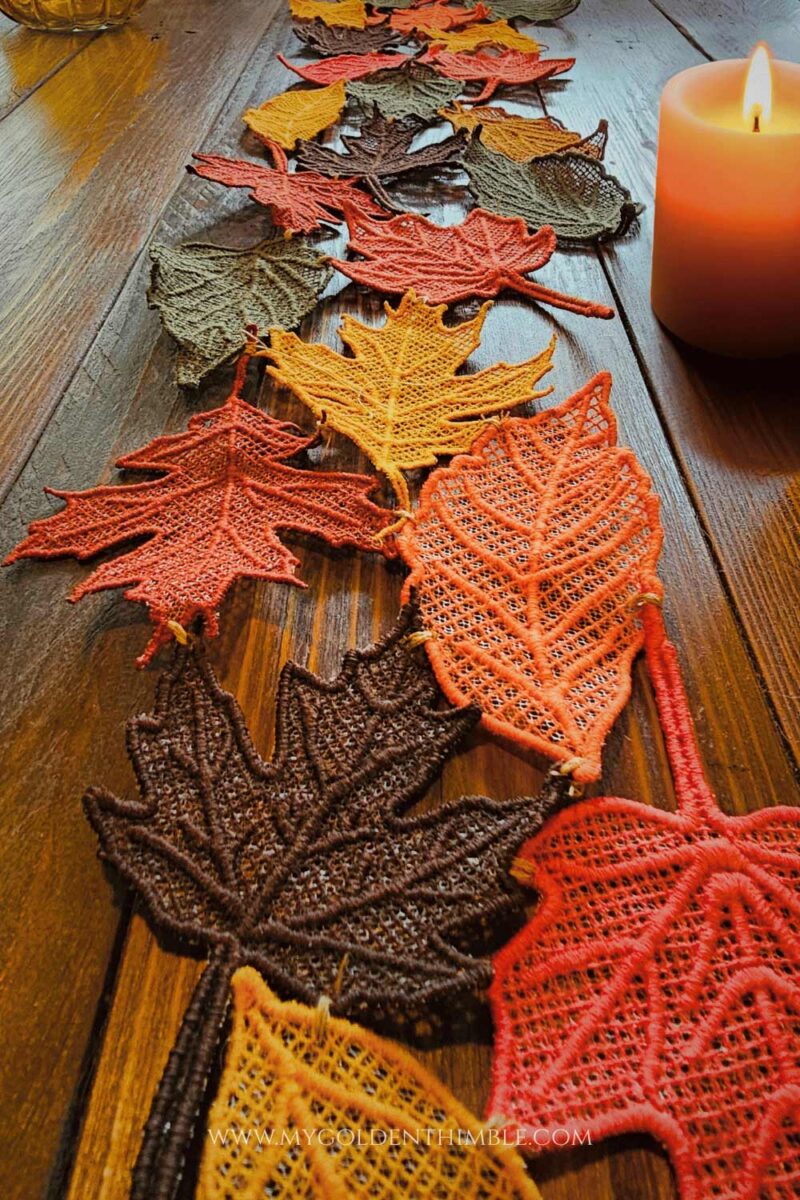
You can use them in so many ways, but in this tutorial, I’ll be turning mine into a DIY fall table runner. It’s such a beautiful way to dress up your table for family dinners, Thanksgiving, or just to make your everyday meals feel a little extra special.
This project is a fun and satisfying way to add handmade charm to your fall decor. Let’s get started!

NOTE: This post contains affiliate links, which means that if you make a purchase using one of the links in this article, I may earn a commission at no extra cost to you (To know more about this, click here.)
About This Project
Today’s project is extra special because it was my very first time trying freestanding lace embroidery, and honestly… I was terrified. I had no idea how it would turn out, but after a few trials (okay, four to be exact!) I finally ended up with results I was so happy with.
The process was definitely a little long, from sketching and designing the leaf patterns to testing and perfecting them, but in the end, it was so worth it.

And because I love you all so much, I’m sharing one of my leaf embroidery patterns for free!
That way you can jump right in and try this technique too. If you end up falling in love with it (like I did) and want more variations, I’ve also made a full set of leaf patterns available as a bundle if you’d also like to support my work.
Remember—your downloads, comments, and subscriptions help me keep this little blog alive and let me keep sharing free sewing patterns and tutorials with you!
Things I Learned (Do as I Say, Not as I Did)
Since this was my first adventure into freestanding lace embroidery, I learned a lot by trial and error. And also watching other designers do it. Here are some of the biggest lessons I want to pass along so you can avoid the mistakes I made:
- Always use two layers of water-soluble stabilizer. At first, I tried saving stabilizer by patching scraps together, but trust me—don’t do that! Two full layers are essential for keeping the embroidery strong.
- Add a layer of fine net tulle between stabilizer layers. This little trick makes your lace extra sturdy and prevents your thread from puckering or scrunching.
- Keep your hoop super tight. Even the smallest wave or looseness can ruin your design and even cause your thread to jam in the machine. That is not fun to fix!
- Don’t wash away all the stabilizer. When you rinse your finished piece, just dip it quickly in water so that a little stabilizer remains. This helps your lace stay nice and strong.
- Thread choice matters. You can use regular thread, but embroidery thread gives a prettier finish.
Troubleshooting Tips for Beginners

Don’t worry if your first leaf isn’t perfect—here are quick fixes for the most common problems:
1. Thread keeps breaking: Re-hoop the stabilizer so it’s nice and tight, lower your machine tension a bit, and switch to a fresh needle.
2. Design looks puckered: Use two layers of water-soluble stabilizer (or add a thin layer of tulle) so the stitches have better support.
3. Leaf is too floppy: Don’t rinse out all the stabilizer—just dip quickly in water so a little stays in and keeps the leaf stiff.
Read This After: Fabric Pumpkin Coasters DIY | Fall Sewing Pattern & Tutorial
Step-by-Step: How to Make Freestanding Lace Embroidery Leaves Table Runner

Materials You’ll Need
- Embroidery machine (this is from the same style as the one I am using)
- Water-soluble stabilizer (2 layers per hoop)
- Fine net tulle
- Embroidery thread (or regular thread if you prefer)
- USB to load the design
- Small sharp scissors
- Bowl of water
- Lighter (for sealing thread edges carefully)
- Freestanding Lace Leaf Embroidery File (download options at the end)
Step 1: Download the Free Or Premium Design
Start by downloading the free leaf embroidery file by filling in the form at the bottom (or the full leaf set if you want more options). Transfer the file to a USB stick and plug it into your embroidery machine.
You can also grab the full leaf bundle if you want more variety and to support my work. Either way, I’m so happy to share this with you.
Beginner Tip: Do not resize the design once it’s on your machine. Resizing can throw off the stitches and make the leaf collapse when you wash away the stabilizer.
Step 2: Prepare and Hoop Your Stabilizer
Now let’s get your hoop ready. Unlike most embroidery projects, where you work on fabric, here the stabilizer is your fabric.
That means it has to be strong enough to hold the stitches until your lace design can support itself. Place two full layers of water-soluble stabilizer into your hoop, making sure they’re perfectly smooth.

If you want your leaf to be a little sturdier, you can add a thin layer of tulle fabric sandwiched between the two stabilizer layers. Once you’ve got them in place, pull the hoop tight.
The stabilizer should be so firm that when you tap it with your finger, it sounds a little like a drum. If it feels saggy or has wrinkles, take a second to re-hoop it, because this step will make or break the final look of your lace.
Step 3: Set Up Your Machine
Next, prepare your embroidery machine. Make sure your feed dogs are lowered so they don’t pull on the stabilizer, and attach your embroidery presser foot.
Then, thread your machine with the color of your choice. I love switching things up with different shades of green or even autumn colors like red, orange, or yellow.
If you’ve never used embroidery thread before, this is the perfect time to try it—it glides through the machine beautifully and gives your leaves that gorgeous shiny finish.
But if you want the piece to be stronger, then regular polyester thread works well too!
Step 4: Stitch the Design
Now the fun begins!
Go ahead and start stitching the design on your machine. The leaf design is composed of two parts: the base and the outline. The base creates the structure, almost like the skeleton of the leaf, while the outline adds the details and gives it that crisp, embroidered lace look.
Use your machine settings to jump to the first stitch (+1).
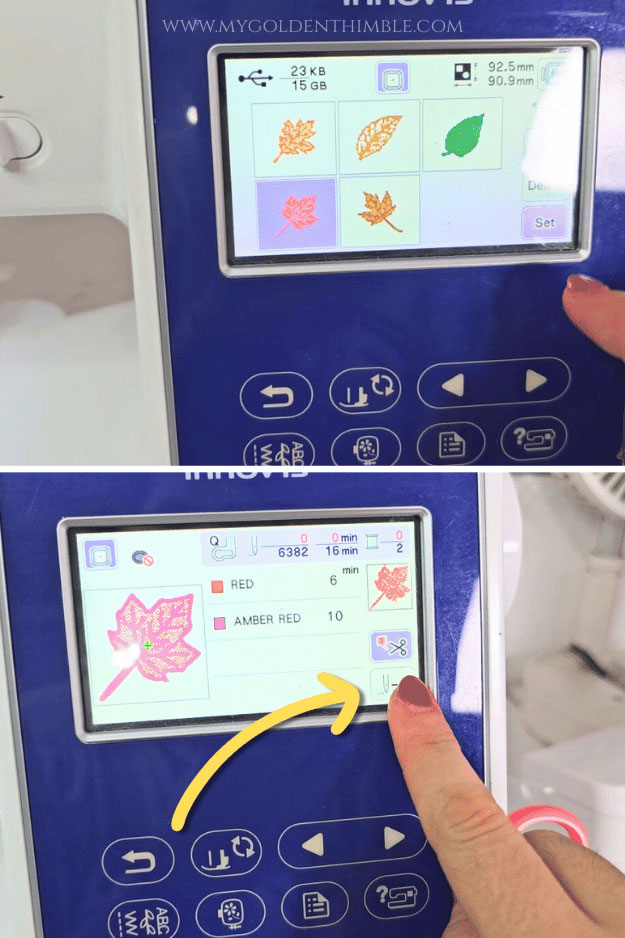
Once you are there, lower the needle and raise it again so you can pull the bobbin thread to the upper surface. Pull both threads a little bit to get longer tails.
We are going to get rid of the long tails, so they don’t end up tangled in our design. Start your design. Let the machine complete 10 stitches and pause, allowing you to cut the leftover thread tails.

Once your machine finishes the base stitches, pause and check everything over.
If the grid looks smooth and the stitches are neat, you’re ready to continue with the outline. This is also the perfect moment to switch thread colors if you’d like your leaf to have some extra personality.
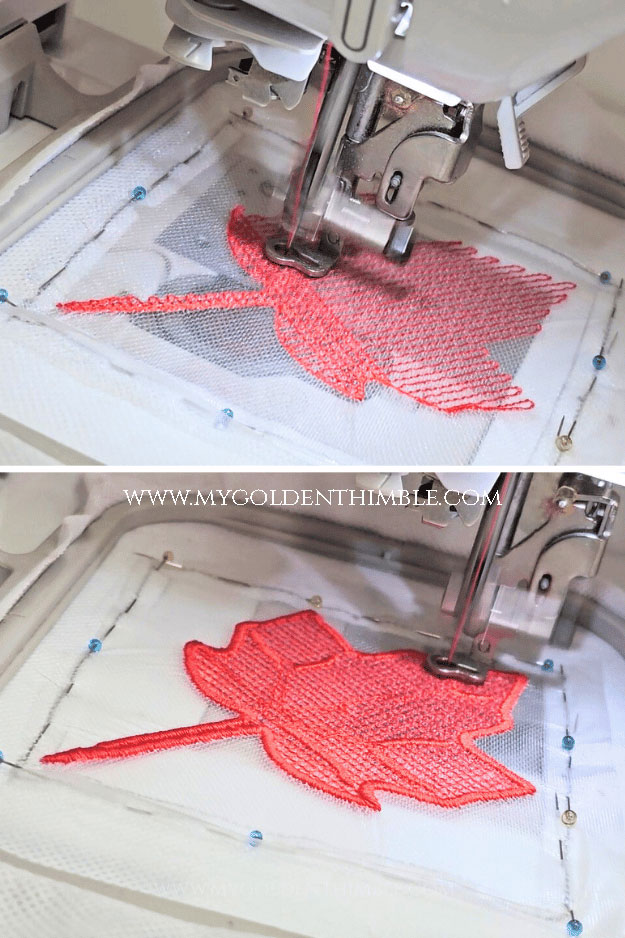
I like to make several leaves in different shades so that when they’re all sewn together, the final project looks colorful and full of life.
Step 5: Trim and Rinse the Stabilizer
When the stitching is done, carefully remove the hoop from your machine and unclip it.
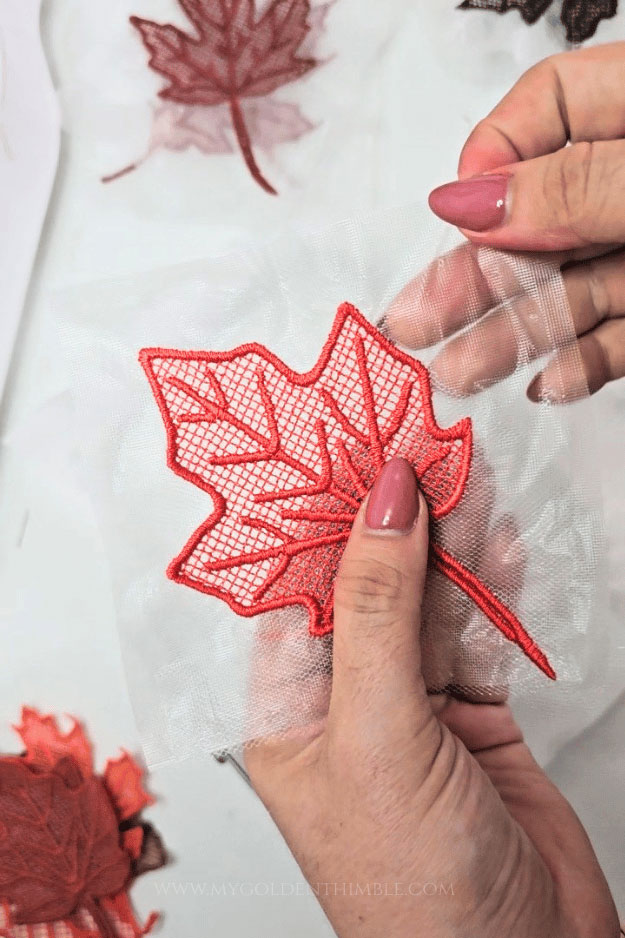
You can now tear away the stabilizer.
Use a pair of sharp embroidery scissors to trim the tulle fabric around your leaf. Careful not to cut the threads.
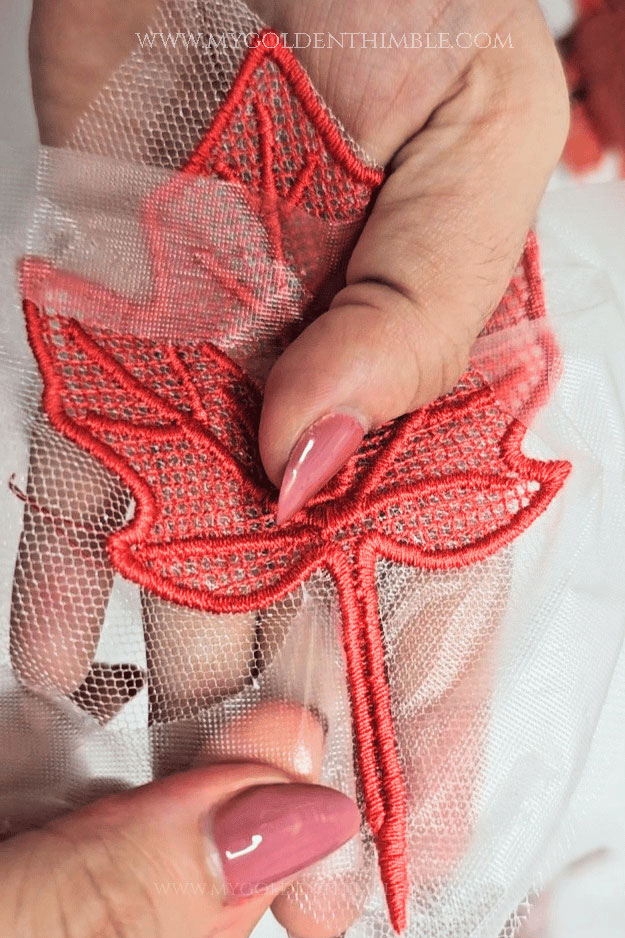

Fill a small bowl with lukewarm water and dip your leaf into it. The stabilizer will begin to dissolve, leaving just your stitched lace behind.
Don’t leave it in for too long, though! If you rinse out all of the stabilizer, your leaf will lose some of its stiffness. A quick dip is enough, and then you can place the leaf on a towel to dry flat for a few hours.
Read This After: 56 Charming Fall Sewing Projects to Embrace the Season
Step 6: Seal the Edges
After your leaves have dried, you might notice a few tiny threads of stabilizer or tulle sticking out around the edges.
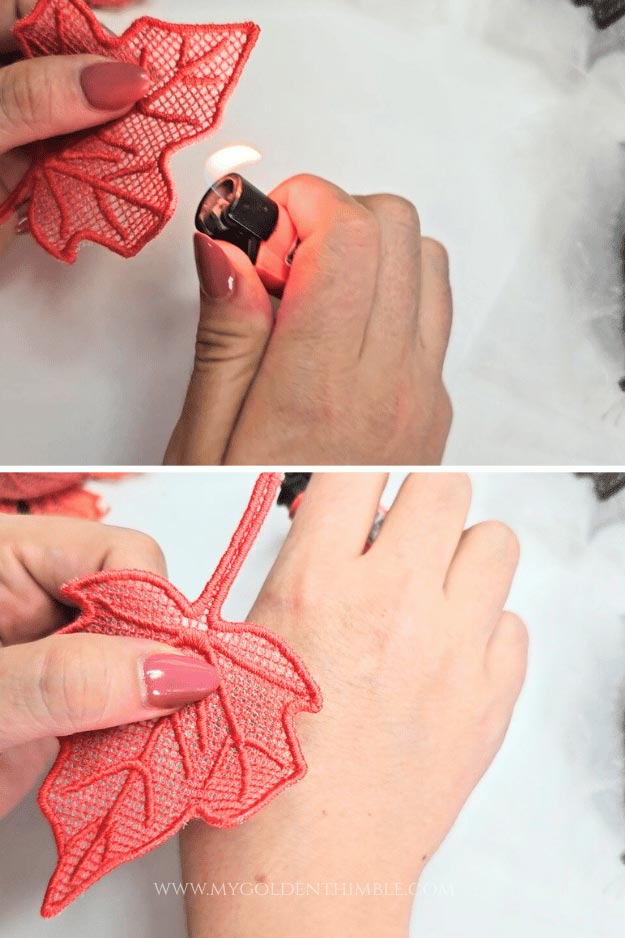
To fix this, carefully use a lighter and pass the flame quickly along the edge of your design. The heat will melt the stray threads back into the lace and give you a nice clean edge.

Be extra careful here—don’t hold the flame too close or too long, because embroidery thread can melt if it gets too hot. I recommend practicing this on one test leaf first, so you get comfortable with how much distance to keep between the flame and the stitches.
Step 7: Assemble Your Table Runner
Once you’ve made enough leaves, it’s time to assemble your table runner. Lay them out on a flat surface and play around with the arrangement until you’re happy with the mix of shapes and colors.

Then, take two leaves at a time and sew them together using a very narrow zig-zag stitch. Keep joining leaves side by side until you’ve built up the length and width you want for your runner.
Gotta be honest!
Ideally, you will have to change the thread color so it blends between each leaf. By the time I was doing this part, I was in a rush.
But again, do as I say and not as I do…
This part is so satisfying because you can watch the project transform from a pile of little leaves into a beautiful, lacy decoration for your table.
Final Thoughts On Freestanding Lace Embroidery Leaves
And that’s it—your very own DIY freestanding lace embroidery leaves table runner! This project definitely stretched my embroidery skills, but it was so worth the effort. The finished piece looks like delicate lace leaves all joined together, and it makes such a beautiful handmade home decor accent.
Don’t forget—you can download the free leaf embroidery pattern to get started today, or grab the full leaf bundle if you want more variety. Either way, I’m so happy to share this with you, and I hope you’ll give freestanding lace embroidery a try.

If you do make this project, please leave me a comment and share your results—I’d love to see your version! Supporting the blog by downloading, subscribing, or even just leaving a kind word helps me keep creating free tutorials, patterns, and classes for you.
Freestanding Lace Download Options
If you’re ready to make your fall projects truly shine, I’ve got something exciting for you! I created a full set of 5 different freestanding lace leaf designs—so you can mix and match and add gorgeous variety to your table runner, napkins, or any other cozy fall sewing project.
They’re available in all the popular formats (DST, EXP, HUS, JEF, PES, VIP, XXX) and are super affordable. Honestly, it’s the best way to get creative with your autumn makes!

But if you’d like to give it a try first, I’m also sharing a free maple leaf design that you can download today. It also comes in all the formats (DST, EXP, HUS, JEF, PES, VIP, XXX) so you can test it out on your machine before jumping into the full set.
Enjoy! And don’t forget to tag me on any pictures, please!!








please send the free autumn leaf FSL pattern (no request box on website).
Thank you in advance!
Hi gorgeous!! Have you tried to disable your ad blockers and refreshing the page?
Thanks for the free leaf download, it stitched out perfectly! I did use a lighter and was glad my leaf didn’t catch fire, but I made sure to move the flame quickly. I am going to purchase the set and use the leaves to make a door wreath for the fall. 🙂 I used tulle as you suggested, it made the leaf turn out nice.
Kitty! Thank you so much for leaving this message! It makes my day to know you enjoyed it this much. I hope I get to see your wreath! Please send it on Insta
Thank you!
You are mooooooost welcome my love! I am glad you liked it.
I love this idea. I have a Husquavarna Viking embroidery machine. It uses VP3 files. Do you happen to have that type?
I wasn’t able to export in that file type! I am trying to figure out how to do it.
Sorry :(, as soon as I do I will update this.
Thank you for offering the fee download. My embroidery machine ranks second to my sewing machine as my favorite non-living possession. I especially like the idea of using tulle. I’ve been using Vilene for my FSL, which can get pretty expensive! I can’t wait to give it a try.
HOWEVER…I don’t trust myself with a lighter, so I’ll stick to using the seam sealant or Mod Podge lol
OMG I loved the “My Favorite non-living possession” thing I totally feel that in my core!
Oh I am not going to lie, the lighter is a very scary part. I do have been using it for years so, I feel a little more confident on doing so. But it has melted some things along those years lol.
Please tag me if you make it!