
This tutorial is all about how to use decorative stitches on your sewing machine, and trust me, once you start, it’s so hard to stop.
This is one of my favorite ways to take any simple sewing project and give it that extra sparkle—using only decorative stitches!
I’ll walk you through my top tips and tricks so you can start using these stitches to upgrade and personalize your sewing projects—from plain hems to pretty napkins, to giving a tote bag a whole new vibe.

NOTE: This post contains affiliate links, which means that if you make a purchase using one of the links in this article, I may earn a commission at no extra cost to you (To know more about this, click here.)
If you’ve ever looked at your sewing machine and wondered what all those fancy little icons were for (the stars, the hearts, the squiggles!), then get ready, because we’re going to unlock all their magic.
This is hands-down my favorite way to add a cute detail without needing extra fabric, trims, or embellishments. It’s just you, your machine, and some creative fun.
So grab your favorite thread and a fabric scrap or two for practice—cuz we’re about to make your sewing projects pop!
What Are Decorative Stitches (And Why Are They So Fun to Use)?
Alright, before we jump in and start stitching hearts, flowers, and scallops all over the place, let’s talk about what decorative stitches actually are.
Decorative stitches are the fancy stitch patterns built into your sewing machine that you can use to add a little flair to your fabric. While they’re mainly used to make things prettier, they can also be surprisingly handy for reinforcing seams, finishing edges, or even adding texture to a plain piece of fabric.

Now, if you’re already comfortable with the usual stitches—like the straight stitch, zigzag stitch, or even the overlock stitch on your sewing machine—you’ve got a solid foundation. Those are your trusty construction stitches that hold your projects together.
Decorative stitches, on the other hand, are here to play dress-up. They’re not meant for building or stitching a project together—they’re for giving it personality!
You can use them to:

- Finish a hem in a cute and unexpected way
- Embellish a seam so it stands out instead of blending in
- Making Stitch in the Ditch Seams more interesting in quilts.
- Add texture to any blank canvas on clothes or bags.
- Add a sweet little detail on the edge to things like napkins, bags, cuffs, and collars.
Now, how many decorative stitches you have will totally depend on your machine. If you’ve got a mechanical machine, you’ll likely have a smaller selection.
But if you’ve got an electronic or computerized sewing machine (learn more about the difference between machines), then lucky you—you probably have lots of options to choose from.

And if you’re like me and you have a combo sewing and embroidery machine, then oh boy—you might even be able to design your own custom decorative stitch patterns (don’t worry, we’ll get there eventually!).
But let’s not get ahead of ourselves—we’re starting with the good old standard decorative stitches that most machines come with.
And once you learn how to use them? You’ll want to stitch them on everything.
Let’s go!
What You’ll Need
Get these ready and let the stitching fun begin—it’s like doodling with your sewing machine!
- Sewing machine with decorative stitches – the more, the merrier!
- All-purpose or fun thread – try metallic or embroidery thread for extra flair.
- Matching bobbin thread – regular thread is just fine down there.
- Scrap fabric – perfect for practice and play.
- Water Soluble Stabilizer (optional) – helps your stitches stay smooth and flat.
- Zigzag or satin stitch presser foot – gives your stitches room to shine.
How to Sew Decorative Stitches on Your Machine
Ready to start stitching? Let’s walk through everything step-by-step so you get the prettiest results with the least amount of fuss!
Step 1: Change to a Satin Stitch Foot
Before you even thread that needle, let’s swap out your presser foot. For decorative stitches, we’re going to use a satin stitch foot instead of your regular one.
This foot is clear, so you can see exactly what you’re stitching. It’s designed to let your needle move side to side as much as it needs to—perfect for creating all those fun little shapes.
Even better? It has a groove underneath that lets the raised, textured stitches glide through easily without bunching up.
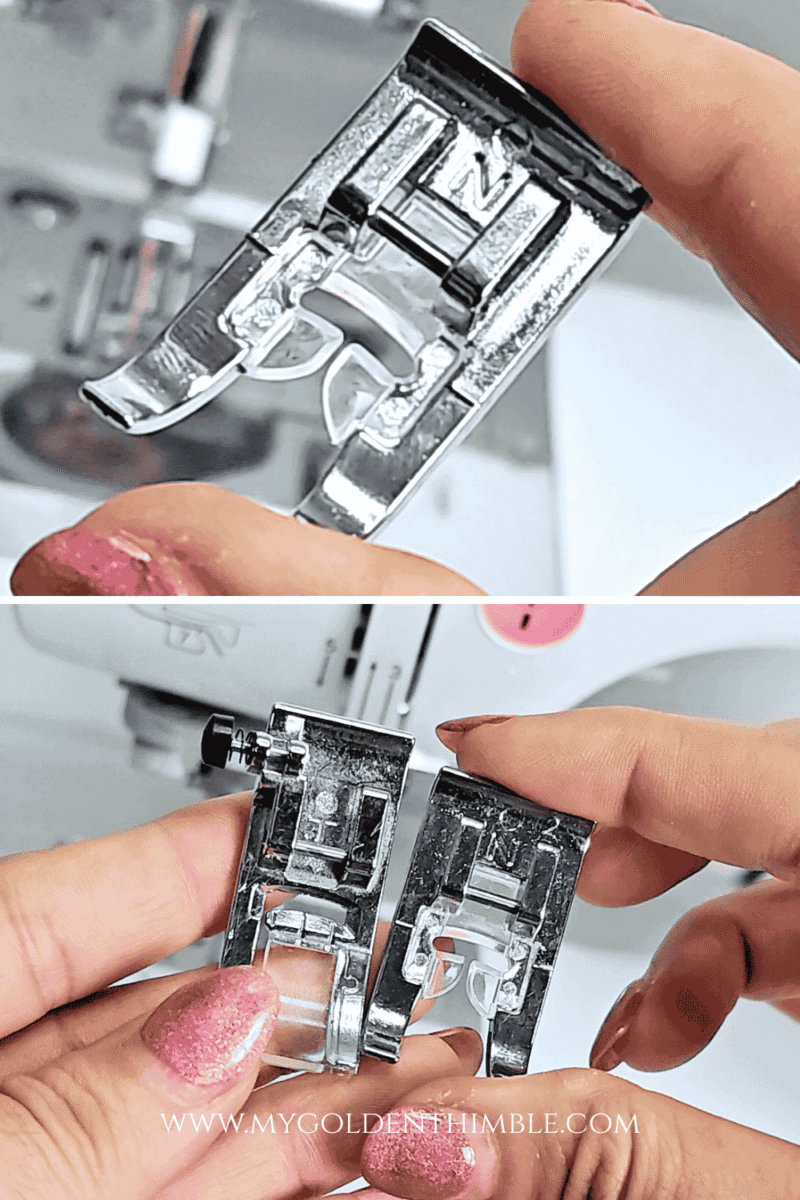
Some decorative stitches can get a bit puffy—almost like embroidery—so this foot really helps feed the fabric smoothly.
If you don’t have a satin foot, an open-toe foot is also a great choice! It gives you a full view of your stitching line and has a similar groove underneath to help your stitches pass through neatly.
Psst… if you’re not sure which presser foot is which, or you want to take a closer look, check out our presser foot guide and grab the free printable while you’re at it!
Step 2: Fill Your Bobbin All the Way
Decorative stitches use a lot of thread—like, way more than regular stitching. So do yourself a favor and fill that bobbin all the way up.

You don’t want to play bobbin chicken halfway through a pretty design only to run out of thread mid-flower. Trust me—it totally messes up the flow!
Step 3: Choose Your Stitch
Time to pick your favorite stitch! If you’re using a mechanical sewing machine, just turn the dial to select your design.
If you’re using a computerized machine (like mine or this one), scroll through your menu and choose your favorite from all those fun little icons.

You can often adjust the stitch length and width, so always do a test run on a scrap piece of fabric first to see what looks best.
Step 4: Mark Your Fabric
Decorative stitches are a little wild—they zigzag, curve, and repeat in funky ways.
So if you want a straight, polished look, I always recommend drawing a guideline on your fabric with a fabric-safe marking tool.

That way, your stitches will follow a straight path instead of going on a wobbly adventure.
Step 5: Add a Water-Soluble Stabilizer (Optional, but Totally Worth It!)

This step is a game-changer, especially if your fabric is lightweight or stretchy. Placing a water-soluble stabilizer under your fabric helps keep your stitches crisp and your fabric smooth.
I usually use one meant for this type of stitching, but here I’m using an embroidery stabilizer (because that’s what I had on hand).
Here are two options you could use.


I’ll link my favorite kind for decorative stitches so you can see the difference—it’s thinner and easier to use for this type of project.
Step 6: Stitch It Up!
Now the fun begins. Place your fabric under the presser foot, align it with your guideline, and start stitching!

Here’s your golden rule: let the machine do the work. Your hands are just there to gently guide the fabric—don’t push or pull. If you force the fabric, the stitches might get uneven or distorted, and no one wants a wobbly star or lopsided leaf.
And that’s it—can you believe how easy (and satisfying) that was?
Once you get the hang of it, you’ll want to decorate everything in sight.

And if you really want to take it up a notch, you can start making your own decorative stitch catalog by sewing samples onto little swatches of fabric. It’s a great reference for future projects!
Ready for the Next Level? Try Combining Stitch Designs!Now that you’ve nailed the basics, let’s move into the fun world of mixing and matching.
If you’re feeling adventurous, I’ve got some cool tricks for mixing decorative stitches in a single row. Let’s dive in!
How to Combine Decorative Stitches (Yes, You Can!)
Okay, here’s where things get really fun.
If you’re using an electronic sewing machine, especially one that’s a combo of embroidery, quilting, and regular sewing like mine, you probably have access to a ton of decorative stitches—and some secret superpowers too.
One of my favorite features? You can combine sewing machine decorative stitches to make one long, continuous row of decorative stitches!
Can you see this last stitch all the way down?

Now, every machine is a little different, so I always recommend checking your manual for the exact steps. But from what I’ve seen, this works pretty similarly across most models:
- Select your first stitch—that’ll be your starting point.
- Then, select your second stitch—and ta-da! You’ll see them start to line up on the screen.
- Keep going if you want—stack up a whole row of different designs in the order you like!

My machine even has letter stitches, which means I can literally write words with my sewing machine. Combine that with hearts, flowers, and other cute shapes, and you’ve got yourself a recipe for totally custom designs.
You can even make your own labels or tags without needing a fancy embroidery machine. Just pick your letters, add some little flourishes, and sew them right on your project!
It all depends on what your machine can do, but even basic models often let you build simple stitch combos—so don’t be afraid to play around and see what magic you can create!
Troubleshooting Sewing Machine Decorative Stitches
Alright, let’s talk about the not-so-fun part of sewing decorative stitches—when things don’t go quite as planned. Yep, it happens to all of us! But don’t worry, most issues have super simple fixes.
Here are the most common hiccups and how to solve them:
Thread keeps breaking?
Try adjusting the thread tension on your sewing machine. Decorative stitches can be a little demanding, so your thread needs some wiggle room to move and shape.
Fabric bunching up underneath?
That usually means your fabric needs more support. Use a stronger stabilizer, especially if you’re sewing on lightweight or stretchy fabric. Trust me—this one’s a game changer.
Skipped stitches ruining your design?
That’s your cue to change the needle (especially if it’s been a while!) and check that your bobbin is threaded properly. A tiny little mistake in the bobbin can cause a whole lot of chaos.
Wonky or wobbly designs?
This is a sneaky one—and it’s usually us! If your stitches are uneven or shifting weirdly, make sure you’re not pushing or pulling the fabric as you sew. Your hands should gently guide the fabric through—no tugging, no forcing. I know it feels like you want to help the machine, but honestly, it’s got this!
Little adjustments go a long way—and once you’ve nailed these, your stitches will look clean, polished, and oh-so-satisfying.
You’ve got this!
Wrap-Up and Final Thoughts!
And that’s a wrap, my friend! I hope you’re feeling inspired and ready to play with your sewing machine’s beautiful decorative stitches. You can now add a sweet detail to a hem or stitch up your name in thread. This is such a fun and creative way to level up your projects.
Remember—it’s all about experimenting, testing things out, and letting your machine do the magic. Now go grab some scraps, pick your favorite stitches, and have fun creating something totally you.





Thanks. My machine can do some decorative stitches, but I have been afraid to do much with them. You have given me enough information that I am now ready to TRY! Thank you!!!
Hi Nancy! I am so glad, please let me know how it goes!
How can I print this without all the ads?
Hi Sandi, We may be can a printable version if enough people is interested in it.