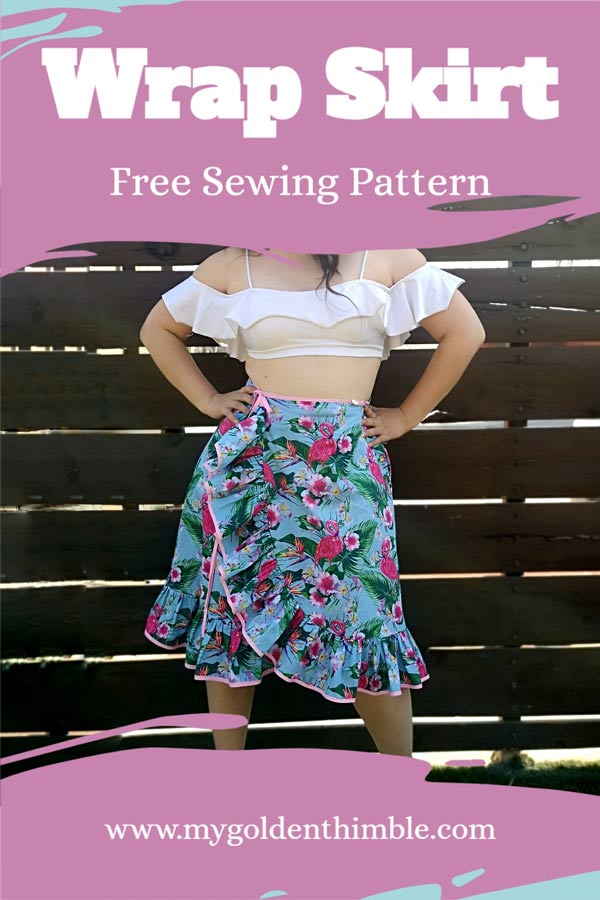
This spring your closet will be season-ready with our Wrap Skirt Pattern. A PDF file you can get for free!
This special tutorial is explained step-by-step with clear and understandable pictures. Plus it is perfect for beginners!!
The best thing about this pattern is its versatility. Just one size can be adjusted to fit you and other sizes.
If you want to share of course.
Are you ready for a new project? Let’s go!
Don’t forget to check this out too: Easy Paper Bag Free Skirt Pattern
This lovely Wrap Skirt Pattern design with a gathered hem trim will turn all the heads towards you.
You will look awesome by the beach, at lunch with friends, at a summer party… Wherever you go.
It’s fresh, feminine, and easy to wear!!
I love every garment I don’t have to work to put on. Dresses and pants are so complicated.
Yeah, lazy, I know.
But it’s true. Try putting on this skirt!

It’s almost like a towel!!
Oh and the best thing? Is so easy to sew that you only need your basic skill set and your sewing machine.
Using your serger machine is optional.
For me, this wrap skirt is going to match perfectly with some of my basic shirts.
Or like in the pictures here, with my Kelani Bikini Pattern.
Just add a pair of sunglasses and a cool hat.
Is a wrap skirt pattern easy to sew?
We made this long wrap skirt pattern so that anyone can make it.
It can be done if you have a sewing machine and have some basic knowledge of machines or hand stitches.

This design, in particular, uses basic stitches like the straight stitch and the invisible hem.
I recommend you to see our basic stitches post to see the different stitches that you can use for the hem.
Also, if you don’t want to add the ruffled hem, remember to opt for an easy invisible hem made with a specialty presser foot.
How much fabric do I need to sew a Wrap Skirt?
For this project, you will need 1.6 meters or yards for a fabric width of 1.5 meters or 60″.
Use lightweight fabrics such as cotton, linen, silk, and viscose/rayon.
Or medium-weight fabrics, if you want more structure on your skirt, such as denim, denim, wool, or linen.
How to make a beginner-friendly Wrap Skirt?

To make this pattern easier to sew we removed the slit that most wrap skirt patterns have and replaced it with a simple button mechanism.
Another thing you can do is to skip the pockets if they feel too much to sew for you.
This will make it faster.
But… Everyone loves pockets. Scratch that!
How many sizes does this pattern fit?
This wrap skirt pattern has a waist measurement of 31″ and depending on your size table can range from sizes S to 1XL.
Why, do you ask?
Because the front panels overlap with each other!
This gives us room to make it way bigger, and way smaller. Up and down from the basic size we are offering here.
Measure your waist with a measuring tool (AKA a measuring tape) so that you can position the button on your skirt waist to fit perfectly.
Are you thinking what I am thinking?
This pattern will make a great gift for your family and friends if you want to give a garment as a present and you don’t know exactly their clothing size.
Wrap Skirt Pattern. Step by Step Sewing Tutorial.
The instructions are a bit long but they are extremely detailed to clarify all your questions.
Plus, we support that even better with reference pictures.
Materials:

- Lily Wrap Skirt Sewing Pattern
- Light or medium fabric (I used a light cotton fabric)
- Sewing Scissors
- Measuring tape
- Pins
- Marking Tools
- Bias binding Tape
- Sattin Trim Cord
- A button
1. Download the PDF Wrap Skirt Pattern.
To download this amazing pattern, sign in to your account below. You will get an instant download with all the files in your email.
Choose between the printing options letter or A4.
Once you download your PDF pattern, print it out, assemble it, and cut it.If you don’t know how you can watch our tutorial to learn how to print it and assemble pdf sewing patterns.
2. Cut your fabric.
Cut the patterns on your fabric following the indications on the patterns.
And if you want your skirt to have ruffles, you must cut out a strip of 5 ½” wide x 142″ long from the fabric.
To achieve this, you can divide the strip into the parts you want according to the width of your fabric and join the strips to make a long single one.
But if you want you can use longer strips for the ruffles to make them fuller.
3. Add Bias Tape and the buttonhole.
Take the left side of the front skirt (the one with the curve on the right side), and place it with the right side of the fabric facing up to you.

Pin bias tape of the color of your preference along the waist. At the end of the front side add a loop of ribbon to form the buttonhole.
Make sure a button can pass through.

Fold the end of the bias tape in so you don’t leave the raw end out on the open.
Sew your bias tape making sure the ribbon loop is secured.
4. Sew the pockets

Serge the edges of the four layers of pockets.
Using the notches of the pattern, position the pockets over each side of the skirt on the back and front.
Face the right sides of the fabrics together.
Sew at 1/2″.
Turn the pocket out and make a topstitch at 1/8″ of the side seam of the pocket lining.
Make sure you grab both seams, the pockets, and the skirt seam allowance.
Repeat this process on all sides of the skirt. The backsides and the front sides.
5. Join sides

Place the back skirt facing up. Place the front skirt panels on the back panel with the right sides of the fabrics facing together.
Then sew the sides ½” pass the seam over the pockets as shown in the image above.
Press the seams of the skirt open.
6. Add the waist bias binding

To the waistband cut a 63 ¾” strip of bias binding.
Extend the skirt to the right side.
Press the bias in half and press inward ¼” on the sides of the bias.
Measure 15″ from the bias tape and mark with a pin or chalk.
From the previous mark, start placing the bias binding around the waist, through the left front and the back skirt.
When you reach the sides of the skirt, integrate the seam by making a slight curve with the bias binding, as shown in the image above. Make sure you cover the front right side of the first waist bias tape you sew first.
However, you can modify the hanging measurements of the strips on each side.
These bias-binding hanging strips will be used as cords to tie up your skirt at the waist.
7. Sew the button

To find the placement of the button, wrap the skirt around your waist and see where the inner layer falls.
Mark, use your buttonhole as a guide to where the button should be.

Make sure that the skirt is tight enough to keep in place but not too tight so you can’t breathe in it.
By adding more buttons you can play with the sizes of the skirt and you can place the buttons at certain distances, so you can wear it depending on your comfort and even share it with your sister or friends.
8. Sew the bias binding on the ruffle

This part is optional, if you want you can finish the skirt with a blind hem.
To add a nice look to your ruffles you can add bias binding to the edge of the strip.
If you have the bias binding foot you can use it. It will make the job way easier.
9. Add a Ruffle Trim

Make a hem of ½” on each side of the strip.
To do the ruffles use the special machine foot and if you have never used it you can see our post: how to use a gathering foot.

If you don’t have this machine foot you can do the following:
Make a long stitch along the length of the bias at ¼”, leaving enough thread at the beginning of the seam and the end (about 3″ on each side).
You can also stitch a seam lower at ¼” as a precaution in case the thread breaks.
Pull the threads to form a ruffle along the entire length of the strip.
Arrange the gathers until there are even pleats along the entire length, and this strip measures the same as the hem of the skirt.

Place one end of the band just below the waist bias tape, with the right sides of the fabric facing together.
Secure with pins all around the skirt, sew at ½”, and press seams out.
10. Press the Ruffle Seams

Finally, serge the edge of the seam allowances of the skirt and of the ruffle trim together.
Press the seams towards the skirt bod

And that’s it! Have you tried it on already?
I loved this wrap skirt pattern, depending on the print you can achieve a pretty unique and feminine look.
You can also experiment and use different fabric colors for the skirt and ruffles.

Make your fabric from scraps, or reuse garments you no longer wear.
Making the skirt with pockets is very useful and even though the ruffles are optional, they give it a completely different and amazing look.

Yes, I know it can be a little bit hard to sew and arrange the ruffles on our hem. But hang in there. It will be worth it!
It is very easy to wear this skirt, you just close the button and make a nice knot to hold it on the other side.
The warm weather is coming and this free project is waiting for you!
Do you enjoy our freebies?? Support us so we can keep making freebies for you by buying us a cup of coffee here. We will be forever grateful!
Don’t forget to follow us on Social Media!!

How to Sew a Wrap Skirt
Learn how to sew a beautiful wrap skirt for Medium Sizes.
Materials
- Lily Wrap Skirt PDF Sewing Pattern
- Lightweight Fabric
- Sewing Scissors
- Measuring Tape
- Pins
- Bias Binding Tape
- Button
- Satin trim cord
Instructions
- Download and Print our Free Sewing Pattern. Assemble the pages by joining the corner squares.
- Cut your fabric following the indications of the sewing pattern.
- Add bias tape on the waist of the right side of the front skirt.
- Make a buttonhole at the end of the front waist hem.
- Place the pockets aligning the notches and sew at 1/2". Make a topstitch.
- Join the sides. Place the fronts over the back of the skirt with the right sides facing together. Align the sides and sew at 1/2".
- Add bias tape on the hem of the waist leaving a tail long enough to tie a knot and a bow.
- Try the skirt on and mark where the button needs to be sewn. Sew the button in place.
- Sew a hem or bias tape on the hem's ruffle.
- Gather the ruffle trim to fit the skirt's hem measurement.
- Join the ruffle to the skirt at 1/2"
- Serge the seam allowances and press towards the skirt.
Recommended Products
As an Amazon Associate and member of other affiliate programs, I earn from qualifying purchases.
-
 1 Yard - Cotton Fabric (Great for Quilting, Sewing, Craft Projects & More) (color62)
 -
Bias Tape Double Fold 1/2 inch, Double Fold Bias Binding Tape 55 Yards (Pink) and 4 Pieces Sewing Fabric Chalks for Crafts, Sewing, Seaming, Hemming, Piping, Quilting.
-
Master FAB -100% Cotton Fabric by The Yard for Sewing DIY Crafting Fashion Design Printed Floral(Spring Flowers Blue)


I really want to make this! You make it seem so easy! But, I need I need a plus-size. Can you tell me how to do this? Wish I could find that pink flamingo fabric…it’s gorgeous.
Hi gorgeous Linda!
We have an option to download all sizes of this pattern as well as the printable step by step sewing instructions at our shop! It is an instant download.
Could you do videos with your sewing projects I love your ideas I just don’t know what I’m doing by reading I learn more by watching. I guess it don’t help I’m new to sewing as well. You inspire me!
Thank you so much Jill! You guys inspire me too, to get better and to provide better tutorials.
I don’t always have the time to make videos but there is already a lot of them on youtube or here on the blog. We will slowly try to add more and more.
Thank you for this free pattern, I’ve just finished printing and piecing it together and I’d just like to say thank you, as it’s one of the best A4 patterns I’ve used, I’m not normally a fan but you’ve made my day. So easy to trim and join, no guess work… well done xx
Kat. These kinds of comments are the reason why I keep waking up and making content for you guys, trying to get better each day!
Thank you so much for taking the time to write this. You made my day 😀
I love this Skirt! Is so pretty and it seems easy to sew. Thank you.
Where is the link for the download?
Under step number 1 is a sign-in box. After you sign you can access to the link to download on either letter or A4 printing size.