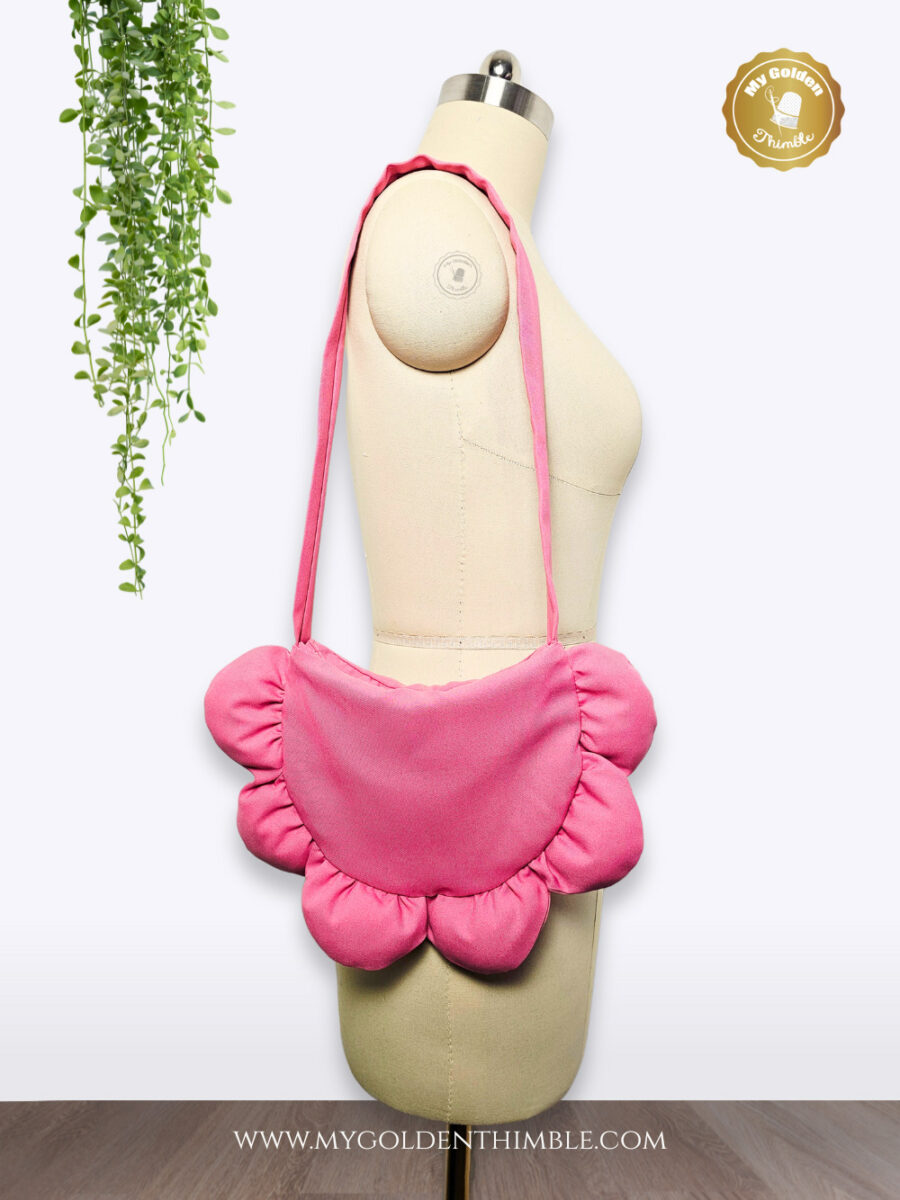
This Flower Shaped Bag Sewing Pattern is my little love letter to spring and my cheerful hello to summer.
It’s playful, it’s adorable, and it’s the kind of accessory that instantly brightens up any outfit, whether you’re pairing it with your sundresses or just jeans and a cute top.
Plus, it’s one of those magical makes that’s just as fun to wear for kiddos as it is for grown-ups like us!
I don’t know about you, but I always feel like the transition from spring to summer calls for something extra fun and floral… and what better way to say goodbye to the blooming season than by literally carrying flowers with you?

NOTE: This post contains affiliate links, which means that if you make a purchase using one of the links in this article, I may earn a commission at no extra cost to you (To know more about this, click here.)
About this bag sewing pattern
Now, let me tell you how this project bloomed (pun totally intended).
Ever since I finished sewing my yellow crop top, I had this dreamy outfit in mind—one that was overflowing with flower-shaped accessories. It had the perfect sunny vibe! I even pinned a bunch of flower crochet bags for inspiration…
But there was just one tiny problem: I don’t know how to crochet. And let’s be honest, starting a whole new craft just to finish one outfit?
That’s a lot of commitment for one look, even for me.
So instead, I did what any sewing-obsessed dreamer would do—I created a sewing pattern version of the flower bag I had been obsessing over.

It even has the perfect size: 14 ½” wide and 10” tall. Just what you need for a casual outing. And you can use any fabric canvas you have in your stash, plus it only needs a standard nylon zipper. That’s it.

Friends, let me tell you, it turned out even better than I expected! I had so much fun putting this one together, and while it might look like a tricky project, it’s honestly way easier than it seems.
The best part? It comes with a printable PDF pattern so you won’t need to stress about shapes, sizes, or doing any funky guesswork. Just print, cut, and sew your way to the cutest bag ever.
Let’s get into it.
Flower-Shaped Bag Sewing Pattern Tutorial

Materials You’ll Need
To sew your own Flower Shaped Bag, you won’t need a lot—just a few cute supplies and a little bit of time:
- ½ yard of fabric – You can use any sturdy woven fabric like cotton canvas or twill, or go bold with soft faux leather for an edgy vibe. Both work beautifully!
- 1 nylon zipper, 9” long – Try to get a fun color that pops or one that blends in—it’s your call!
- Matching thread – Because nobody wants their stitching stealing the spotlight.
- Craft Filling- To give volume to those petals.
- Optional: Fusible interfacing – If your fabric feels too flimsy or lightweight, a little interfacing will give it the structure it needs.
That’s it! We’re keeping this simple and sweet.
Step 1: Cut All Your Pieces
Start by cutting out all your fabric pieces. You can grab the PDF sewing pattern at the end of this post, which includes every petal and curve already measured and ready to go.
I designed it with a lot of love and attention to detail, so you don’t have to second-guess shapes, sizes, or how things fit together.
It’s the easiest way to make your bag look polished and pretty from the very start. But hey—if you’re the adventurous type and want to draft your own, I’ll leave a picture reference you can use.

Just draw a half-circle for the body of the bag and a scalloped strip for the petals in whatever size you want. It’s a fun little challenge, but if you’re short on time (or just want to skip the math), trust me—the pattern will make your life so much easier.
Step 2: Sew the Petals
Now we’re going to sew the petals of our bag, and honestly, this part is so satisfying. It’s basically like sewing a scalloped edge. You’ll want to pin the two layers of the petal strip together with the right sides facing each other.

Then sew along the scalloped edge using a ¼ inch seam allowance. Take your time around those curves, especially at the inner corners—they’ll help shape each petal beautifully once we flip it.
After sewing, clip the curved seams using small triangle notches, and make tiny snips into each corner (but not through the stitch line!) so the fabric turns nicely. Then flip the whole strip right side out and press it gently, taking care to shape the curves as crisply as you can.
Step 3: Add Craft Filling to the Petals
This part adds a little puff to your petals and makes them look extra cute. Grab your craft stuffing and gently fill each petal with just a small amount—enough to give it a nice rounded shape without overstuffing. Think of it like giving them a little pillow softness, not plush toy volume.

Once you’re happy with the puffiness, pin the raw edge of the strip together and sew a basting stitch at ⅜ inch.

After that, gently pull the threads to gather the strip until it measures about 21 inches in total length. This is where the flower shape really starts to come alive!
Step 4: Attach the Petal Strip to the Bag
With your petal strip ready, measure 1 inch down from the top edge of the back body panel. Start pinning the gathered petal strip all the way along the curve of the panel, stopping at the 1-inch mark on the opposite side.

Make sure to use plenty of pins or sewing clips to keep everything in place. Petals have a mind of their own sometimes, so you’ll want to guide them with your fingers as you pin to make sure they don’t overlap too much at the seams.
A little patience here will give you a really clean finish later.
Step 5: Sew the Bag Body
Once the petal strip is pinned in place, take the front body panel and lay it on top of the back, with the right sides facing.

Pin everything together, sandwiching the petal strip between the two layers. Then sew all the way around the curved edge using a ½ inch seam allowance.
This will join the petals to the body and close up the main part of the bag.
Step 6: Make and Attach the Strap
To make the strap, fold the strap piece in half lengthwise with the right sides facing in, and sew down the long edge using a ¼ inch seam allowance.

Turn the strap right side out with a loop turner (or safety pin!), then press it flat with the seam running along one side.
Now, pin one end of the strap to each side of the bag, matching the strap seam with the side seam of the body.

Use a basting stitch—either by hand or machine—at ⅛ or ¼ inch to keep the straps in place for now.
Step 7: Prepare the Zipper
Let’s get the zipper ready before we attach it. If you’re using zipper by the yard, go ahead and add the zipper pull now. Then prepare your zipper panels by folding one long edge ¼ inch toward the wrong side and pressing it flat.

Next, we’ll secure the zipper ends. Fold the top edges of the zipper tape at a 90° angle and stitch them in place to keep the ends neat.

For the bottom, shorten the zipper if needed and add a zipper tab made from a strip of bias tape from your bag fabric. Sew it to the bottom end, then trim the excess.
This gives your zipper a clean, finished look.
Step 8: Sew the Zipper Panel
Now, sandwich the zipper between two zipper panels with the right sides of the panels facing each other. Align the edges and sew along the top edge at ¼ inch seam allowance.

Do the same for the other side. Once both sides are sewn, flip everything right side out and topstitch along the zipper edges to give them a crisp, professional finish.
Step 9: Attach the Zipper to the Bag
Make sure your zipper is at least one-third open—you’ll need that later to turn the bag inside out. Center the zipper panel on the top raw edge of the bag, pin it in place, and sew at ½ inch seam allowance.

You should now have a fully enclosed outer shell with petals, strap, and zipper. Almost there!
Step 10: Sew and Insert the Lining
To make the lining, place the two lining body panels right sides together and sew around the edges using a ½ inch seam allowance, but leave a 3-inch opening at the bottom.

Next, open the zipper completely, and insert the lining into the bag with the right sides facing. Align the top raw edges and sew all the way around at ½ inch seam allowance.

Then, turn the whole bag right side out through the opening you left in the lining.
Step 11: Finish the flower shaped bag sewing pattern
To finish up, close the opening in the lining. If you want that invisible finish, use a ladder stitch by hand.

Or if you’re short on time (no judgment here!), you can tuck the seam allowances in and topstitch the opening closed. Honestly, no one will notice—it’ll still look adorable either way.
And just like that, you’ve made the cutest little flower-shaped bag sewing pattern ever!
Grab the Flower-Shaped Bag Sewing Pattern
If you’re ready to make your own Flower Shaped Bag Sewing Pattern, I’ve got a super detailed PDF sewing pattern waiting for you! It includes all the templates you need—perfectly measured petals, scallops, and curves—plus step-by-step diagrams to guide you through the process. I put a lot of heart into making this pattern beginner-friendly and fun, and it’s the exact one I used to sew the bag in this tutorial.

You can download the pattern right here and print it at home in just a few clicks. It’ll make the whole project so much smoother—no guessing, no measuring, just sewing!
➡️ Get the Flower Shaped Bag Sewing Pattern Here
Trust me, once you sew one of these, you’ll want to make it in every color for summer. And maybe a mini version for your favorite little one too!