
Today I want to share with you one lovely Free Quilt Pillow Pattern. One of my first pillow patterns.
I made this quilt pillow cover using only fabric scraps—very small scarps. And in my opinion, it turned out great.
Keep reading to learn how to make this beautiful quilt throw pillow cover.

NOTE: This post contains affiliate links, which means that if you make a purchase using one of the links in this article, I may earn a commission at no extra cost to you (To know more about this, click here.)
I have not made a lot of quilts in my life. Maybe two big ones for beds and 3 or 4 as covers for my dog’s mattresses or my machine covers.
There is a reason. I don’t do it that often because I get very invested when I start making a quilt.
Usually, I lose track of time when piecing my blocks together.
If you are a quilter, I bet you understand the feeling. There have been days when I forget to eat! When I turn my face away from the machine, I discover it is dark outside.

The weirdest thing is that I know I would take half the time using bigger blocks. Nevertheless, I am obsessed with using tiny blocks (1 ½” to 2” squares).
I admit that is way harder. Especially when you are nesting seams at ¼”.
But check out the result and tell me it isn’t worth it. I bet you can’t.
The tip this beginner can give you is to cut your blocks a bit larger than indicated on the patterns and trim the excess. For example, blocks are 1 ½” in my pattern, and I cut the squares to 2”. That will allow room for minor mistakes.
How to sew the Pookie Free Quilt Pillow Pattern.

You can sign up below to unblock the Pookie Free Quilt Pillow Pattern instructions to sew this throw pillow.
You can save these step-by-step instructions, pin them and even print them.
The second option is to get the printable PDF (ads free) with the exact graphic instructions to join the blocks in steps. This can be more comfortable for you to follow, and you can download it to your computer or phone for easy reading.
The final measurement of this throw pillow is 18” by 14”.
Please let me know if you liked this free design by dropping a comment at the end of this post.
Pookie Free Pattern and Sewing Instructions

How to Sew the Pookie Quilt Pillow Cover Pattern
Make a beautiful Pinwheel Quilted Pillow Cover with our easy step-by-step graphic instructions.
Materials
- 126 square blocks of 2” x 1 ½” (solid)
- 24 square blocks of 2” x 1 ½” (striped print)
- 1 strip of 108” x 1 ½” (prints)
- Pillow Insert (19” x 15”)
- 2 pillow backing pieces of 12” by 14”
- 1 piece of batting of 20” by 16”
Tools
Instructions
Note: All seam allowances are ¼” unless stated otherwise on the instructions.
Quilt Block Preparations:

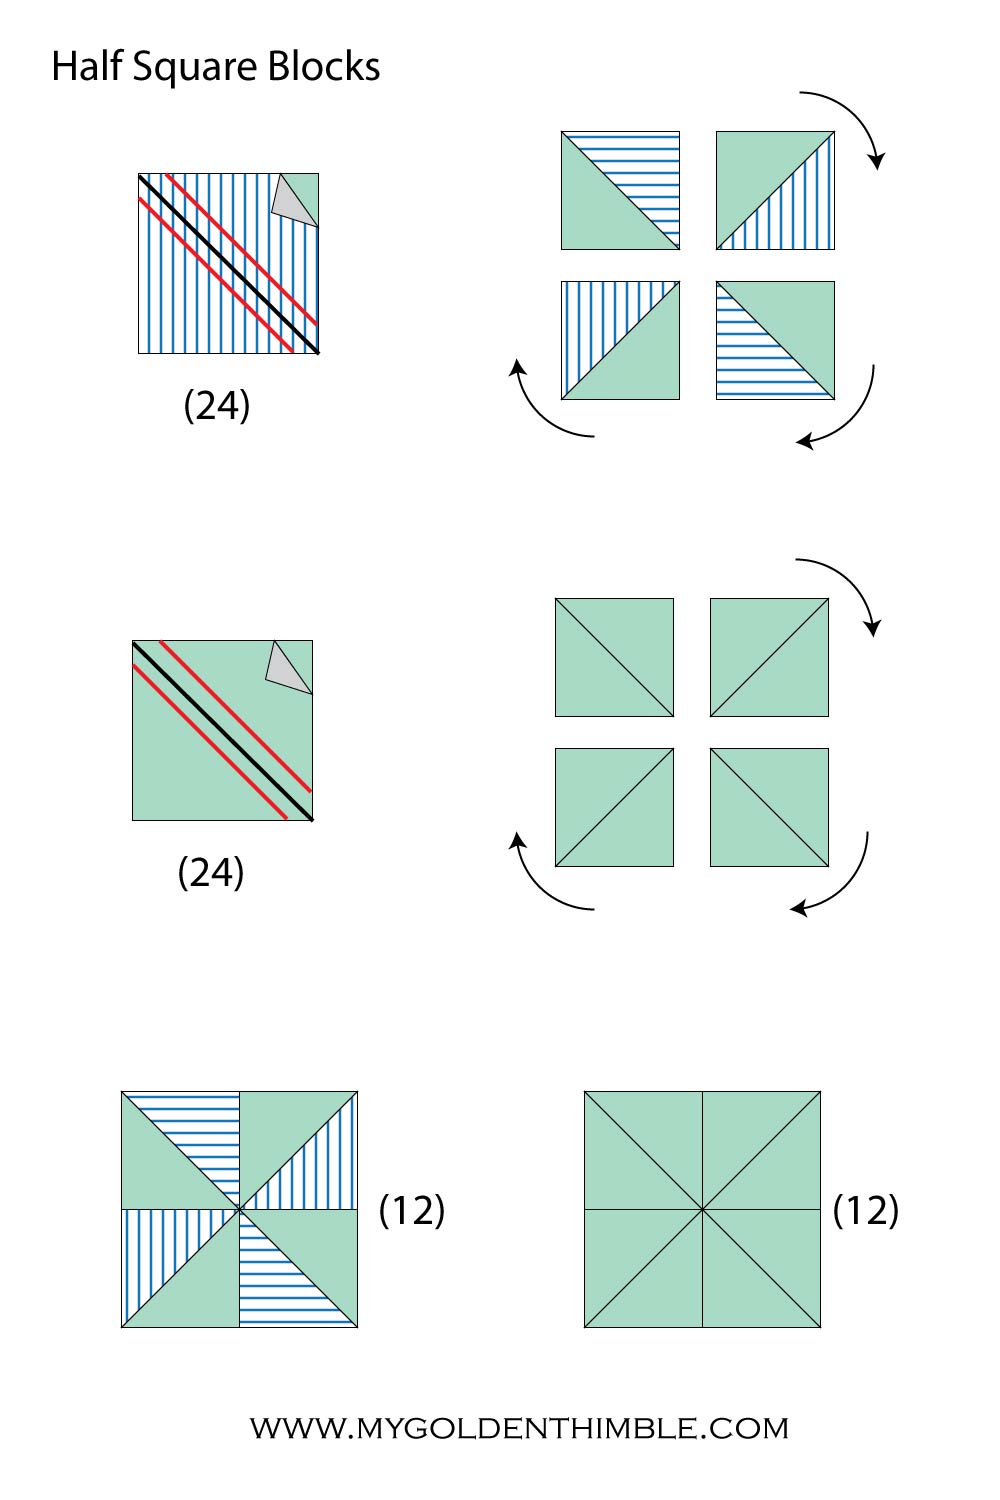
1. Create the half-square triangles.
Place two square blocks (one solid and one printed) together with the right sides of the fabric facing together.
Draw a straight line across the square from one corner to the other.
Repeat this 24 times. Trim the blocks to a 1 ½” x 1 ½” square.
Place two square blocks (two solid colors) together with the right sides of the fabric facing together.
Draw a straight line across the square from one corner to the other.
Repeat this 24 times. Trim the blocks to a 1 ½” x 1 ½” square.
Stitch on each side of the line at ¼” and press to set in the seams. To make it easier, sew all the squares in a chain.
Then turn them to the other side and sew that side.
2. Create the Pinwheel Block
Cut all blocks on the center of the seam (black line). Open each square to reveal the half-square triangles.
Press the seams to the same side on all blocks so you can nest the seams later.
Rotate your squares as indicated on the picture to create a pinwheel block.
Make 12 pinwheel blocks with combined fabrics and 12 blocks with solid fabrics.
3. Pinwheel Rows
Make 2 rows of 6 pinwheel blocks. Alternate between the printed blocks and the solid color blocks.
One row starts with the printed pinwheel, and the second row starts with a solid color block.
Repeat these steps a second time.
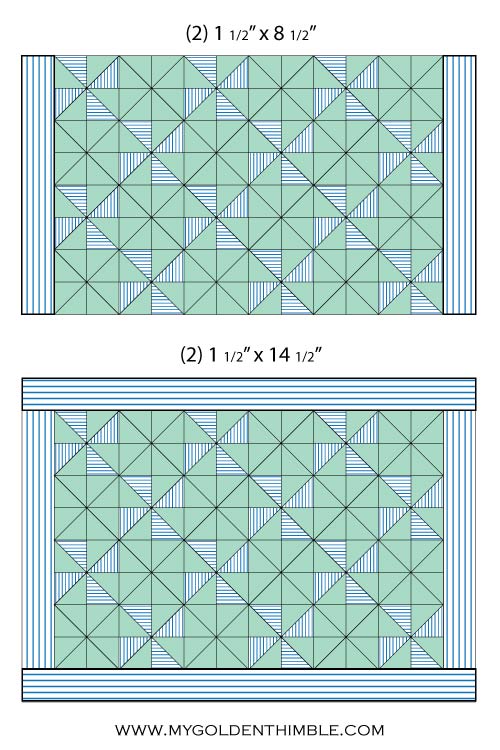
Join the four rows together, as indicated in the picture below. Press your seams.

4. Strip frames.
Cut 2 strips of the printed fabric of 1 ½” x 8 ½”.
Join them at each side of the rectangle (on the shorter sides) at ¼” press seams to one side.
Cut 2 strips of the printed fabric of 1 ½” x 14 ½”.
Join them to the top and bottom of the rectangle (on the longer sides) at ¼” press seams to one side.
5. Strip Block Frames
Make 2 rows of 10 square blocks. Press the seams to one side.
Join each row to the sides of the rectangle (on the shorter sides) and press flat.
Make 2 rows of 16 square blocks. Press the seams to one side.
Join each row to the top and bottom of the rectangle (longer sides) at ¼” and press the seams to one side.

6. Strip frames.
Cut 2 strips of the printed fabric of 1 ½” x 12 ½”.
Join them at each side of the rectangle (on the shorter sides) at ¼” press seams to one side.
Cut 2 strips of the printed fabric of 1 ½” x 18 ½”.
Join them to the top and bottom of the rectangle (on the longer sides) at ¼” press seams to one side.

7. Quilt
Place the batting layer behind the patchwork and quilt the fabrics with the design of your preference.
8. Make the pillow’s back
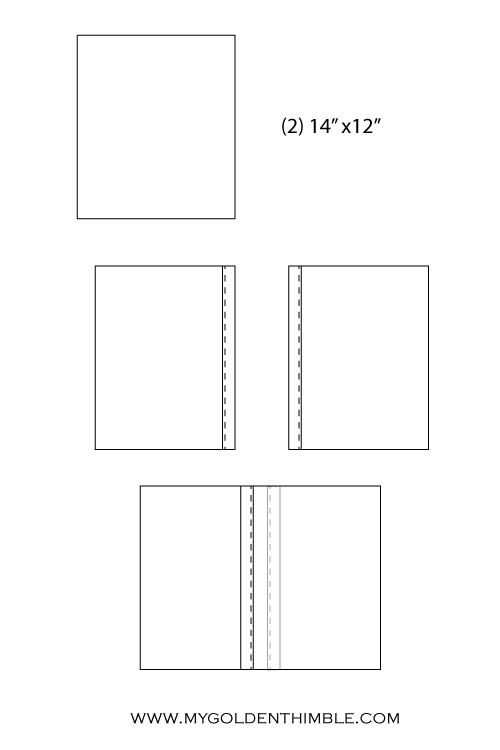
Take the back's 14” x 12” rectangles and hem the center sides.
Make a rolled hem of ½” twice.
Overlap the side of the hems 1” and place them over the quilted layer with the right sides of the fabrics facing together.
Sew the pillow back to the front layer at ¼” or ⅜,” then zig-zag or overlock the edges. Turn outside. Finally, insert the pillow.
Notes
Note: All seam allowances are ¼” unless stated otherwise on the instructions.
Recommended Products
As an Amazon Associate and member of other affiliate programs, I earn from qualifying purchases.
-

 Spoonflower Fabric - Blue White Stripes Ticking Cottage Chic French Country Nautical Printed on Petal Signature Cotton Fabric by The Yard - Sewing Quilting Apparel Crafts Decor
 -
 Contempo Words To Quilt By Happy Feather Teal, Quilting Fabric by the Yard
 -
 Warm & Natural Twin Cotton Batting
 -
 100g/3.5oz Polyester Fiber Fill, Premium Fiber Fill Stuffing, Fluff Stuffing High Resilience Fill Fiber for Stuffed Animal Crafts, Pillow Stuffing, Cushion Stuffing
Psst…Is this article helpful to you?? Please support us so we can keep making awesome tutorials for you by buying us a cup of coffee here. We will be forever grateful!







