There is no one better suited to Remove Car Seat Stains than a homemaker or seamstress.
Ha! Are you telling me that a store-bought product can be a better choice than my experience?
I have dealt with food, blood, dirt, ink, glue, and all sorts of drink stains on my whole house and fabrics. Even from my three dogs and their fluids…
So yes. When I need to remove a car fabric seat stain, I make my own cleaning mixture. One with ingredients that I already have in my household is way less risky to damage my car.
And today, I will share this homemaker’s process for cleaning your car seats the best way. I will also share with you the best store-bought brand products to remove different kinds of stains from fabrics.
So keep reading until the end.

NOTE: This post contains affiliate links, which means that if you make a purchase using one of the links in this article, I may earn a commission at no extra cost to you (To know more about this, click here.)
One thing you should know about me is that I prefer clean, shiny, and perfectly organized spaces.
Despite what you might think, my car is one of the cleanest spaces I own.
I never leave things lying around. And I definitely don’t eat inside it.
Well… I might have sneaked a bag of chips or two. But I always vacuum afterward. And never wet food!
That’s why I was so surprised when I found this ugly stain on the seat a couple of weeks ago when I opened the back door.
Stains are easier to remove right after they happen.
What the heck was that, and how on earth did it get there?
At first, I was mad because if someone threw something in my car… Why didn’t they tell me?
Stains are easier to remove when you clean them right after they happen.
So, common courtesy would have been telling me so I could do something about it right then.
Anyways… After I had two extra minutes to think, I calmed down.
Maybe they didn’t know. Perhaps I was to blame! I am pretty clumsy sometimes. In any case, that stain had to be cleaned.
As I didn’t know what was the composition of that stain I decided to play it safe and use my basic fabric cleaning mixture.
I use the same mixture to deep clean my couch and cushions.
Let’s dig into it.
Ingredients to avoid.
There are many options available, depending on the type of stain on your car seat. If you don’t know what kind of stain you have, try a laundry detergent and baking soda mixture.
Baking Soda is the best cleaning ingredient in the world. I use it for everything, even to make toilet cleaning lemon pods.
This type of mixture will remove 90% of stains.
Avoid using ingredients that you have never used to clean things before. Car seats can be very easily damaged. And as you might know, once a permanent mistake happens… You can’t go back.
If my baking soda and laundry detergent mixture doesn’t work, you can try one of my recommended car seat cleaning solutions.
I am telling you this because most of the recommended ingredients to clean fabric seats out there suggest risky components.
If you don’t have any experience cleaning with items like vinegar, club soda, toothpaste, or nail polish remover (please refrain from using nail polish remover!), you can accidentally make things worse.
If you don’t remove the vinegar correctly, your car will stink for weeks!
Club Soda might actually stain the seat more and leave you with a humid smell.
Other things… Well, you can imagine.
So, try my technique first. If you don’t see the same results as me, go for a brand-name cleaner.
Before I teach you my cleaning technique, please read what things you should avoid while doing it.
What Not to Do When Cleaning Your Car Seat.
Leave the stain sitting for too long.
The longer you leave a stain sitting and drying on fabrics and leather, the harder it will be to clean it. Most fabric cars have open-weave fabrics, which makes them prone to catching and absorbing liquids and small particles more easily. Therefore, if you leave a stain for an extended period, it will dry and become permanently attached to the fabric.
Avoid using stiff brushes.
Fabrics shed. All fabrics are made of tiny threads that are woven to create a canvas. Those threads can break tough and leave a “hairy” look on the surface. To avoid that happening to you, choose a soft and small brush. You can even use a Silicone Sponge. They are way gentile when cleaning fabrics.
Scrubbing too hard.
Scrubbing a stain too hard can cause two problems with your car seat. One is that it can damage the fabric fibers, causing them to break. Another concern is that you can spread the stain further if you push the seat too hard. We are trying to isolate the stain. That’s why we need to do this nicely and softly.
Not cleaning the dirt first.
What happens when you mix dirt and water? Mud! Mud happens. While it was a blast playing with mud as a kid. As an adult with a car, it’s not that fun. Remove the dust and dirt before applying any kind of wet mixture to your car seat stain. You can use a cloth or, even better, vacuum the entire area before cleaning.
Dampen the seat with water or soap.
This is a mistake that I learned the hard way. You should never use a fully damped cloth to clean a cushion or a seat. Nothing that has the property to absorb and keep water. Even if there is not a lot of water, leaving the seat wet to the touch can cause humidity issues, such as bad odors or mold.
Cleaning just the stain instead of the whole sit.
I assume you have had your car for more than a day. Even if you don’t. And your car is brand new. If you use any kind of ingredient and you put it in your seats, it will make that part different. So, if you use the mixture to clean only the spot where the stain is, what will happen is that part will look clearer than the rest of the seat. Why? Because you clean that part and not the whole thing.
Using Lemon.
I have no idea why using lemon is suggested to clean car seats. But if you know anything about how natural fabric dyes work, you will know that lemon juice is another kind of stain waiting to happen.
Using Cheap Brand Cleaners.
The reason why I am cleaning my car with a homemade recipe is not that I want to save money. It is because it is the safest way for me to do it. Don’t get me wrong. I love a good bargain as much as the next gal. However, purchasing a low-quality product solely to save money on something as expensive as a car is not a wise decision. If it fails, it can end up costing me more to replace the seat.
Don’t allow the car to dry appropriately.
Correct me if I am wrong. But there is no such thing as pure water anymore. Tap water, the one we normally use for everything, is already treated. Therefore, it is possible that even if you clean your seat with clean water, any remaining water may still form a ring. That and the odor are why I take an extra step in my cleaning process.
How to Remove Car Seat Stains on Fabric. Easy Homemade Recipe.

Mixture Ingredients:
- 4 Cups of Warm Water
- 2-3 Tablespoons of Laundry Detergent Powder
- 2 Tablespoons of Baking Soda
Tools:
- Heat Resistant Bowl
- Old Tooth Brush
- White or clear Cloth
- Towel Microfiber Cloth
1. Vacuum your Seat
As we said above in the “What-not-to-do” section, we need to clean any dirt or dust out of the surface of the seats.
If we don’t, then the mixture will mix with the dust, creating a layer of mud. That will only make it harder for you to clean.
Vacuum the seats thoroughly and ensure they are dust-free. If you don’t have a vacuum, use your clean cloth to try and remove as much as you can.
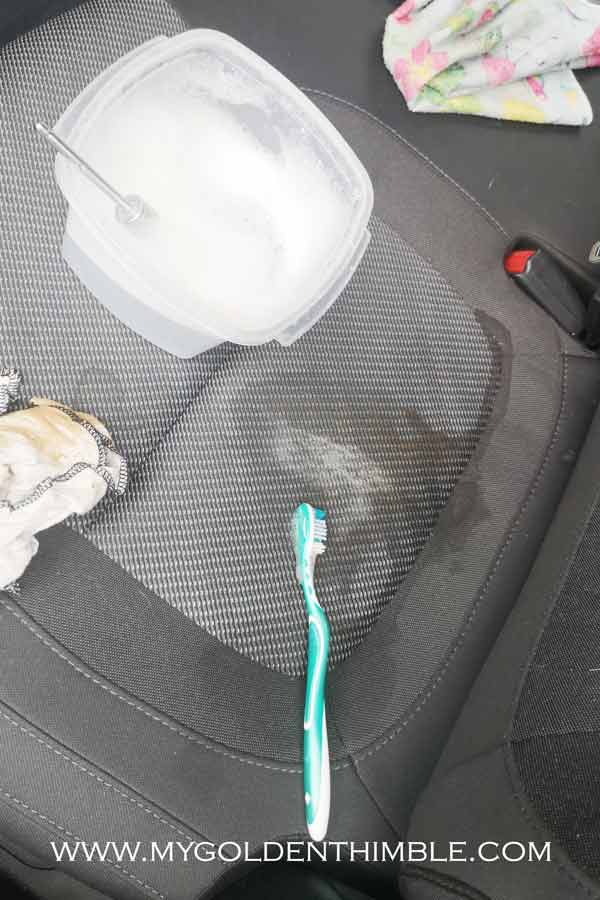
2. Prepare the Mixture.
To make the mixture that will remove car seat stains, first bring 4 cups of water to a boil.
Once boiled, let it cool for about 15 minutes, or until the water is very warm but not hot enough to burn.
Mix the Baking Soda and laundry detergent. Use a kitchen whisk to make a lot of foam with this mixture.
3. Test on a corner.
Before trying to put the mixture on the whole stain, test it first on the furthest and least likely to be seen edge of the stain.
We will see if the mixture works for your type of stain. If you see that it starts to come out, then proceed with the rest of the seat.
4. Scrub with the foam only.
If you are going to take any lesson from this tutorial, it is this one. Clean from the edges to the center.
If you do it in reverse, you will push the stain out of its edge, and you will end up making it bigger.
On the contrary, if you clean it from the outside, it will contain the stain.
Now, use the whisk to create as much foam as possible from the mixture. We will use only the foam to clean our car.
The reason for doing this is to prevent excessive water from accumulating on the seat.
Believe me, you don’t want that. I made that mistake with my bed while trying to clean it out…
It ended up smelling like humidity for days!
Take a small amount of foam with the toothbrush and make circular motions to loosen up the stain.
5. Wipe right after.
After you begin seeing that the foam is changing colors (because of the stain) remove it with your clear/white cloth.
This will prevent the liquid from being absorbed too much by the fabrics. And it will be easier and faster to dry.
Repeat this process until the cloth comes out clean.
7. Clean with a slightly dampened cloth.
Remember how I told you not to clean only the stain spot?
Use a clean, almost dry cloth and pass it through the entire seat, starting from the center of the stain outward.
This will even up the look of the seat, removing any leftover dirt, if any.
6. Use the Towel to dry it out.
Take the towel and press it against the seat using as much weight as you can.
The towel needs to absorb as much water and wetness as possible. Use two towels if you think is necessary.
7. Use more Baking Soda.
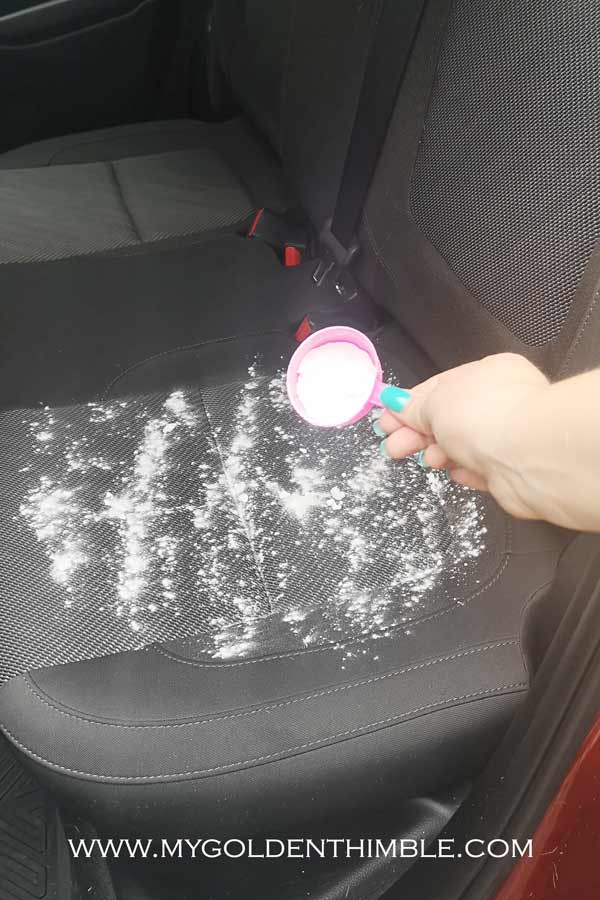
Before letting it dry by itself, we are going to do something to make the drying process better.
Sprinkle 1 or 2 tablespoons of baking soda on all the seats.
This will help absorb any humidity and eliminate unpleasant odors that the stain or water may have caused.
8. Vacuum
Finally, vacuum the baking soda out of the car seat. It should be as good as new!
Planning Ahead. Emergency Kit to Remove Car Seat Stains.
Accidents happen!!
And some accidents are worse to fix than others. That’s why I suggest you have these “emergency cleaning kits” in your car at all times. That way, if something happens, you will be able to act as soon as possible.
What can I include in my Emergency Car Cleaning Kit?
- Wet Wipes
- Towel
- Baking Soda
- A spray bottle with your mixture
- A soft brush
- Waterproof container to store it all.
What is the Best Brand of cleaner to Remove Car Seat Stains?
These are the top-rated brands of products for removing stains from your car, according to user reviews.
- Chemical Guys Foaming Citrus
- Fabric and Carpet Cleaner for Cars by Armor All
- Weiman Leather Cleaner and Conditioner (Leather)
- Resolve Fabric Cleaner and Upholstery Stain Remover
Do you have any more tips for cleaning a car seat? Let me know in the comments!


Use spell check- not “sit” but “seat”.
Hi Marie, thank you for your note. I didn’t had the money to buy a spell checker back then, and some things were missed. Now I am slowly updating these little mistakes.
Cheers, have a nice day.
Great tips! This guide makes removing car seat stains so simple and effective. Loved the natural solutions and step-by-step approach. Very helpful for everyday messes!
I am happy that you liked this.