
In this post, you will learn how to make your own Peter Pan Collar Pattern for any dress or top.
From its exciting origins to this day, the peter pan collar is still a classic look for any fashionista.
After you read this post, you will be able to make this collar for any bodice pattern you already have.
Also, you can download our free PDF Peter Pan Collar Pattern to make a detachable piece to switch and update your garment’s look.
Don’t forget to keep reading until the end to see design ideas for your collar.

NOTE: This post contains affiliate links, which means that if you make a purchase using one of the links in this article, I may earn a commission at no extra cost to you (To know more about this, click here.)
I first wore this type of collar with my clothes around 2010. I remember that this trend went crazy popular among all girls.
Since then, I have seen it on and off in runways and in street fashion.
I have to say that I thought this would be a brief trend.
Nevertheless, it has become a style and a fashion statement that returned to stay.
And actually, it has been around longer than you think.
You can see peter pan collars everywhere.
They symbolize a look of innocence. That’s why we often see this style in young kids’ clothes.
But of course, we grown-ups like to stay cool.
That’s why fashion houses began to push this style everywhere since it first appeared as a “thing” in 1905.
We can add them to designs such as dresses and tops (one of my favorite uses for the peter pan collar are tops). And even in a detachable form, as I will show you at the end of this post.
Do you want to know more about this iconic collar and how to draft and sew it yourself?
Keep reading!
Table of Contents:
- What is a Peter Pan Collar?
- Brief History. Where did the name come from?
- How to Draft a Peter Pan Collar Pattern.
- Detachable Collar
- How to Sew a Peter Pan Collar Pattern.
- Design Ideas
What is a Peter Pan Collar
A Peter Pan Collar is a narrow flat collar with rounded ends at the center front.
It is a variation of the high-stand collar that sits on the shoulders instead of standing out around the neck.
This type of collar sits flat on the shoulders and doesn’t have a band.
You can draft it as a one-piece with a cut-on-fold direction on the center back pattern, or you can draft it in two separate pieces with openings on the front, on the back, or both.
Peter Pan Collar Brief History. What is it called that way?
When you hear the name Peter Pan, the first thing you might think of is the all-known and loved Disney movie.
That’s why you might find it confusing: nowhere in that movie did Peter Pan wear this type of collar.
The term actually dates from the far year 1905.

Rounded collars had been worn before. But they didn’t become that popular until 1905. Maude Adams appeared first in the production of Peter Pan, wearing this type of collar in her costume.
The collar fascinated me so much that the media started talking about it, referring to it as “The Peter Pan Collar was this and that…” Referring to the collar that the actress that played Peter Pan was wearing.
They used the words so often that when the collar became a fashion statement, the name of Peter Pan Collar stuck as a reference.
When you think about it, the fact that “a boy who never grew” was the wearer of this collar as it became popular has everything to do with this collar being associated with innocence and youth.
How do you make a Peter Pan Collar Pattern?
To draft a Peter pan collar pattern, you will need the help of the front and back bodice blocks. You can trace this pattern for any bodice with a rounded neckline.
For example, you can use a dress sewing pattern, a blouse, and even sweaters.
First, place the two neck points together, aligning the shoulders. Then, overlap the shoulder line by ½”.
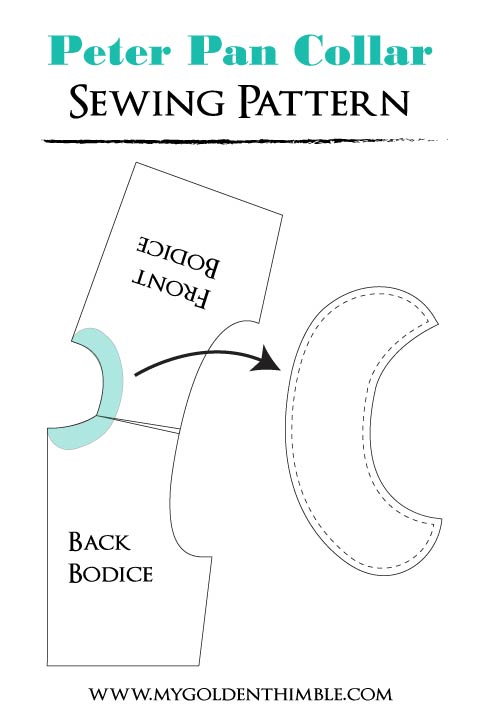
Now you can use your pattern-making rulers to measure and mark how wide you want your collar to be. The standard measurement is 2 ½”.
Which is the size I used.
Mark this measure from the neckline out.
Finally, use your french curve to draw the rounded edges on the center front and back.
Or just on the front if you have an opening or buttons there.
You can use pattern maker’s paper to make a new block of this pattern and add the seam allowance you prefer.
I like to use a ¼” seam allowance for a better finish.
Use this technique to add a Peter Pan collar pattern to any of your necklines.
But, if you don’t feel like drafting a new pattern each time you want to do this, download our free printable sewing pattern at the end and just modify the measurements to fit.
How do you make a detachable Peter Pan Collar?

To make a detachable collar, you only need to copy the pattern we made before and modify the seam allowances.
When you make a collar like this, the important thing to remember is to press fusible interfacing on it. Either on one or both of the layers.
This will give your collar more strength and body.
Depending on what kind of style you want your detachable collar to be, you can change where the opening will be.
For example, I made a detachable collar that opens on the front with a ribbon.
And now that I mentioned this. Remember to choose a closure for your collar.
It can be a ribbon as I did, a hook and eye, a snap button, or a ribbon loop, and sewing a shank button too.
And as both the front and back have rounded ends, I can wear them with the bow on the front or back.
Peter Pan Collar Dress Pattern
With our free detachable pattern, you can turn any dress pattern into a peter pan collar dress. In fact, you can turn on any dress in general.
It doesn’t matter if you made it or not.
Pattern-making speaking, you can use the drafting tutorial above to draft a new collar for any dress you have.
I am using the detachable pattern we made for this tutorial on my Dahlia Dress sewing pattern in this picture.

I think it looks fantastic.
The only thing I would recommend is to maybe add a safety pin to your design.
As I said, you can use it with any garment. But not every neckline will be the exact same as the one we made in this pattern.
Use a safety pin to hold your accessory in the center front to avoid the undergarment showing off.
How to sew a Peter Pan Collar Pattern. Free PDF Printable Sewing Pattern.
1. Print the pattern and cut your fabrics.

To get this free sewing pattern request, join our Facebook group, My Golden Thimble Sewing Club. Once accepted, go to the group files and search for “Peter Pan Collar Pattern.”

Click to download and print the pattern in real size.
Then cut four layers of fabric (2 for each side of the collar). As I made my collar with lace fabric I cut an extra layer of lining, making it a total of six.
2. Sew at ¼.”

Place your pieces aligning them with the right sides of the fabrics facing together.
If you use ribbons as a closure, this will be the time to place them between the two layers of fabric.
Pin and sew around the piece at ¼”.
Leave 2” to 3” open so you can turn the piece inside out.
Before turning the piece, snip the inside of the curve and clip the outside.
This will help you make a nice clean edge when you turn it inside out.
3. Turn and press.

Turn the piece inside out through the opening.
With the help of a tailor’s ham and a press cloth, press your two pieces flat.
Use steam if you need it.
4. Close the openings.
Close the space you left open with an invisible stitch by hand.
Finally, make a stay stitch to join the back or the front of your collar.
Add closures if needed.

And that’s it! Now you have a gorgeous Peter Pan Collar Pattern you can use on any of your garments. Inseam and detachable!
How cool is that??
If you need inspiration on decorating your collar, I found some ideas on amazon.
Please remember to leave a comment on your thoughts at the bottom of this post to tell us how you liked this tutorial.
Don’t forget to follow us on Social Media!!
Do you enjoy our freebies?? Support us so we can keep making freebies for you by buying us a cup of coffee here. We will be forever grateful!








1 thought on “DIY Peter Pan Collar Pattern. Drafting + Free Detachable PDF Pattern”