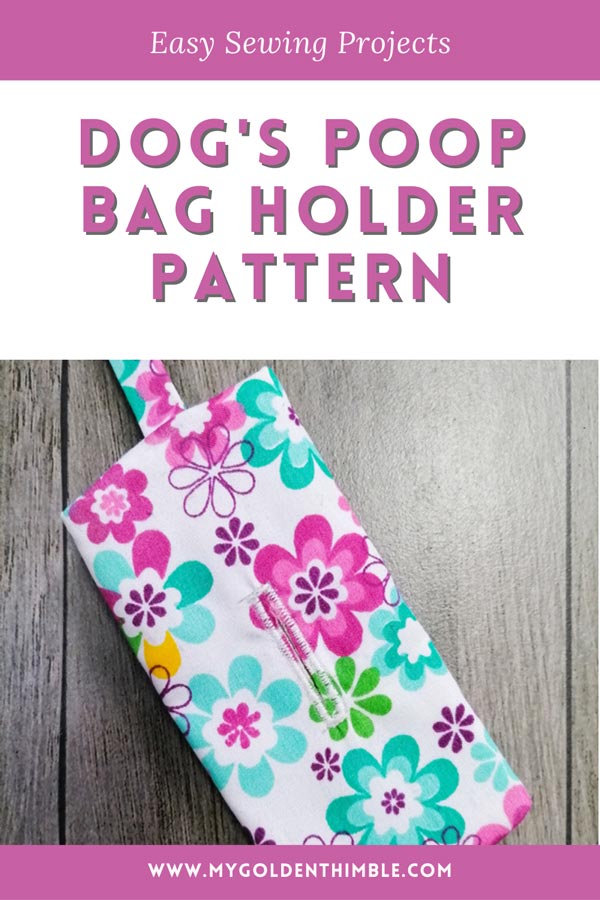
Let’s make a super easy Fabric Dog Poop Bag Holder Pattern!
This project will be perfect for those long walks in the morning with your best friend. It needs only a small piece of fabric and a key ring.
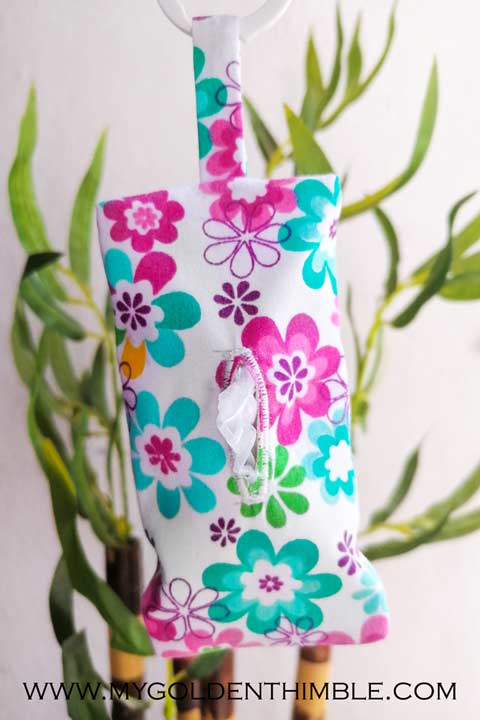
And it’s so convenient to carry that you can hang it from your dog’s leash. You will never forget to bring the poopie bags with you again!
Save this Tutorial on Pinterest.
NOTE: This post contains affiliate links, which means that if you make a purchase using one of the links in this article, I may earn a commission at no extra cost to you (To know more about this, click here.)
I love to take my dogs for walks in the park.
As you know, I have 3 of them!
Spending time with them outdoors in big green spaces is good for his and my health.
It’s a way to take away the stress of a hard day at work. Also, it is a proven way to reinforce the bond between each other.
But, as you can imagine, three dogs mean something else…
That is three times picking up dog poops!
As a responsible dog owner, I must make sure to have the doggie poop bags with me all the time.
But they are so easy to forget!! Not to mention so small that I keep losing them all the time.
You can’t imagine what I have to go through if I forget the bags at home (and I have).
Let’s just say that the walk in the park turns into picking-up trash that can double as a poop bag.
Is that too much information? L.O.L.
Having Dog Poop Bags is a Responsible thing to do!
The point is that I don’t want to have problems with my neighbors or anyone who happens to be at the same park as me.
Stepping into that situation is just a terrible thing for everyone. And to be completely candid is just a matter of common courtesy.
That’s why I decided to make a small dog poop bag dispenser that you can hang wherever you feel more comfortable.
You are going to love it, it is small, practical, and of course, adorable!
Is a Fabric Dog Bag Holder easy to Make?
This cute fabric dog poop bag holder pattern is super practical. I am sure that it will save you from many problems with your pet.
It is super easy to sew, but you need almost no fabric to make it!
In fact, this is a perfect sewing project to use your scrap fabrics. You can even use the fabric from an old garment.
By doing this pretty dog accessory sewing project by yourself, you’ll be able to choose any fabric print or design you like.

You can even match it with your dog’s personality!
Do you want to take it a step forward? Match this bag holder with your dog’s DIY Fabric Bandana.
I made my Fabric Dog Poop Bag Holder with a flower print fabric I had lying around.
The result was pretty cool if you ask me.
And the best part is that it took me less than 20 minutes to make from start to finish.
What can I use to hang a Fabric Dog Poop Bag Holder Pattern?

Use different keychain hooks to hang your bag holder for dogs anywhere you like.
It can be as simple as a keychain or a D clasp ring.
These are perfect for hanging on your purse, on the belt loop of your pants, on your keychain, and even on the dog leash, as I did in the video tutorial.
If you want some different options, here are some notions you can use to hang this holder. You can quickly put and remove any of these in and out of the fabric loop of the bag dispenser.
Which bags can I put in the dog bag dispenser?
All dog poop bags have the same standard size, and our bag holder pattern can fit most of them pretty well.
If you don’t have commercial bags and use any other kind instead, here is my recommendation.
Place your bags in a row with one end over the other and make a small roll with them. This is perfect if you want to recycle any plastic bags from your kitchen.
How to Make a Fabric Dog Poop Bag Holder Pattern. Step-by-step Tutorial.
You can now print these sewing instructions. Just scroll down to the bottom of the post to get the free printable card.
Follow these step-by-step instructions to make this dog poop bag dispenser, or watch the video tutorial to make your own.
1. Gather all your materials

To make this Dog Poop Bag Holder Pattern, you will need.
- Printed fabric
- Lining fabric
- Fusible interfacing
- Scissors
- Pins
2. Cut the fabric pieces

Cut a 6 1/2″ by 7″ square out of your chosen print and lining fabric.
One of each.
To have more structure on the bag, you can add fusible interfacing to one of the layers.
If you want to do this, cut an extra rectangle of 6 ½” by 7”.
3. Cut the strip for the loop
Cut a small 4″ by 1 1/2″ rectangle.
This small piece will be the loop of the pouch.
4. Press the fusible interfacing

Press the fusible interfacing in the patterned fabric on its inner side.
6. Sew the lining with the main fabric.

Place the lining and the printed fabric face to face by pinning them together.
Sew the outline at 1/4″, leaving an open space.
Remember to pin the beginning and end of each seam.
8. Cut the corners

Carefully cut the corners of the piece without touching the seam.
9. Turn and press


Turn and press the piece pulling the seam allowances out. We recommend using your iron with steam.
Make a top stitch at ⅛” on two smaller sides of the rectangle where the opening is.
10. Sew a buttonhole

Turn on the buttonhole function of your sewing machine and set it up to make a 1” tall buttonhole.
Mark the exact center of the rectangle and draw the 1” line of the buttonhole.
This line should be parallel to the topstitched sides of the rectangle.
Sew the buttonhole.
Carefully open the buttonhole with the help of a seam ripper. Make sure you don’t cut the stitches.
11. Make the Top Loop

Take the small rectangle and fold it half lengthwise, with the right side of the fabrics facing together.
Sew the sides at ¼”, leaving the shorter ends open.
Use a loop turner to turn this piece inside out.

Press this strip of fabric to make it flat. Throw the seam to one side.

Fold it in half to join the shorter ends and pin it.
Then, place the folded loop in the center of one side of the rectangle. Align it with the buttonhole center.
12. Make the bag shape.

To form the bag of the Fabric Dog Poop Bag Holder Pattern, do the following.
Take one of the topstitched ends to the center of the rectangle and cross it over the buttonhole. About ¼” to ⅜” away from the center.
Repeat with the opposite side.
13. Close the top

Close the bag shape by sewing the top sides at ¼”.
Sew the sides together 1/4″ to close the square.
14. Turn and press

Turn the bag holder to the right side.
Press the piece flat to make the side creases and even out the seams.
15. Add snap-on button *Optional*
This step is entirely optional. I decided to add a snap-on button to make this bag more secure.
If you don’t have a snap-on button kit, or simply don’t see the need for this, you can skip this step.
I hope you liked this tutorial. If you did, please remember to share it on Pinterest and click on the heart at the bottom of the page.
Do you enjoy our freebies?? Support us so we can keep making freebies for you by buying us a cup of coffee here. We will be forever grateful!
Don’t forget to follow us on Social Media!!

How to make a Fabric Dog Poop Bag Holder
Use this tutorial to make a poop bag holder for dogs.
Tools
Instructions
1. Cut the fabric pieces
Cut a 6 1/2" by 7" square out of your chosen print and lining fabric.
One of each.
Cut a small 4" by 1 1/2" rectangle.
2. Press the fusible interfacing
Press the fusible interfacing in the patterned fabric on its inner side.
3. Sew the lining with the main fabric.
Place the lining and the printed fabric and sew the outline at 1/4".
Leave an open space.
5. Cut the corners
Carefully cut the corners of the piece without touching the seam.
6. Turn and press
Turn and press the piece pulling the seam allowances out.
Make a top stitch at ⅛” on 2 smaller sides of the rectangle where the opening is.
7. Sew a buttonhole
Turn on the buttonhole function of your sewing machine and set it up to make a 1” tall buttonhole.
Sew the buttonhole at the center.
Open the buttonhole with the help of a seam ripper.
8. Make the Top Loop
Take the small rectangle and fold it in half lengthwise, with the right side of the fabrics facing together.
Sew the sides at ¼” leaving the shorter ends open.
Press. Fold it in half to join the shorter ends and pin it.
Then, place the folded loop in the center of one side of the rectangle.
9. Make the bag shape.
Take one of the topstitched ends to the center of the rectangle and cross it over the buttonhole. About ¼” to ⅜” away from the center. Repeat on the other side.
10. Close the top
Sew the top sides at ¼”.
Then, sew the sides together 1/4" apart to close the square.
11. Turn and press
Turn the bag holder to the right side.
Press the piece flat.
12. Add snap-on button *Optional*
This step is entirely optional. I decided to add a snap-on button to make this bag more secure.
If you don’t have a snap-on button kit or simply don’t see the need for this, you can skip thisstep.
Recommended Products
As an Amazon Associate and member of other affiliate programs, I earn from qualifying purchases.
-
 maycom Retro Style Simple Strong Carabiner Shape Keychain Key Chain Ring Keyring Keyfob Key Holder (Black)
 -
MumCraft Multipurpose Sewing Clips with Tin Box Package, Assorted Colors, Pack of 100
-
EuTengHao 1440Pcs Plastic Snap Buttons No-Sew Snap Fasteners T5 Snaps with Snaps Pliers Kit for Clothing Sewing,Rain Coat,Bibs,Clothes Crafting(24 Colors,360Sets)
-
7Pcs 20" x 20" Cotton Fabric DIY Making Supplies Quilting Patchwork Fabric Fat Quarter Bundles DIY for Quilting Patchwork Cushions Cotton Fabric for Patchwork (20" x 20", Green)


Thank you
You are most welcome!!